Secure communication between apps registered in the Azure AD B2C using OAuth 2.0 client credentials flow
Introduction
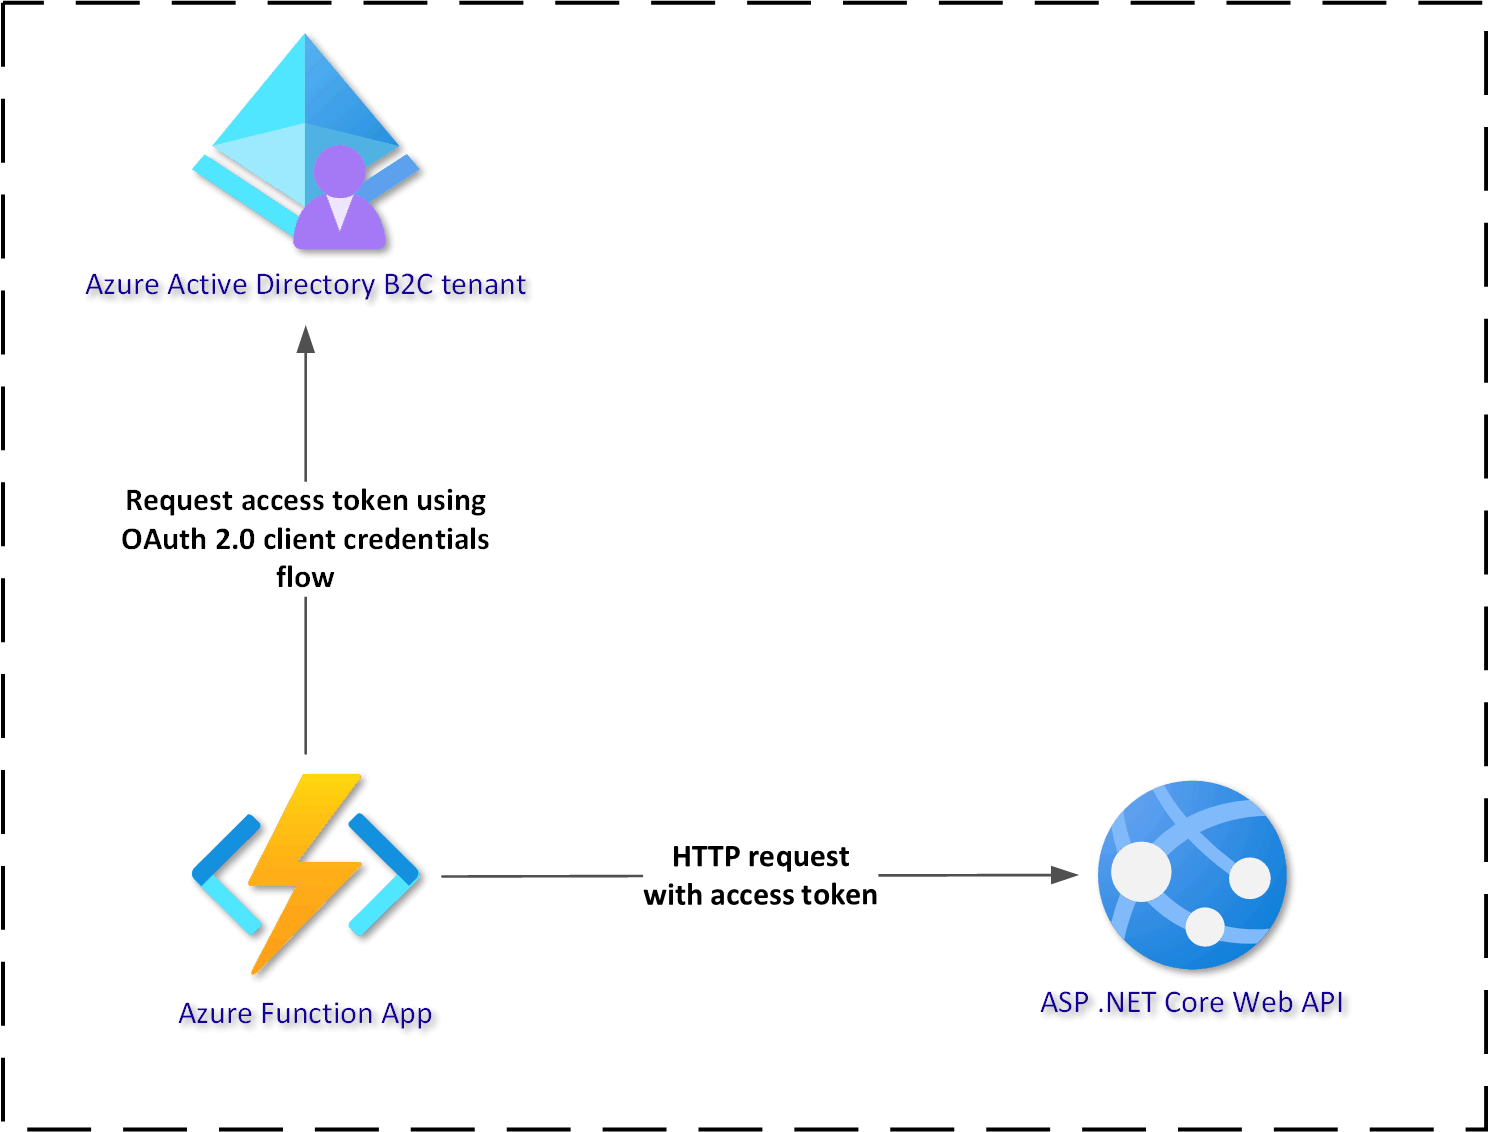
Azure AD B2C identity service enables issuing access tokens on behalf of the authenticated user. In scenarios where we want to access specific resources like APIs, we can sign in and obtain an access token in the context of a specific user. What about scenarios where we would like to still use Azure AD B2C as an identity service but we would like to use client credentials flow to enable secure communication between two applications without the context of the authenticated user? In this article, we will see how to implement client credentials flow to obtain an access token in the Azure Function App to securely call ASP .NET Core Web API endpoint with this token.
To demonstrate how to implement the above scenario, we are going to use two applications:
- Azure Function App - this one will obtain an access token from the Azure AD B2C using client credentials flow
- ASP .NET Core Web API - this one will be secured by Azure AD B2C and provide access to endpoint only for the requests with access tokens added in the authorization header
IMPORTANT
In the official documentation of the Azure AD B2C identity service, we can find information that The OAuth 2.0 client credentials grant flow is not currently directly supported by the Azure AD B2C authentication service. It is true but we can still obtain access tokens with client credentials flow using Azure Active Directory and the Microsoft identity platform /token (https://login.microsoftonline.com/your-tenant-name.onmicrosoft.com/oauth2/v2.0/token) endpoint for an application in our Azure AD B2C tenant. An Azure AD B2C tenant shares some functionality with Azure AD enterprise tenants. To sum up - we can still obtain access tokens using client credentials flow to securely communicate between the applications we registered in the Azure AD B2C tenant without the context of the user.
Application registrations in the Azure AD B2C
First of all, we have to register the two applications I mentioned above:

ASP .NET Core Web API registration
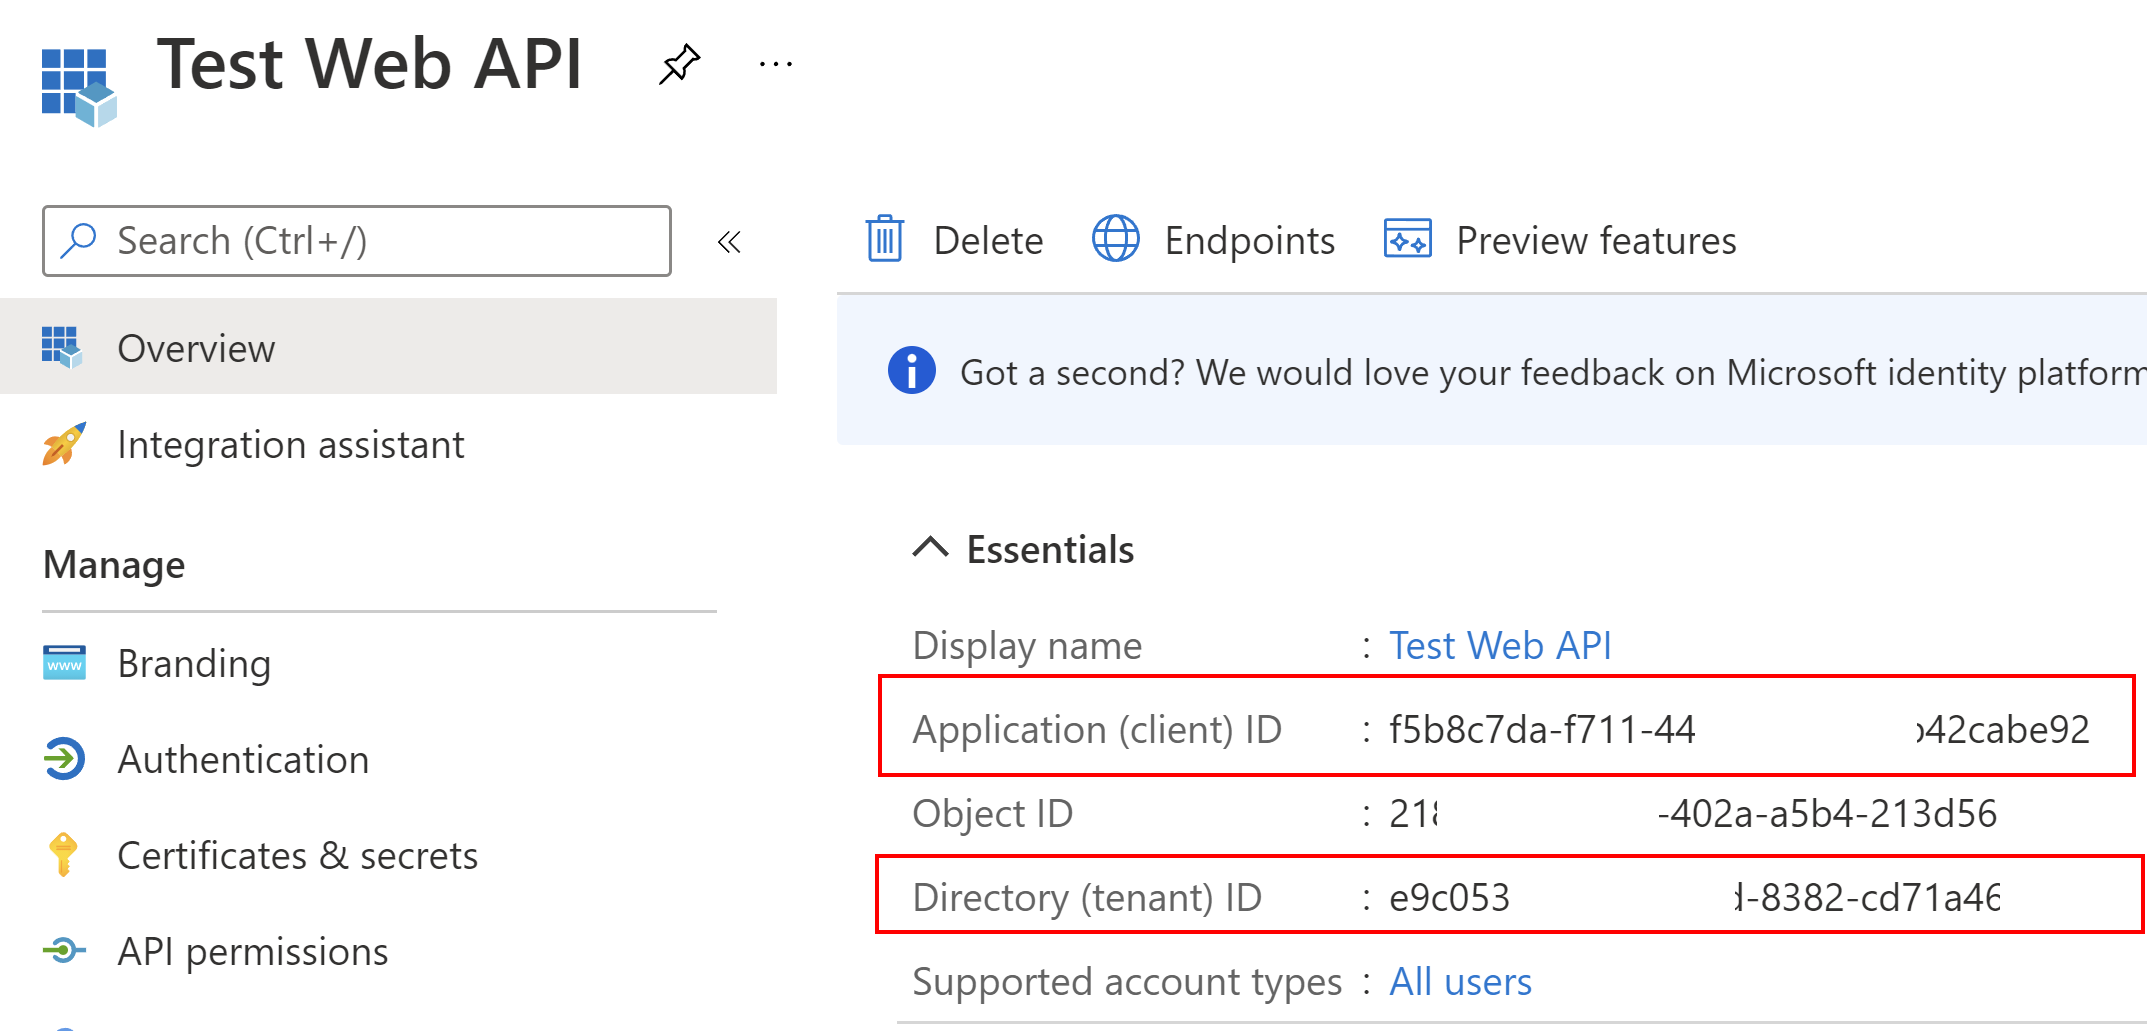
First, we will register an API application which will be called from the Azure Function App. Once the application is registered, we have to note these two parameters:
- Client ID
- Tenant ID
We will use the above parameters in the application’s configuration.
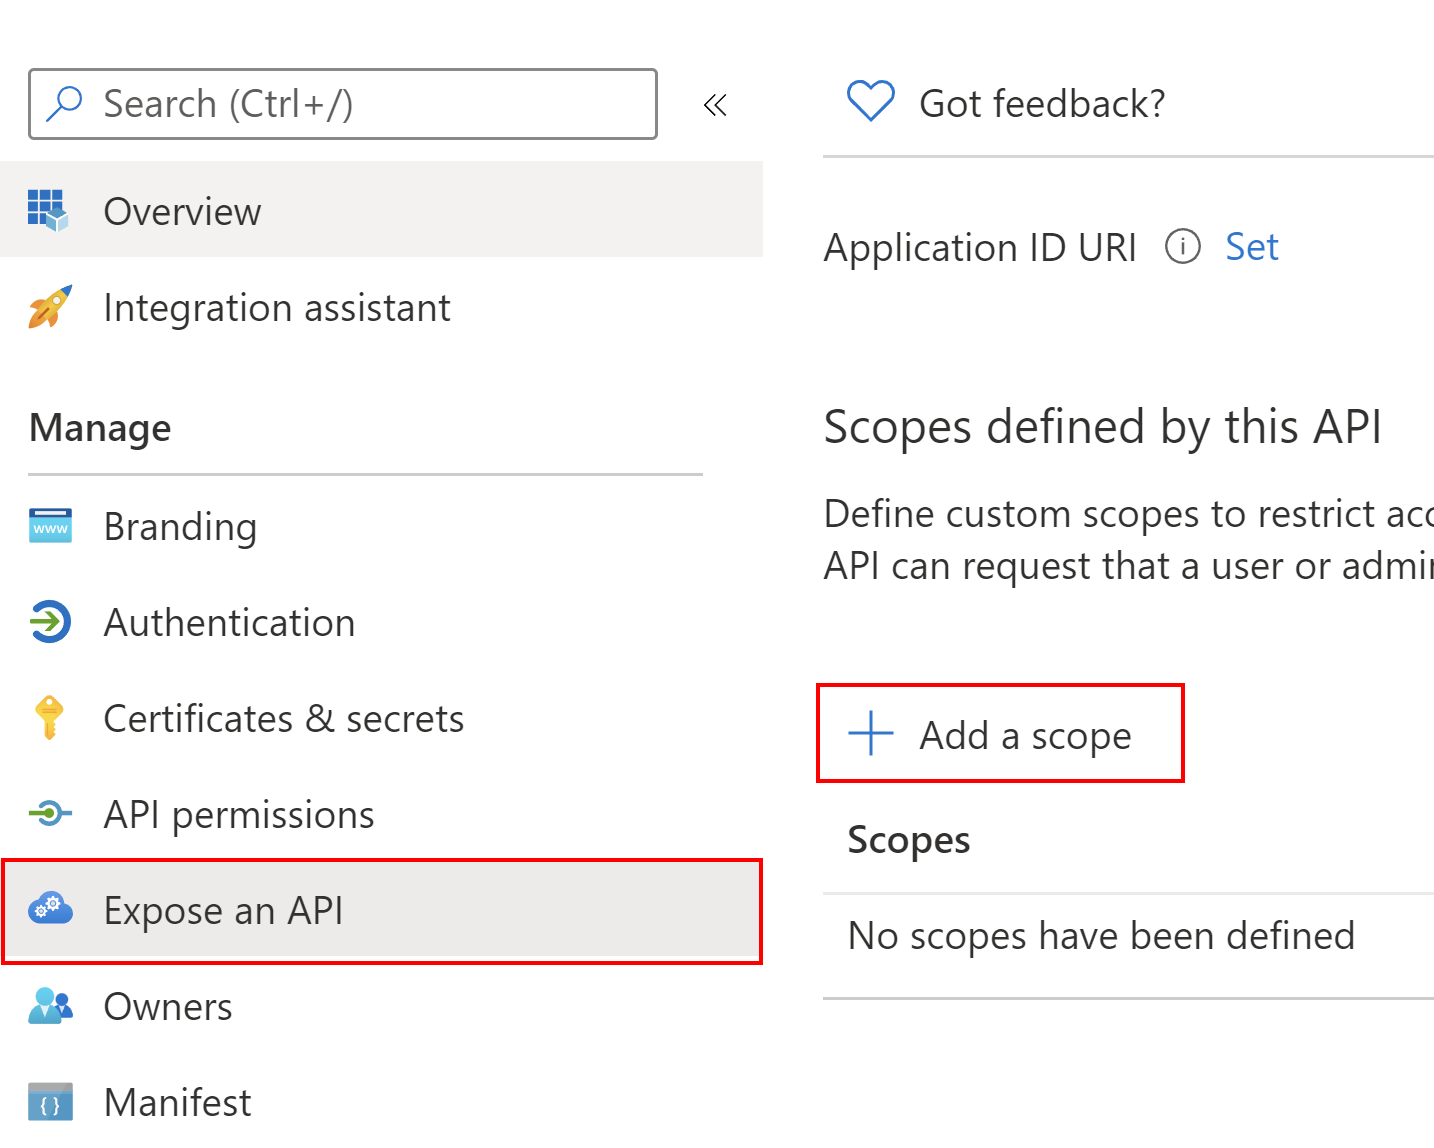
Then, we have to expose our API so we can obtain access tokens to access it. Under Expose an API section we have to click +Add scope button:
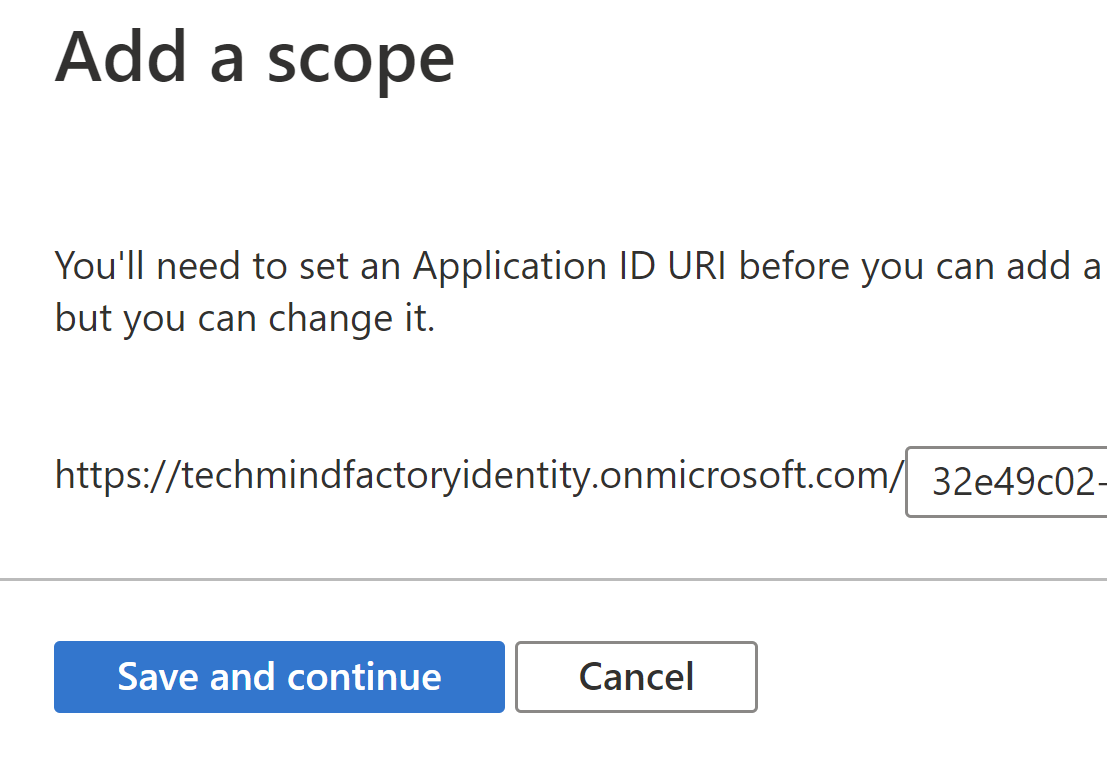
Then we have to click Save and continue button:
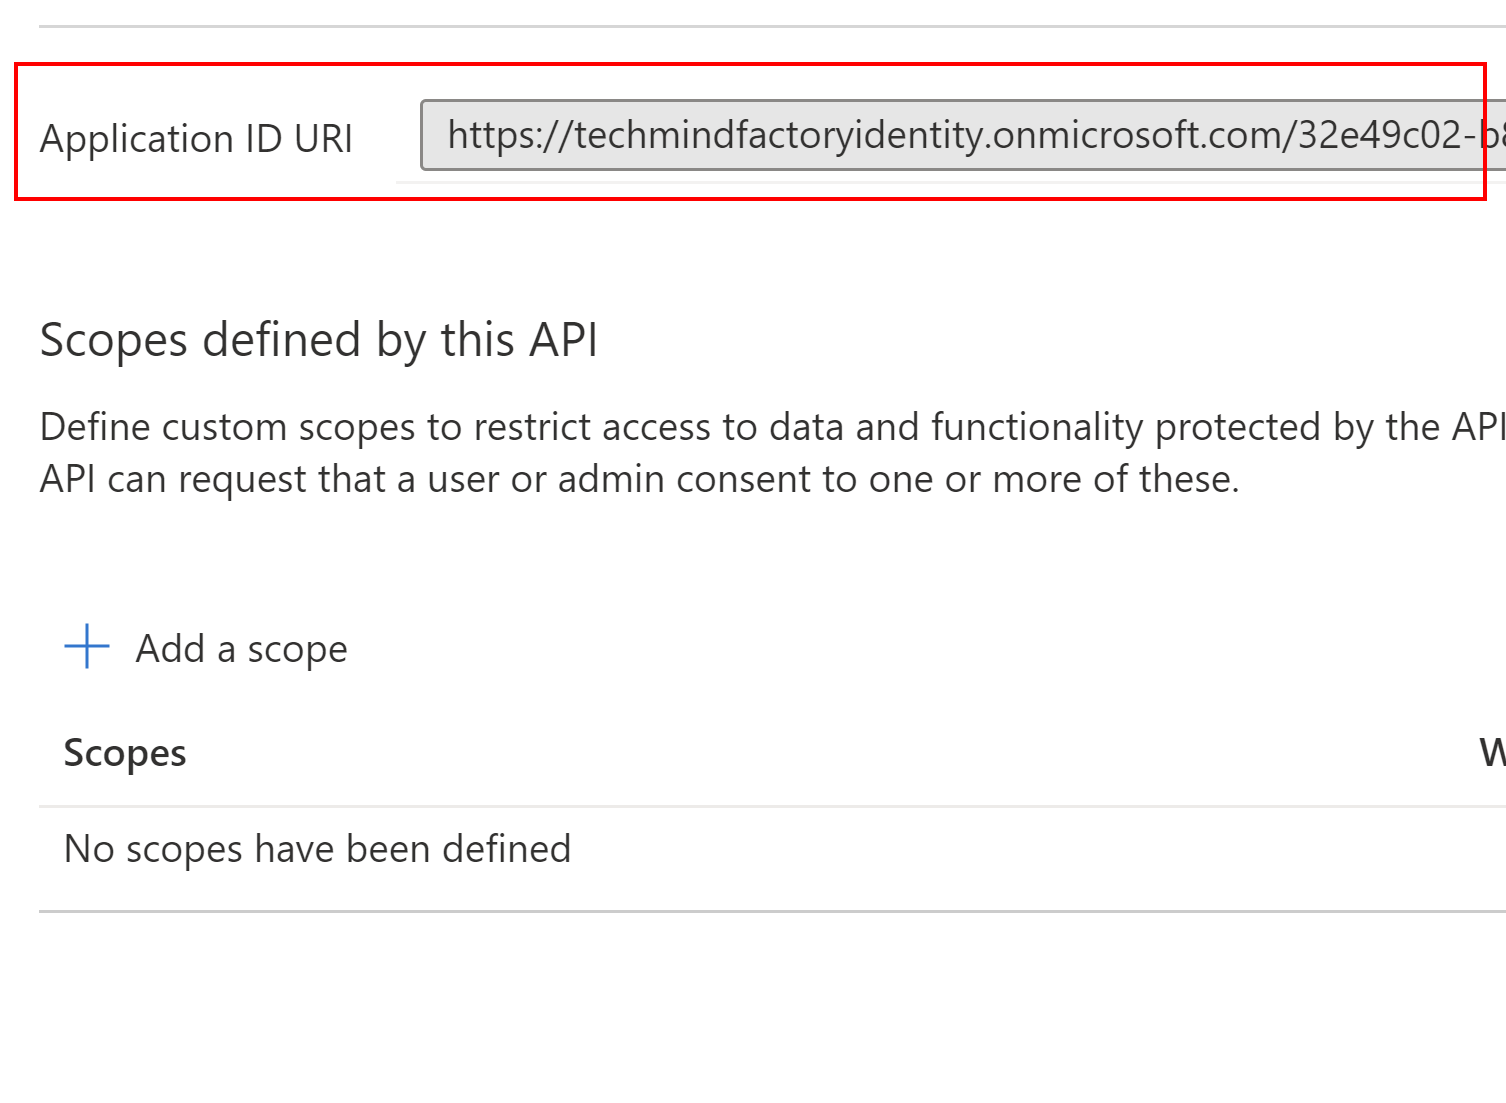
On the next blade that will be displayed, we can click X icon to close the tab - yes, we do not want to add any additional scopes. At the top, there will be Application ID URI displayed. We have to copy it because we will need it later when we will configure Azure Function App.
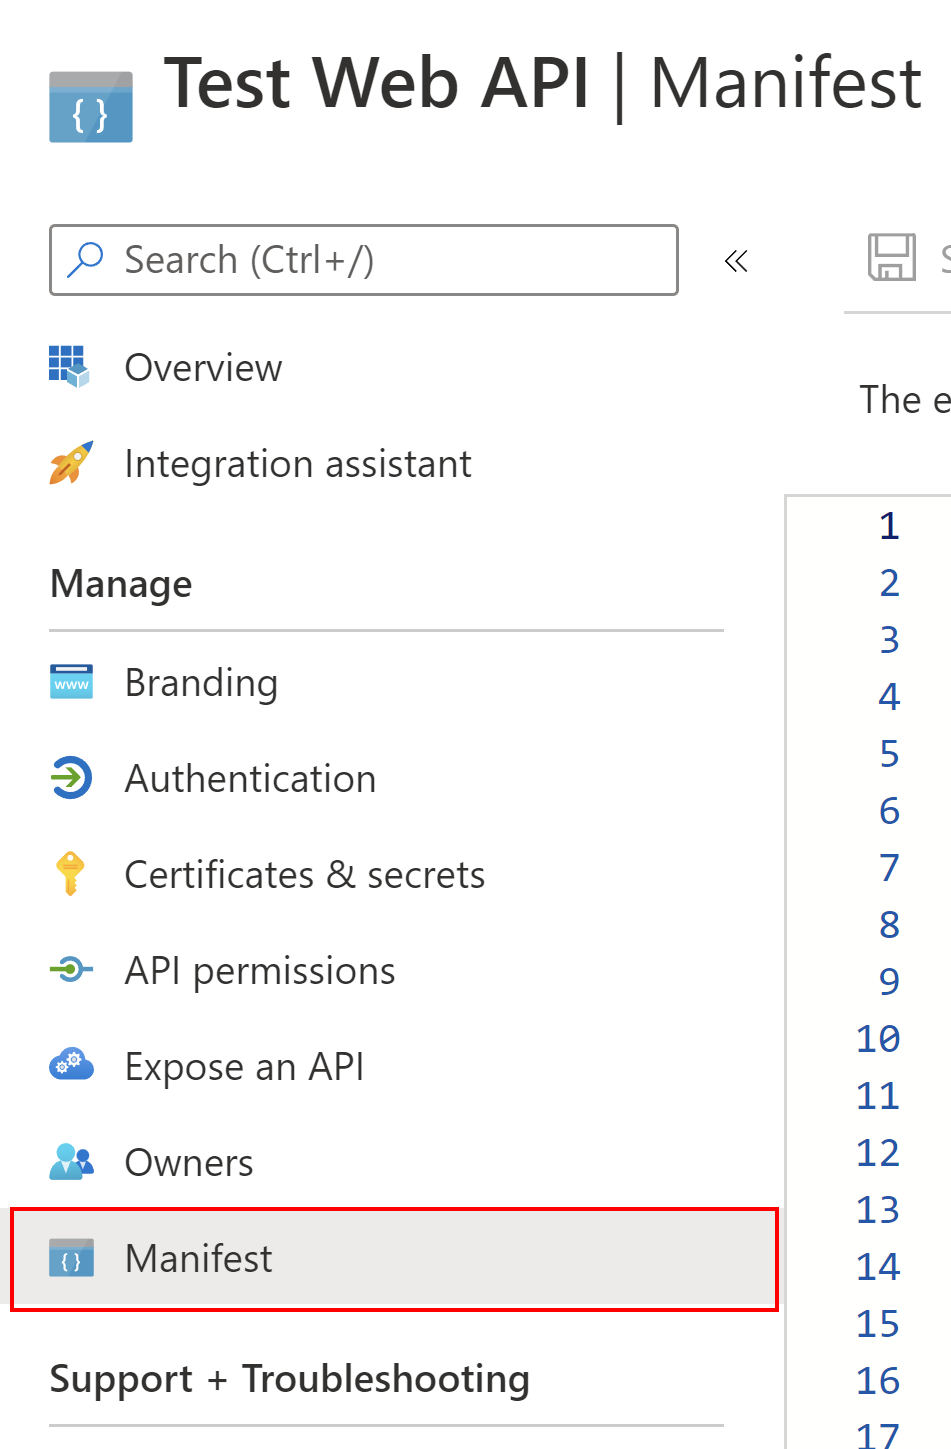
Now we have to add an application role in the Manifest file. We want to include the role in the access token so our API will not only validate the access token issued by Azure AD B2C but also it will verify if a specific role is included in the access token. To modify manifest, we have to select Manifest section:
We have to find appRoles property. It is empty by default. We will add access:test-api role to it. We have to replace the existing property with the below value:
    "appRoles": [
        {
            "allowedMemberTypes": [
                "Application"
            ],
            "description": "All API read-only access",
            "displayName": "All API read-only",
            "id": "bc3b46b8-22ab-4868-8136-573a1a38233a",
            "isEnabled": true,
            "lang": null,
            "origin": "Application",
            "value": "access:test-api"
        }
    ],
You can ask how ID value was generated - it has to be GUID that you can generate with any online GUID generator. The ID property should be unique for each role we add in the manifest. Great, once we add the above role, we have to save changes.
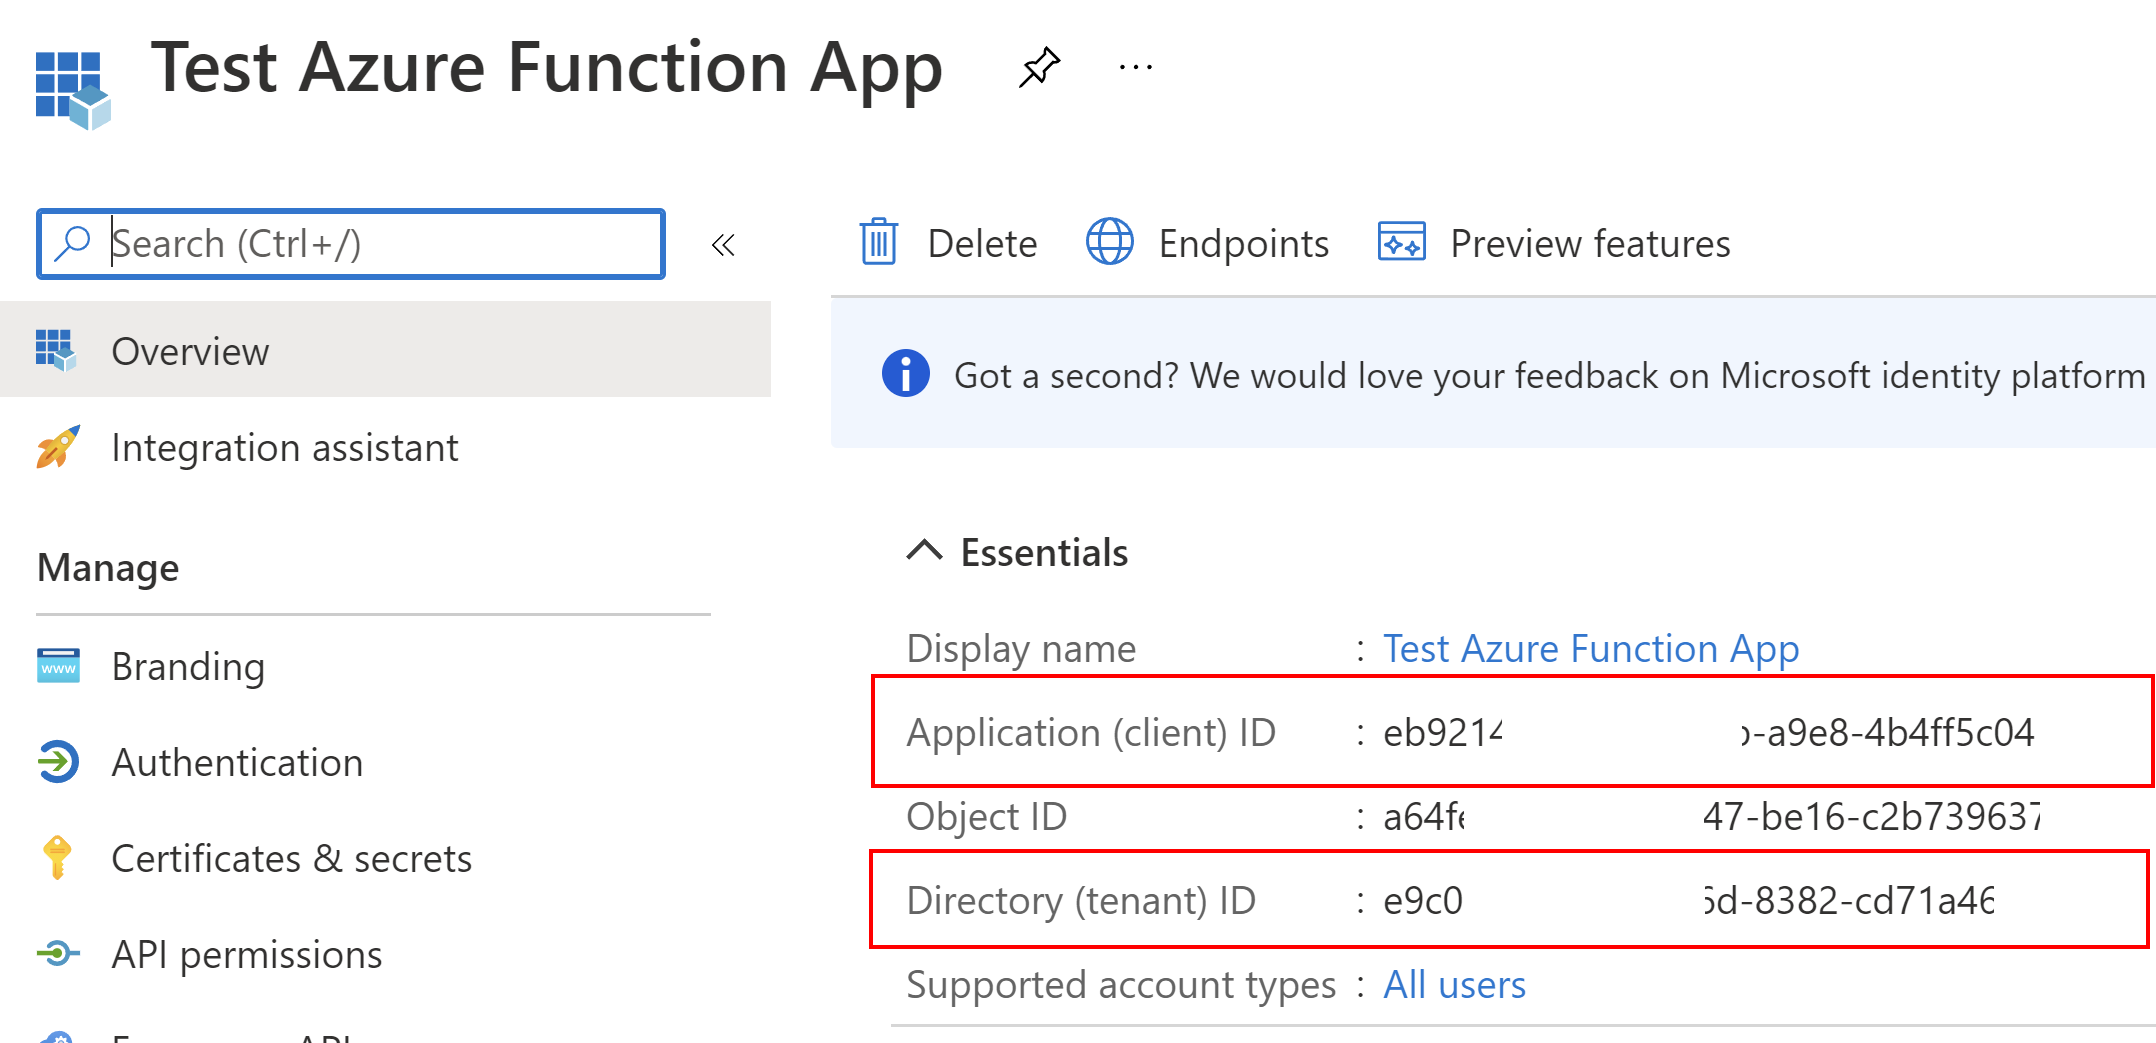
Azure Function App registration
Once the application is registered, we have to note these two parameters:
- Client ID
- Tenant ID
We will use the above parameters in the application’s configuration.
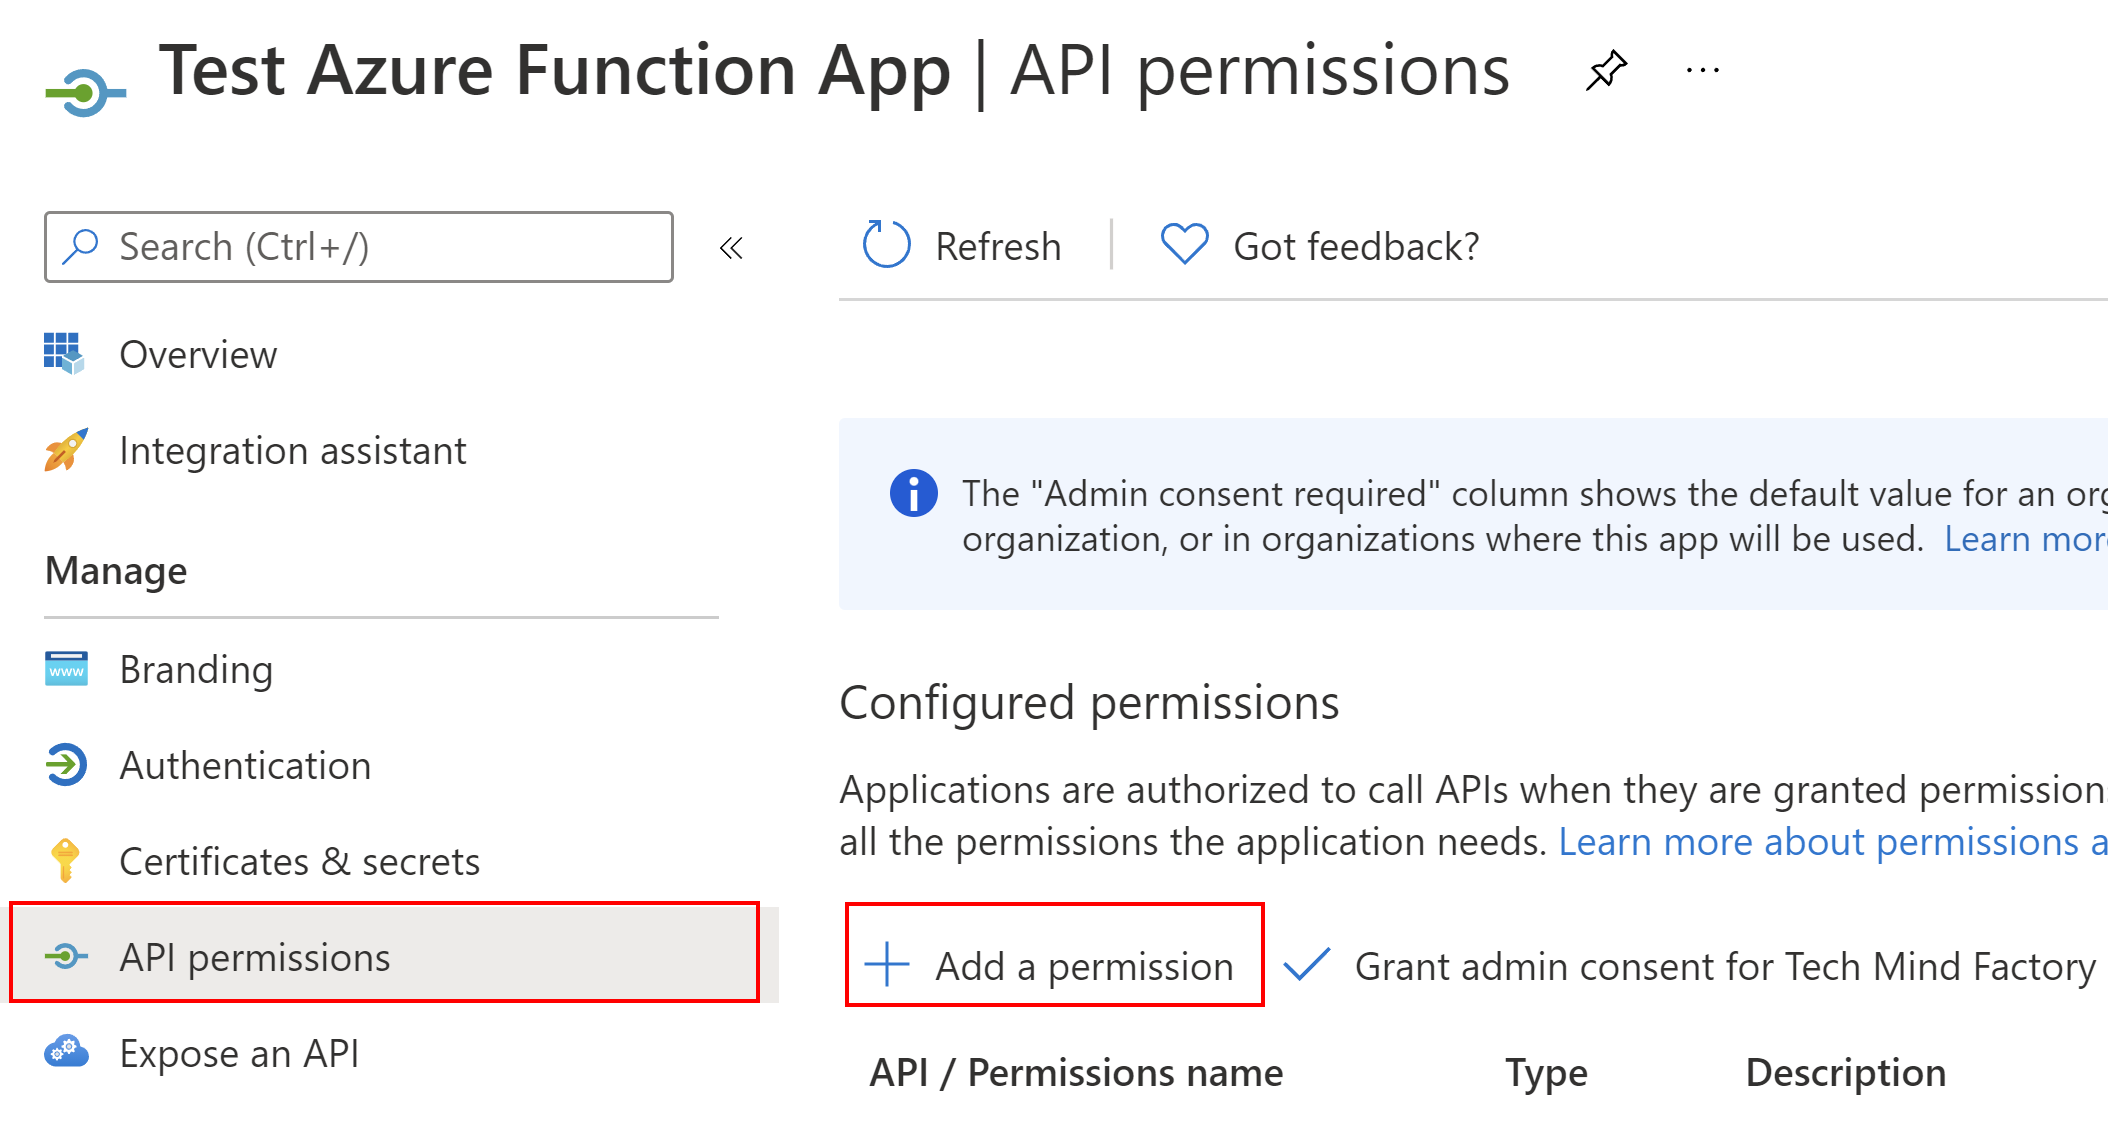
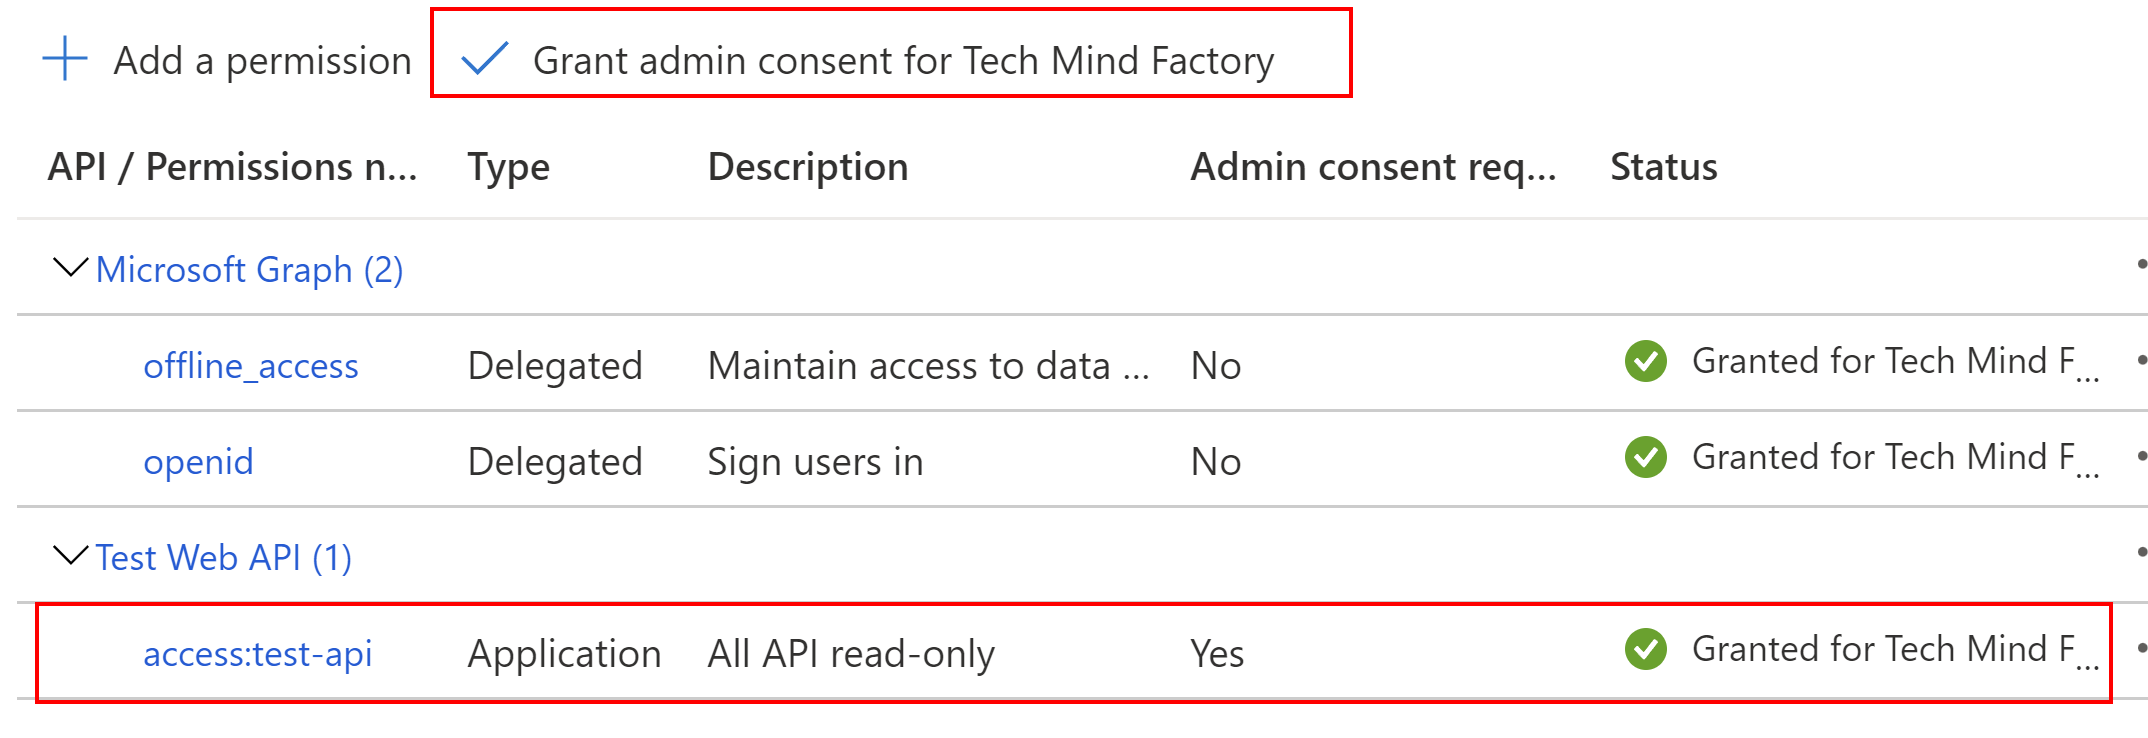
Then, we have to grant permission for Azure Function App to obtain access tokens to call ASP .NET Core Web API application. To do it, we have to select API permissions tab, and then click +Add permission:
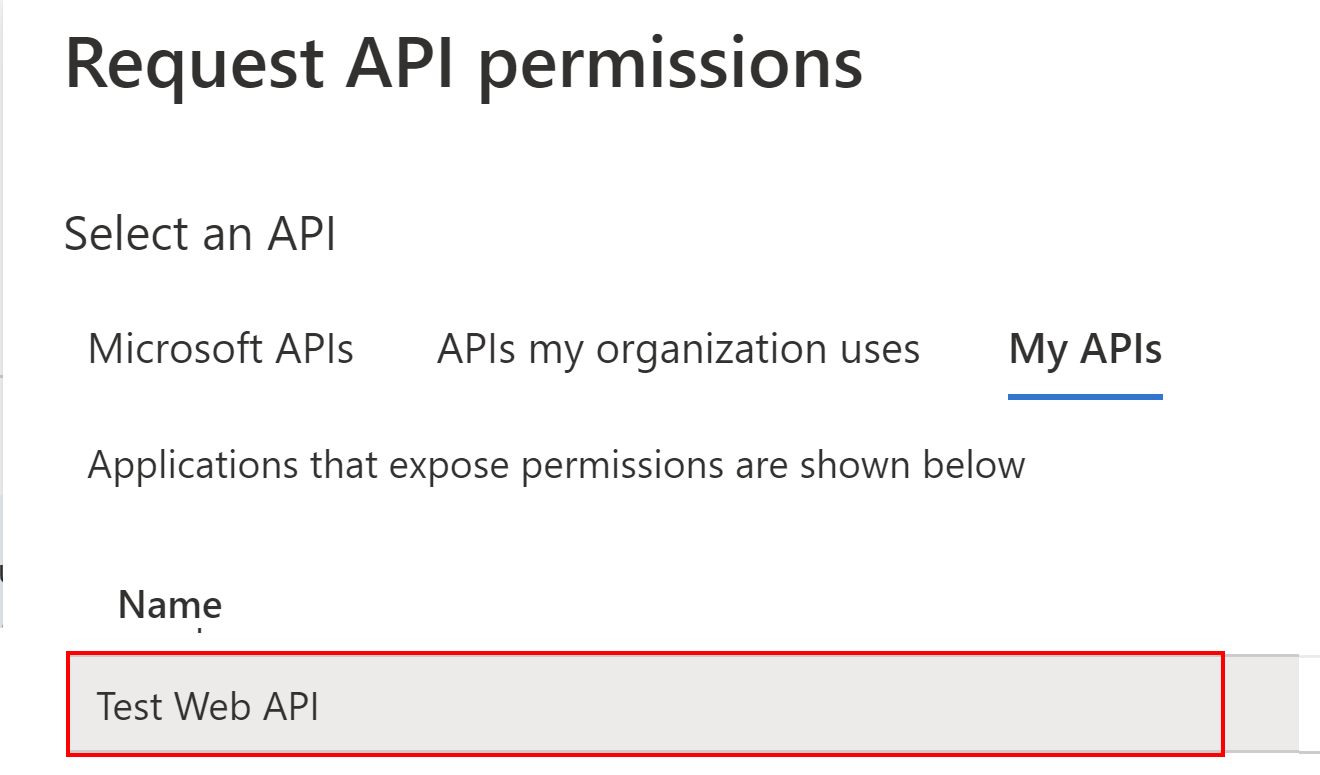
Then, we have to switch to My APIs tab, and find the API application we registered above:
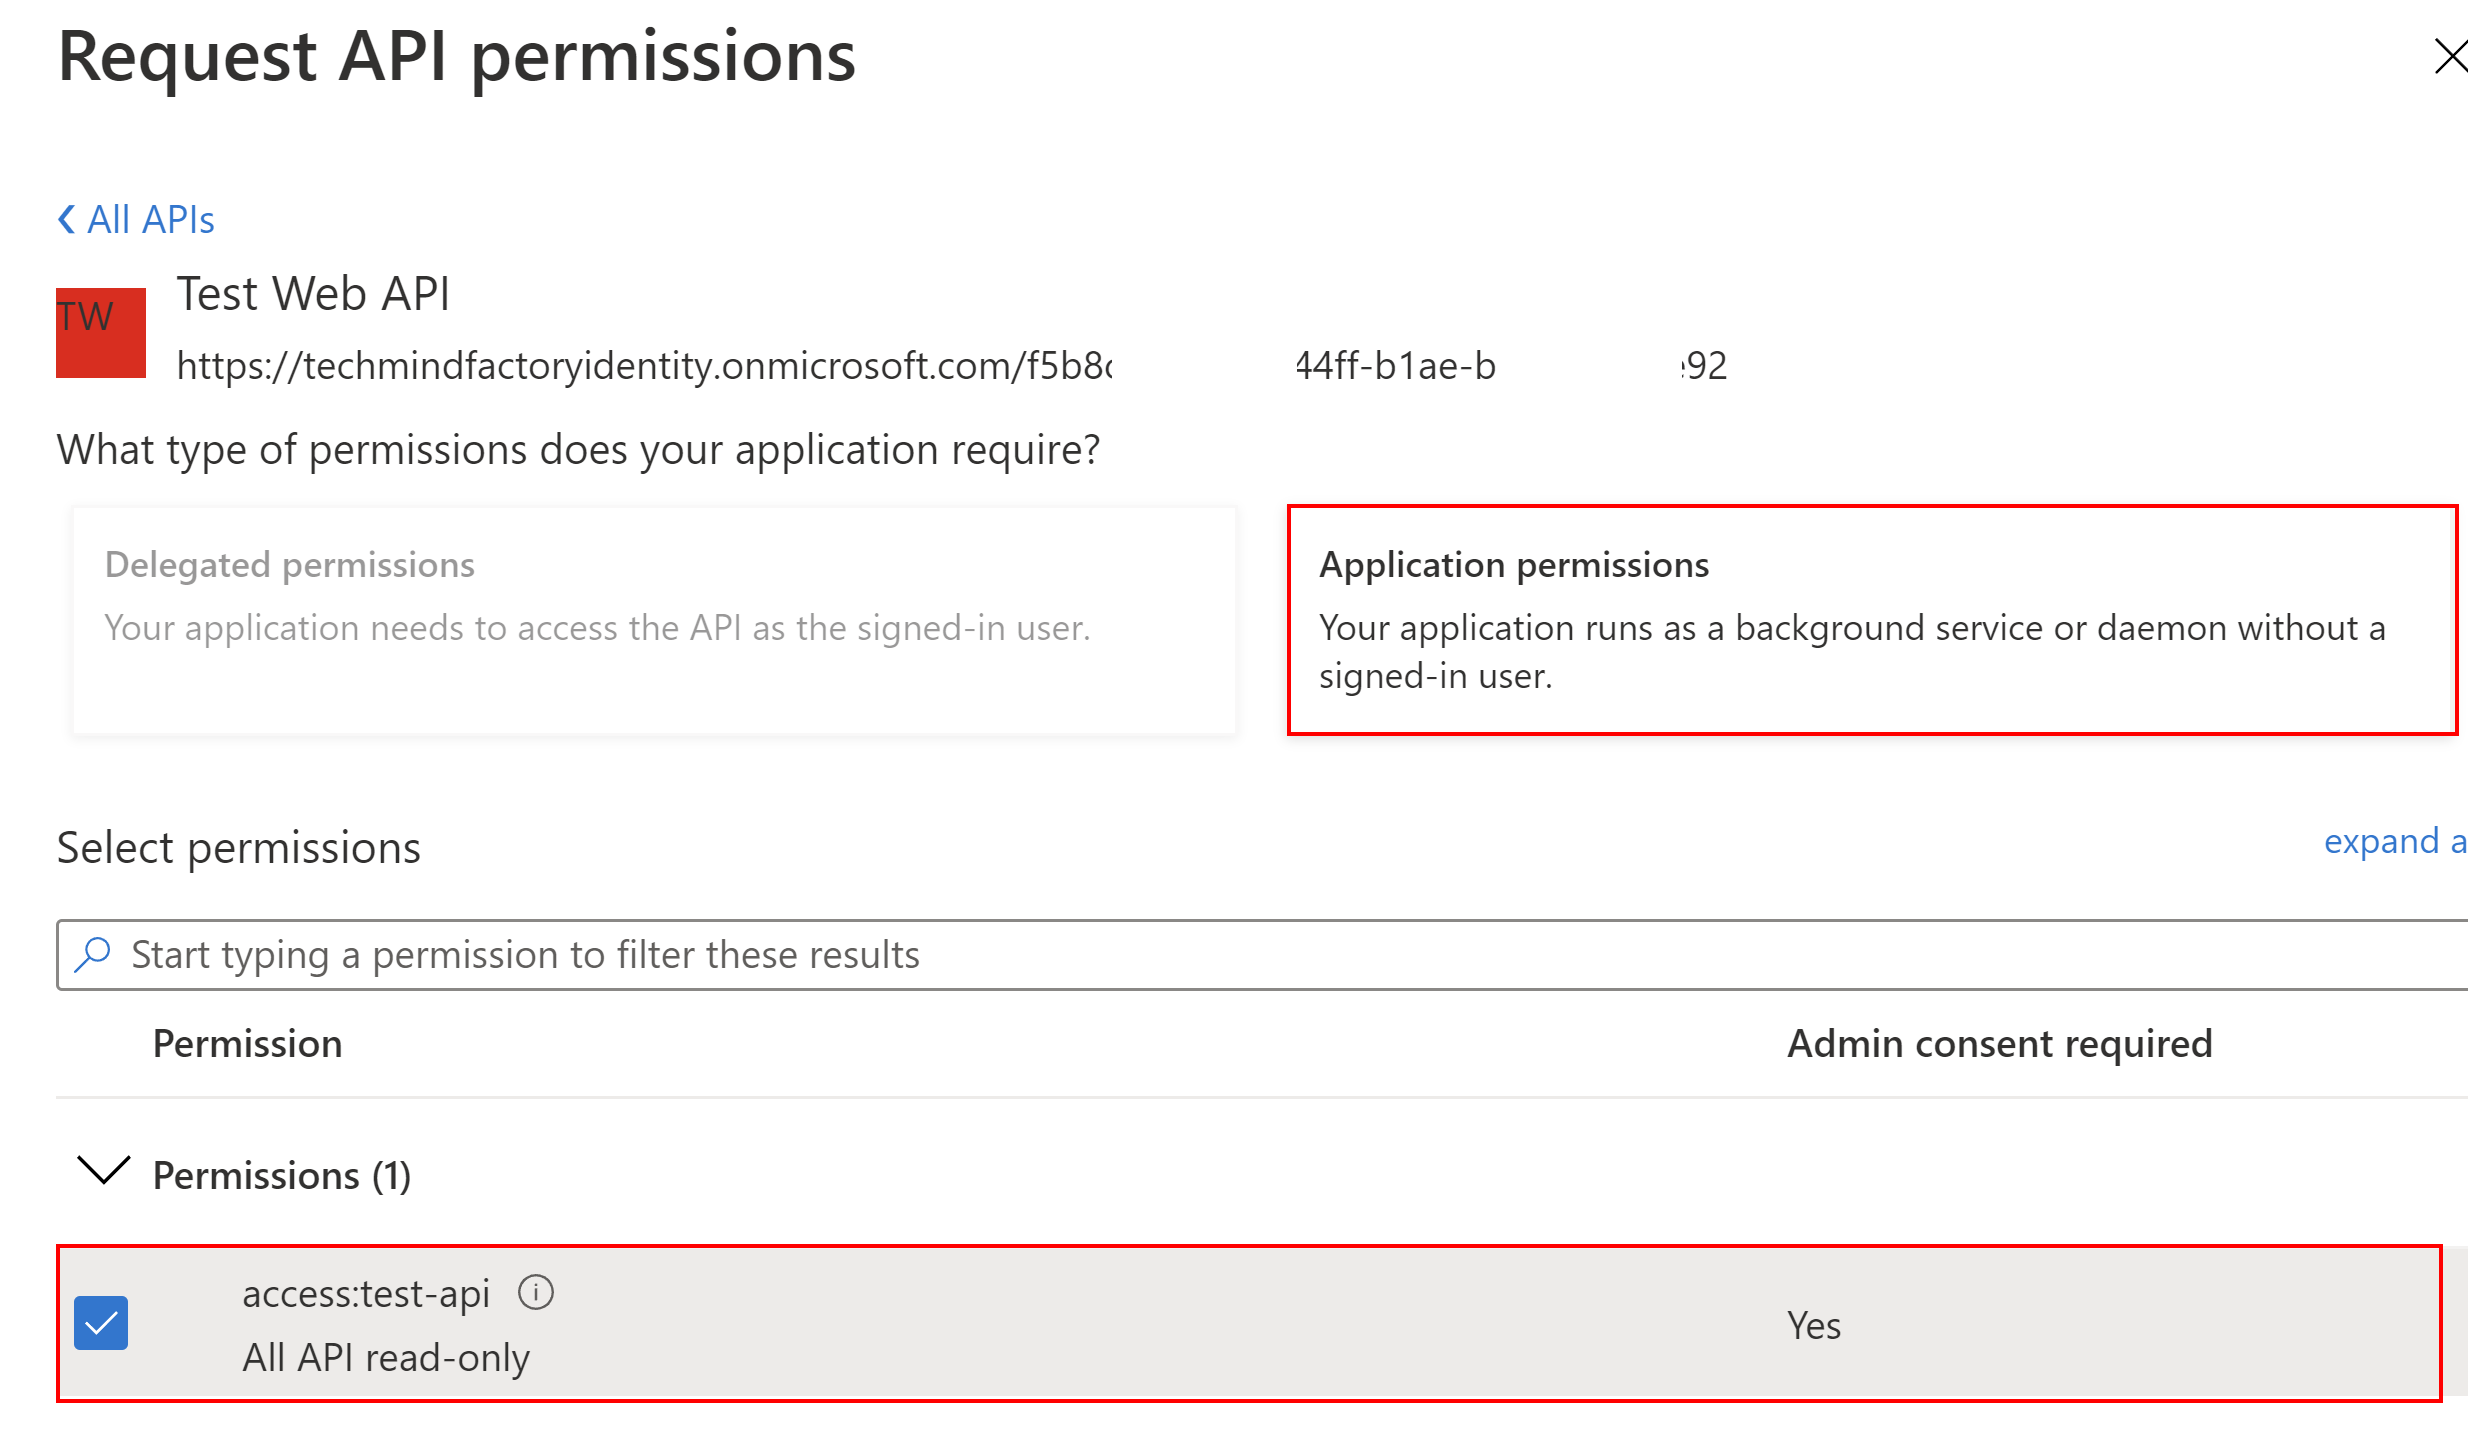
Next, we have to select Application permissions, and select the checkbox next to the access:test-api permission:
In the end we have to grant admin consent:
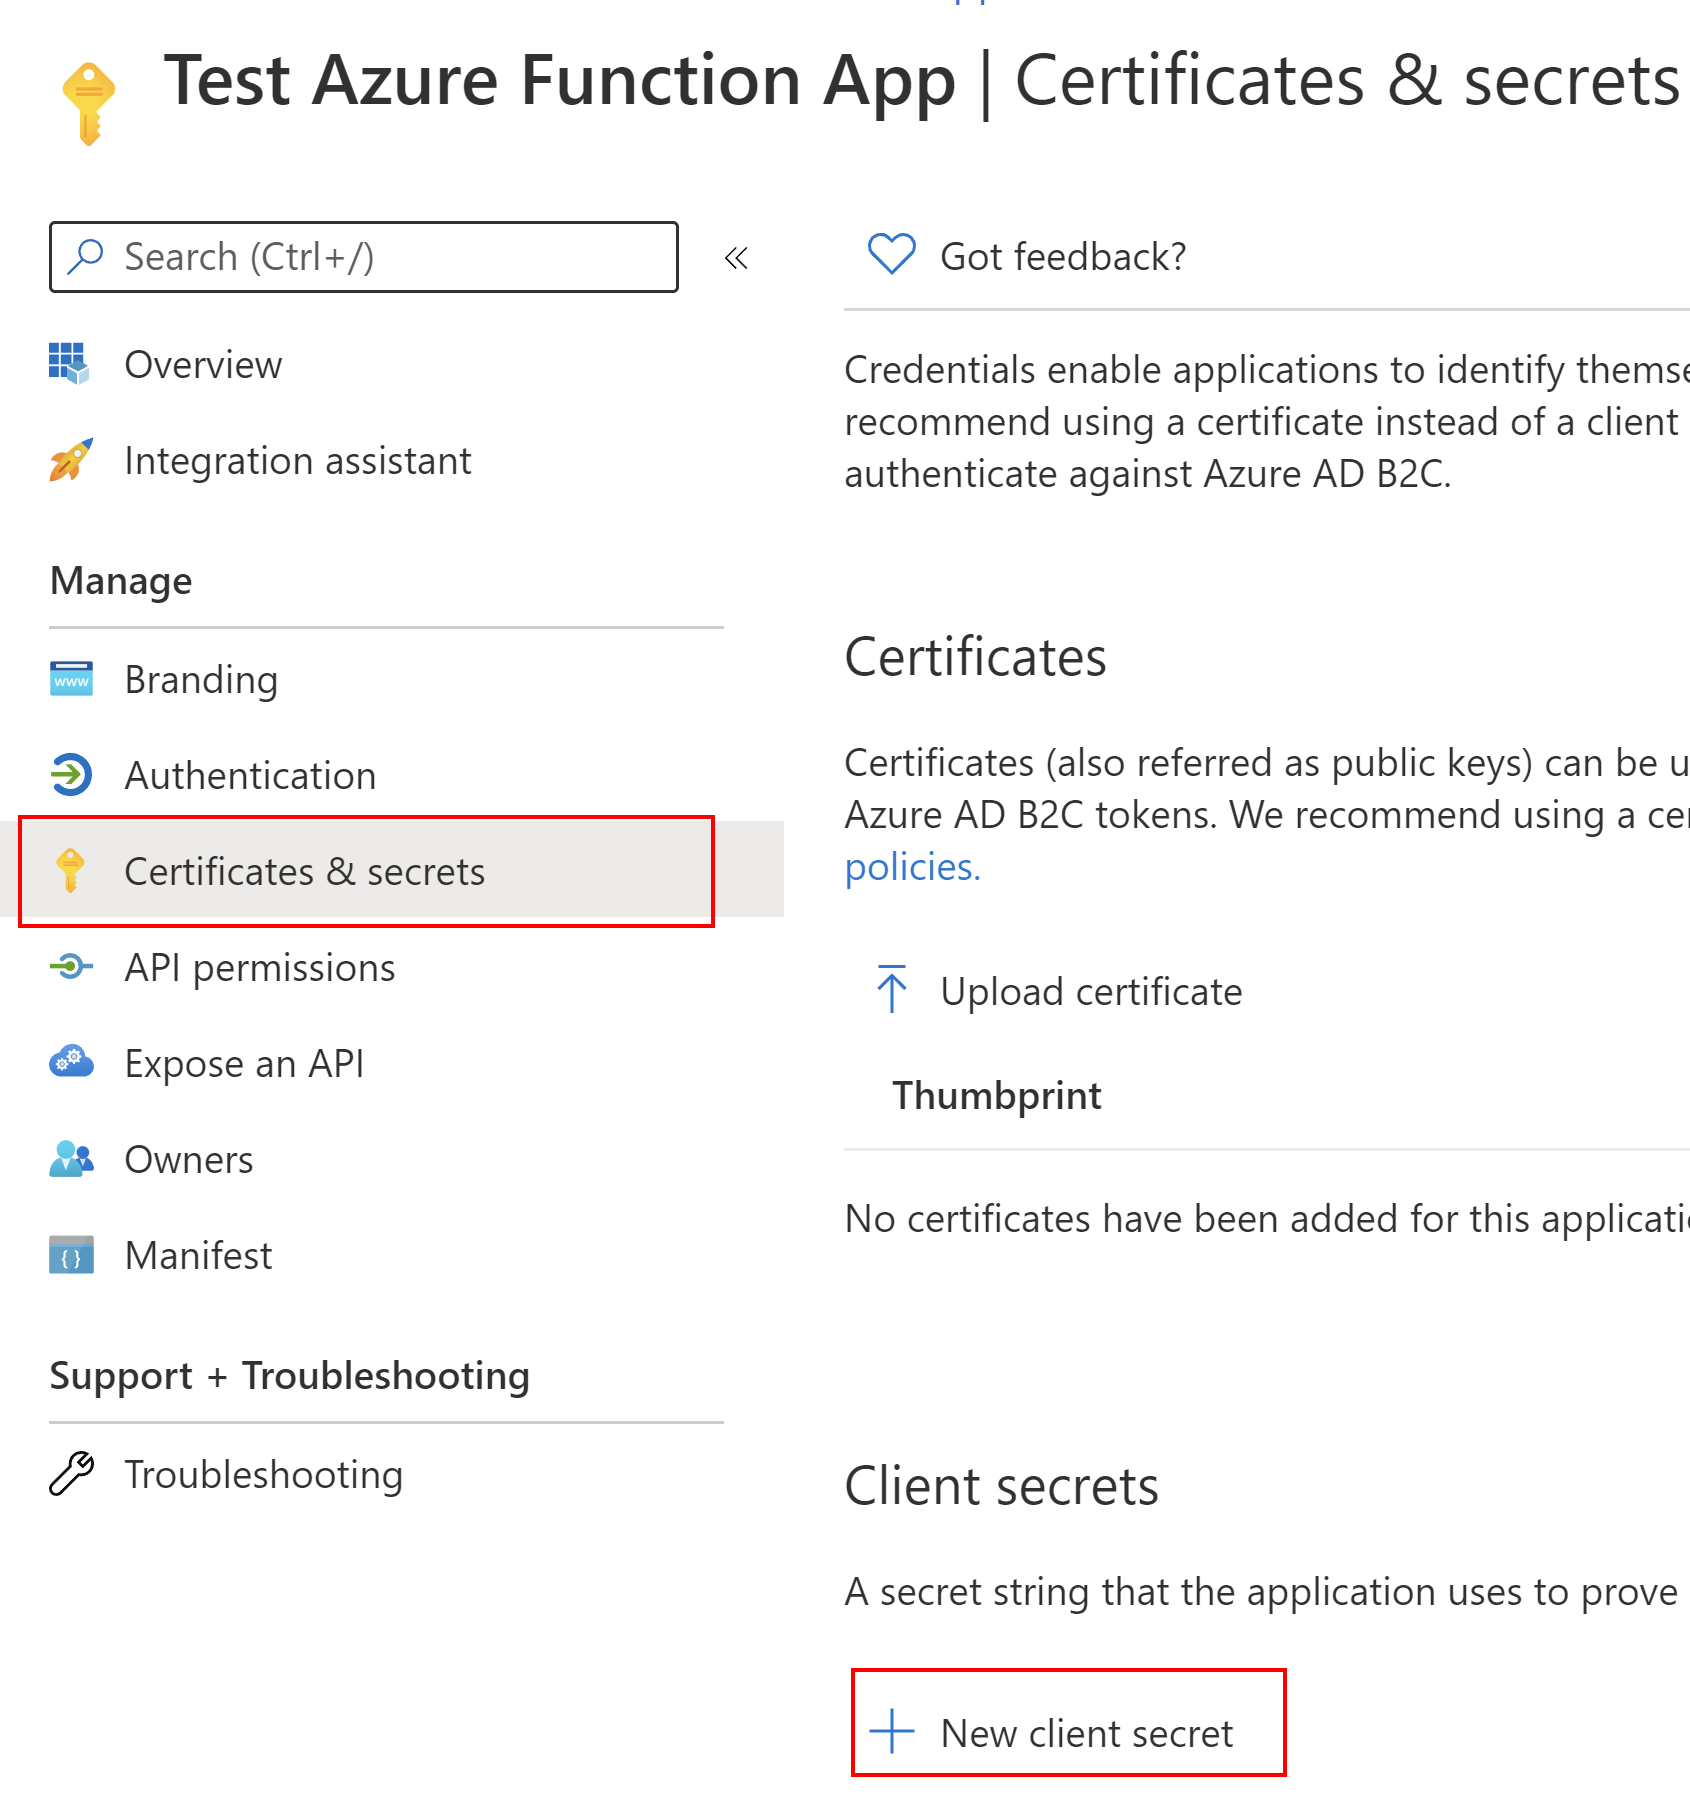
Now we have to do is secret generation. We will need an app secret to call token endpoint using client credentials flow. We can generate app secret for our Function App under Certificates & secrets section using New client secret button. We will need the value of the secret in the app configuration later in this article.
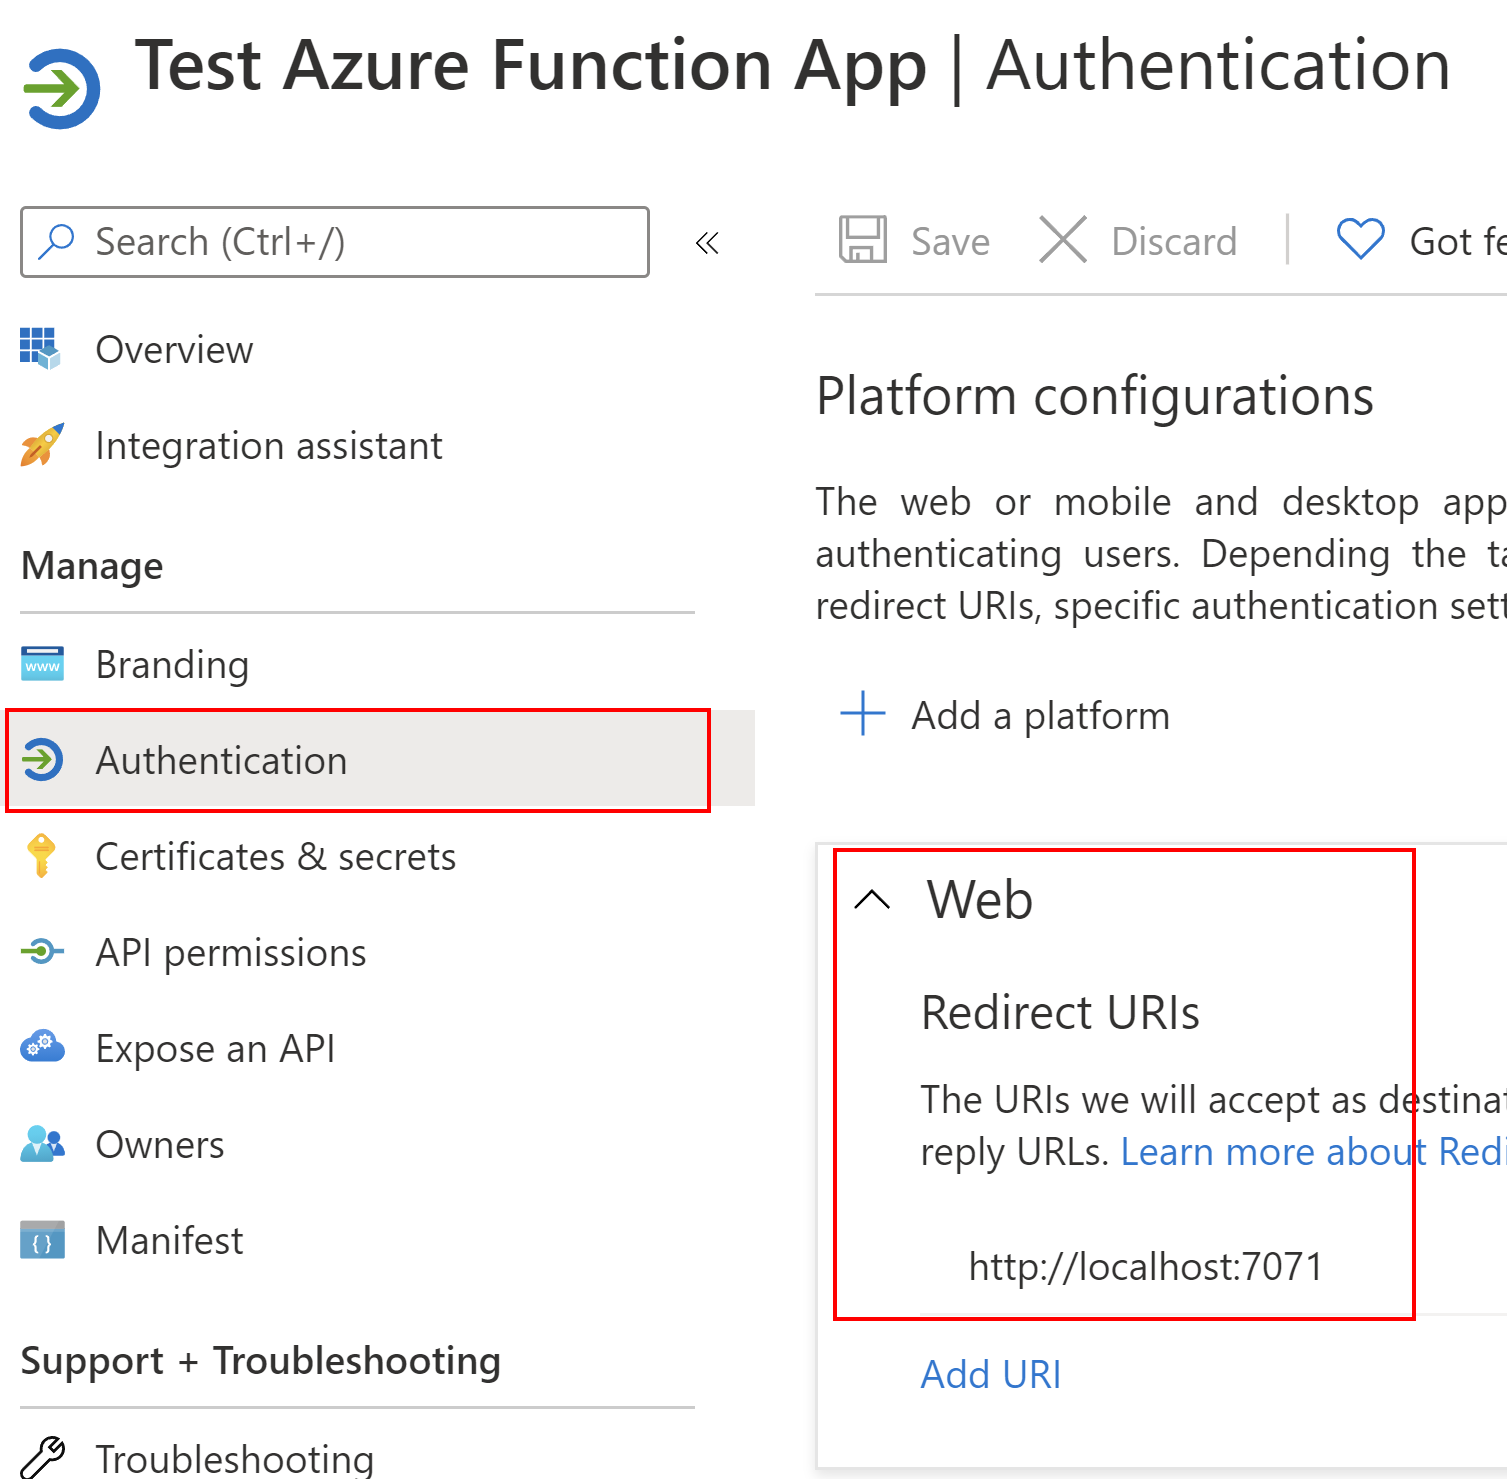
The last thing we have to set it to redirect URL. Under Authentication tab, we have to add a web platform, and indicate the URL of our Azure Function App running on the localhost in this case:
Great, now we can dive into the source code and configuration.
Obtain access tokens using client credentials flow in the Azure Function App
Source code of the Azure Function App I used in this article is available on my GitHub here. To obtain access tokens using client credentials flow I used Microsoft.Identity.Client library provided by Microsoft.
Function App configuration
First, we have to prepare settings of the Azure Function App to be able to call token endpoint and obtain access tokens. Here is the AzureAdB2C section from the local.settings.json file:
  "AzureAdB2C": {
    "Authority": "https://login.microsoftonline.com/<<TENANT-ID>>/oauth2/v2.0",
    "ClientId": "",
    "ClientSecret": "",
    "RedirectUri": "http://localhost:7071",
    "Scope": "https://techmindfactoryidentity.onmicrosoft.com/<<API-APP-CLIENT-ID>>/.default"
  }
Let’s discuss above parameters:
- Authority - this parameter indicates which authorization server issued the token, it is validated when the request is sent to the API with the access token included in the HTTP authorization header. Under TENANT-ID we should place tenant ID we copied from the Azure portal
- ClientId - ID of the registered Azure Function App in the Azure AD B2C tenant
- ClientSecret - Secret value we generated for the registered Azure Function App in the Azure AD B2C tenant
- RedirectUri - URL where access token should be returned
- Scope - this parameter indicates that we want to obtain access token to call ASP .NET Core Web API. Under API-APP-CLIENT-ID we should place Client ID of the registered Web API application in the Azure AD B2C tenant
Function App source code implementation
Now in the Program.cs file we need to register few dependencies. To do it I created a dedicated method called RegisterDependencies that will be called in the ConfigureServices method:
        private static void RegisterDependencies(IServiceCollection services)
        {
            var config = new ConfigurationBuilder()
               .SetBasePath(Environment.CurrentDirectory)
               .AddJsonFile("local.settings.json", optional: true, reloadOnChange: true)
               .AddEnvironmentVariables()
               .Build();

            services.Configure<AzureAdB2cSettings>(config.GetSection("AzureAdB2C"));

            services.AddScoped(implementationFactory =>
            {
                var confidentialClient = ConfidentialClientApplicationBuilder.Create(config["AzureAdB2C:ClientId"])
                    .WithClientSecret(config["AzureAdB2C:ClientSecret"])
                    .WithAuthority(config["AzureAdB2C:Authority"])
                    .WithRedirectUri(config["AzureAdB2C:RedirectUri"])
                    .Build();

                return confidentialClient;
            });

            services.AddHttpClient();
        }
In the above code fragment, we can see that ConfidentialClientApplicationBuilder class is used. It is provided in the Microsoft.Identity.Client NuGet library which we use in this project. We have to provide all the parameters we discussed above. Please note that we also have to register HttpClient to make HTTP calls to Web API application. There is also AzureAdB2cSettings class used to keep information about the scope. We will use it when making a call to obtain an access token.
Now in the TestFunction class we have to implement source code responsible for obtaining new access tokens. We use IConfidentialClientApplication instance with AcquireTokenForClient method to call Azure AD token to obtain the access token:
            AuthenticationResult result = await _confidentialClient
                                               .AcquireTokenForClient(new string[] { _azureAdB2cSettings.Scope })
                                               .ExecuteAsync();
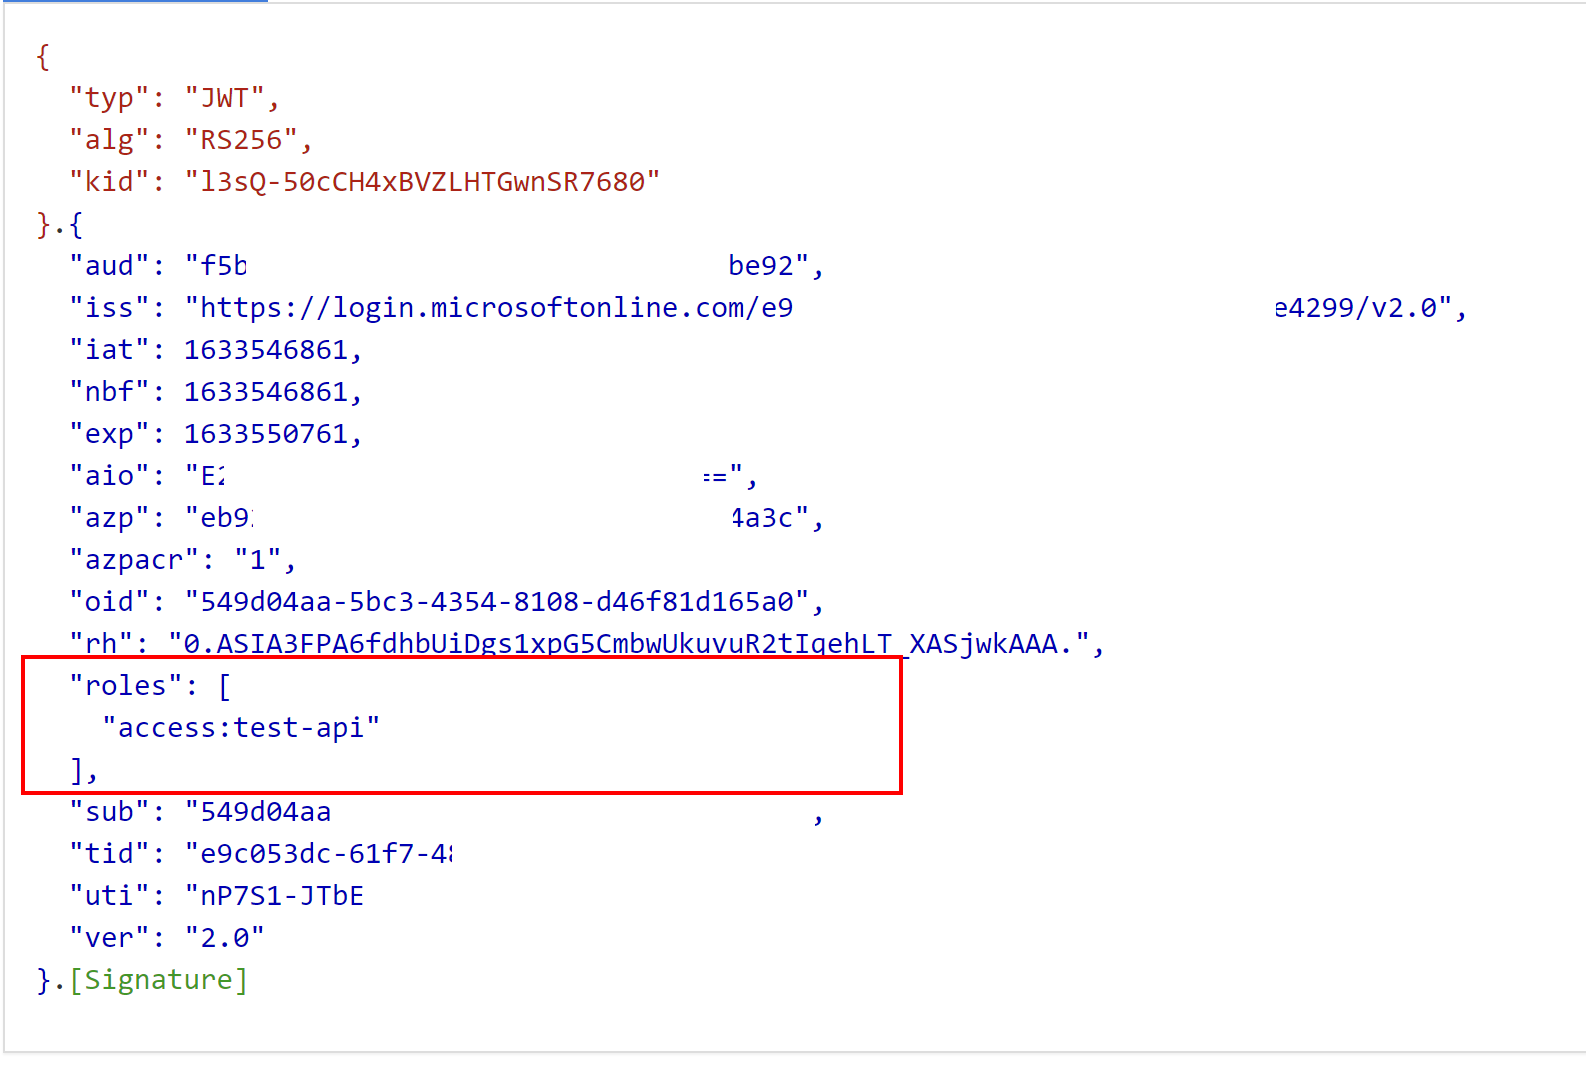
As we can see, the scope is also passed to the request. It is required because we want to obtain access token with the access:test-api permission included in the roles claim inside an access token.
Once we obtain access token, we have to place it in the authorization header before the request to the API is sent:
var accessToken = result.AccessToken;

            _httpClient.DefaultRequestHeaders.Authorization = new AuthenticationHeaderValue("Bearer", accessToken);
            var testDataEndpointResponse = await _httpClient.GetAsync("http://localhost:5000/testdata");
The rest of the code is responsible for the verification of the HTTP status code returned from the API.
If we look inside the content of the access token, we can see that roles claim is included:
Now it is time to see how access tokens are validated in the ASP .NET Core Web API project.
Validate access tokens issued using client credentials flow in the ASP .NET Core Web API
Source code of the ASP .NET Core Web API application I used in this article is available on my GitHub here.
ASP .NET Core Web API configuration
First we have to prepare settings of Web API application to be able to validate access tokens. Here is the AzureAdB2C section from the appsettings.json file:
  "AzureAdB2C": {
    "ClientId": "",
    "Domain": "xxx.onmicrosoft.com",
    "MetadataAddress": "https://login.microsoftonline.com/<<TENANT-ID>>/v2.0/.well-known/openid-configuration",
    "Authority": "https://login.microsoftonline.com/<<TENANT-ID>>/v2.0"
  }
Let’s discuss above parameters:
- Authority - this parameter indicates which authorization server issued the token, it is validated when the request is sent to the API with the access token included in the HTTP authorization header. Under TENANT-ID we should place tenant ID we copied from the Azure portal
- ClientId - ID of the registered Web API application in the Azure AD B2C tenant
- MetadataAddress - Url address under which API can obtain OpenID configuration and get signing keys used to sign access tokens
ASP .NET Core Web API source code implementation
We need to implement source code that will be responsible for validating access tokens including verification of the role included in the token. In the Startup.cs file in the ConfigureServices method we have to add below lines of code:
            services.AddAuthentication(JwtBearerDefaults.AuthenticationScheme)
                    .AddJwtBearer("ClientCredentialsScheme", jwtOptions =>
                     {
                         jwtOptions.MetadataAddress = Configuration["AzureAdB2C:MetadataAddress"];
                         jwtOptions.Authority = Configuration["AzureAdB2C:Authority"];
                         jwtOptions.Audience = Configuration["AzureAdB2C:ClientId"];
                     });

            services.AddAuthorization(options =>
            {
                var authorizationPolicy = new AuthorizationPolicyBuilder()
                                              .RequireRole("access:test-api")
                                              .AddAuthenticationSchemes("ClientCredentialsScheme")
                                              .Build();
                options.AddPolicy("OnlyAuthorizedAccess", authorizationPolicy);
            });
Let’s describe the above fragment. With AddAuthentication we want to add handling JWT access tokens to verify if these tokens were issued by the proper authority (in this case Azure AD B2C tenant). As we can see we have to provide the parameters we described above. If you want to read more about authentication concepts in the ASP .NET Core, I encourage you to check official documentation.
Then, we want to also verify if the access token contains access:test-api role. This is why we have to use AddAuthorization method. Please note that we require access:test-api role and we define OnlyAuthorizedAccess which will be used in the controller class. With this approach, we validate access tokens sent to the API endpoints but also we check if these tokens contain a specific role.
In the Configure method we have to also add below two lines:
            app.UseAuthentication();
            app.UseAuthorization();
Now let’s see how to secure API controller with the policy we created above:
    [Authorize(Policy = "OnlyAuthorizedAccess")]
    [ApiController]
    [Route("[controller]")]
    public class TestDataController : ControllerBase
    {
        private readonly ILogger<TestDataController> _logger;

        public TestDataController(ILogger<TestDataController> logger)
        {
            _logger = logger;
        }

        [HttpGet]
        public IActionResult Get()
        {
            return Ok("Operation authorized");
        }
    }
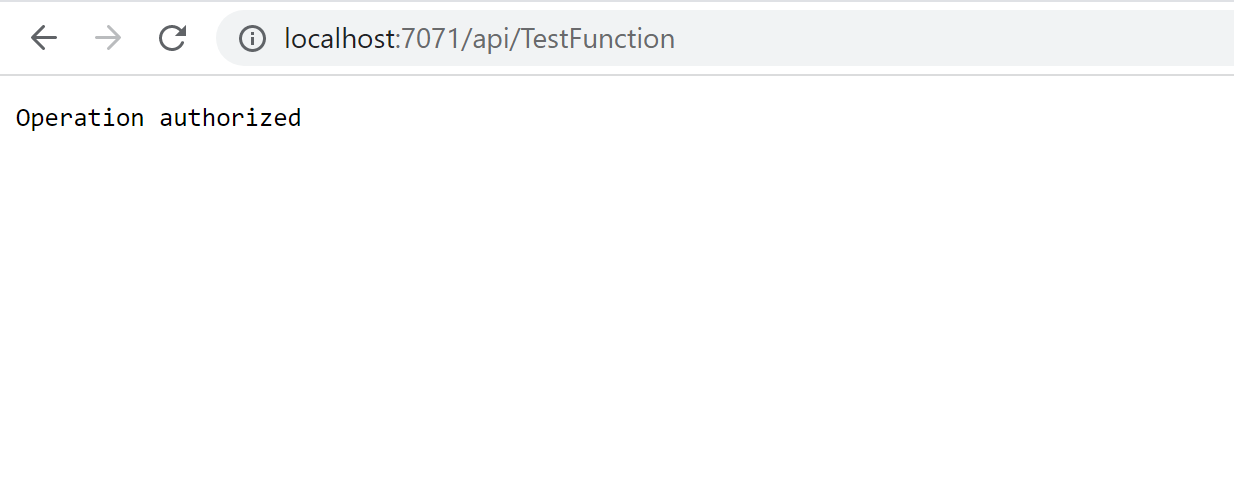
From this point, if we try to call Get method without the access token, API will return 403 status code forbidden. If we try to use the access token without the access:test-api role, the result will be the same.
Summary
In this article, we discussed how to restrict anonymous access to ASP .NET Core Web API controller methods. We saw how to obtain an access token using client credentials flow. This approach can be helpful in scenarios where user context is not presented and we would like to still secure access to our API using access tokens.