Manage Azure infrastructure with Pulumi and .NET C#
Cloud applications have become more popular these days. There are modern cloud capabilities such as microservices, containers, serverless, and data stores. An old-fashion approach where developers worked separately from the infrastructure team is gone. Modern cloud architectures require thinking deeply about infrastructure while building the application, instead of waiting until afterward. Term “infrastructure” covers all of the cloud resources our application needs to run and “Infrastructure as a Code” covers the process of managing and provisioning cloud resources through machine-readable definition files. Cloud resources like virtual machines or web apps can be easily created, modified and deleted without waiting for days and weeks. This is why we need the right tools to manage cloud infrastructure. In this article, we will discover Pulumi - a tool that enables managing application’s infrastructure with real languages like JavaScript or .NET C#. Pulumi’s free open source SDK, which includes a CLI and assortment of libraries, enables these capabilities. Pulumi also offers premium features for teams wanting to use Pulumi in production, such as Azure ActiveDirectory integration for identity and advanced policies.
Introduction
Many tools help to manage Azure cloud infrastructure like ARM templates or Terraform. In both cases, we have to be familiar with some specific aspects of the tool. When playing with Azure Resource Manager (ARM) templates we need knowledge about the JSON file structure and how different parts of the files are connected with each other. In Terraform, we write programs in a custom domain-specific-language (DSL) called HashiCorp Configuration Language (HCL). With Pulumi, we can use general-purpose languages like .NET C# to express the desired state, and Pulumi’s engine similarly gives us diffs and a way to robustly update your infrastructure. In this article, I would like to present how to use Pulumi to provision Azure cloud infrastructure.
Setup Pulumi
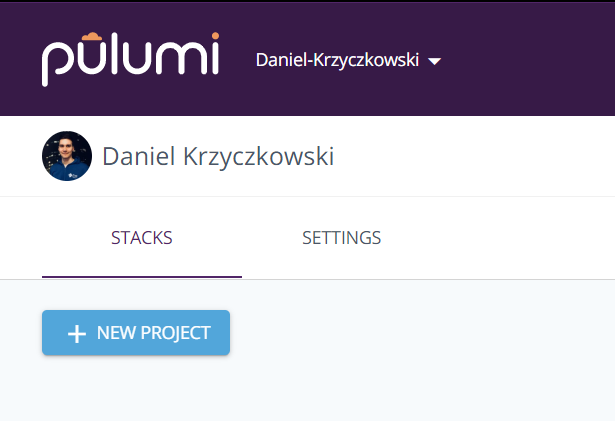
Before we start using Pulumi we have to create an account under Pulumi.com. Once we have our account created we can set up a new project.
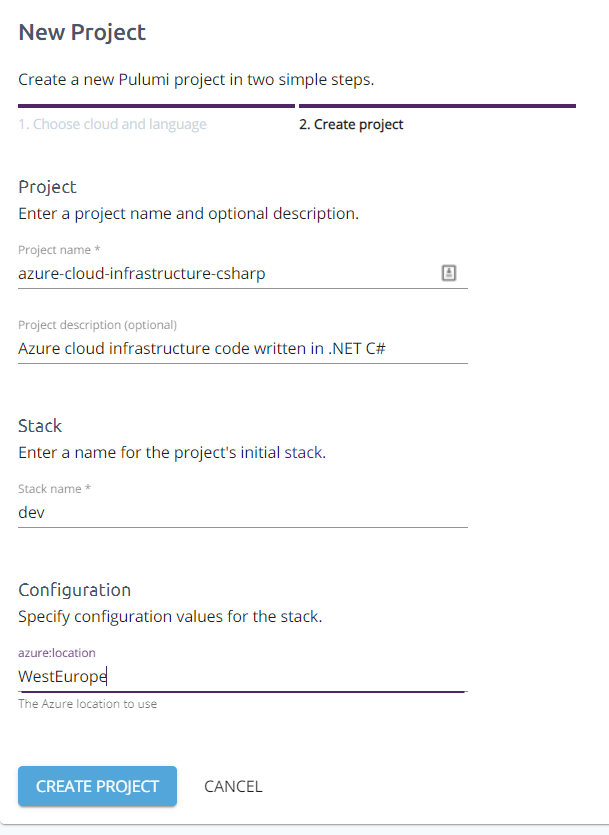
In the Pulumi panel select “New Project”, then choose “Azure” as a cloud provider and choose “C#” as a language:
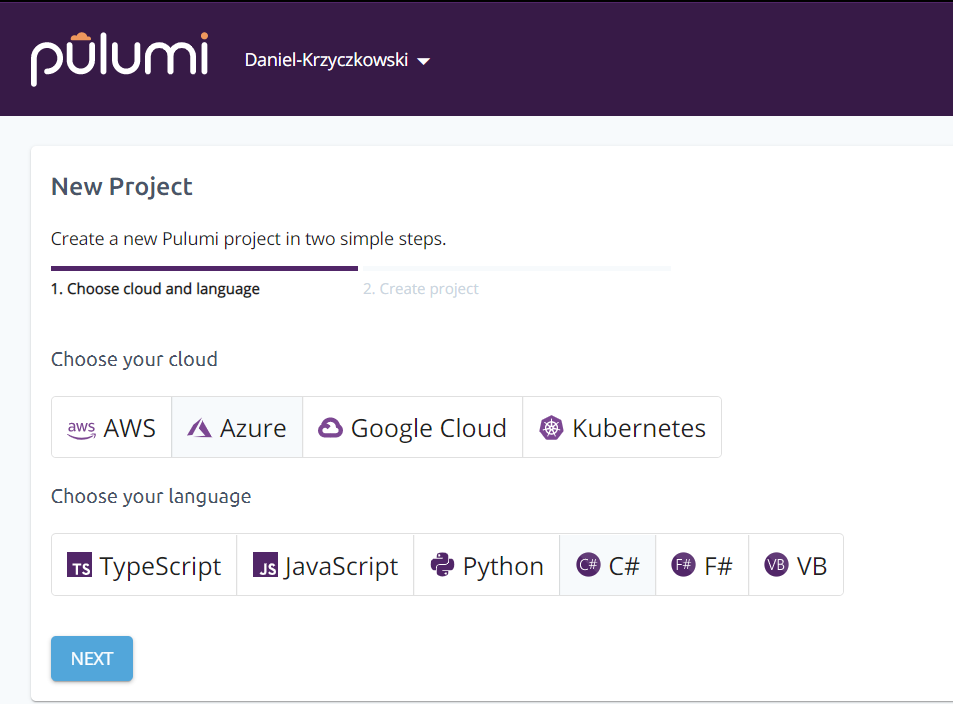
Then we have to specify project details. We have to provide project name so in my case, it will be “azure-cloud-infrastructure-csharp”, then description so “Azure cloud infrastructure code written in .NET C#”. Then we have to set project stack so in this case, this will be “dev”. In the end we have to set Azure resource group location - in my case, this will be “WestEurope”. Then we can click “Create Project”:
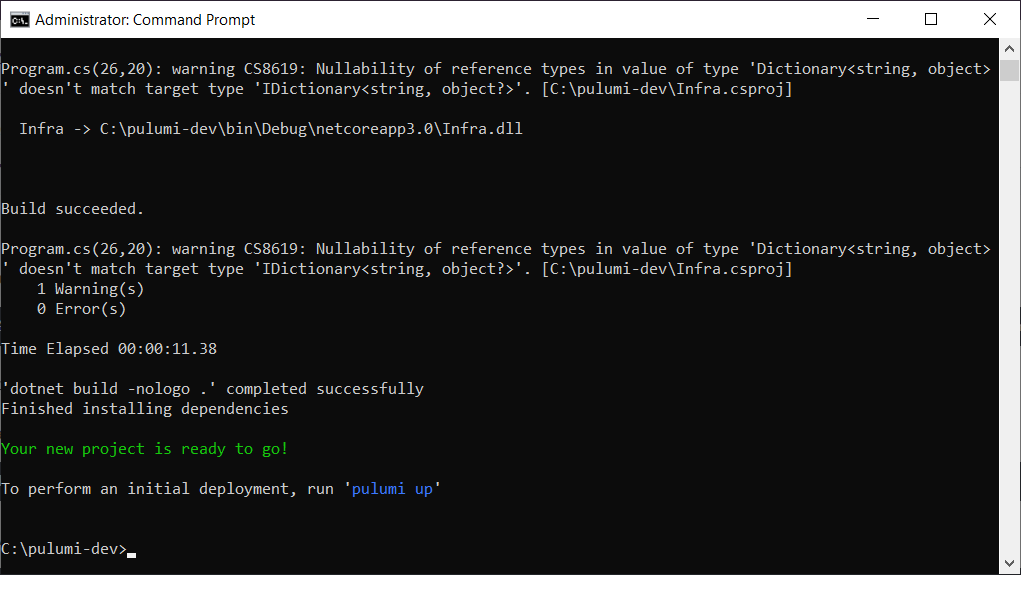
Once project is created “Get started” page will be displayed with the information how to setup Pulumi on the local machine (local computer):

The first step will download and install Pulumi and also set some environment variables. Then using second command we will create a new directory for our project and we will be moved to it (using “cd” command). Using the third command we can download the initial project. Last command enables deploying resources in the Azure cloud.
We have to also download and install Azure CLI so we can connect to our Azure subscription first time when using Pulumi commands. Detailed steps are provider in the official documentation here:
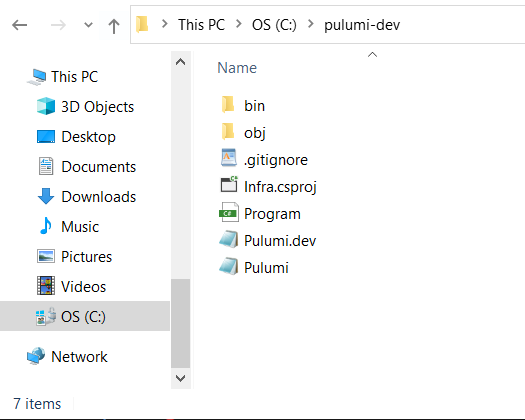
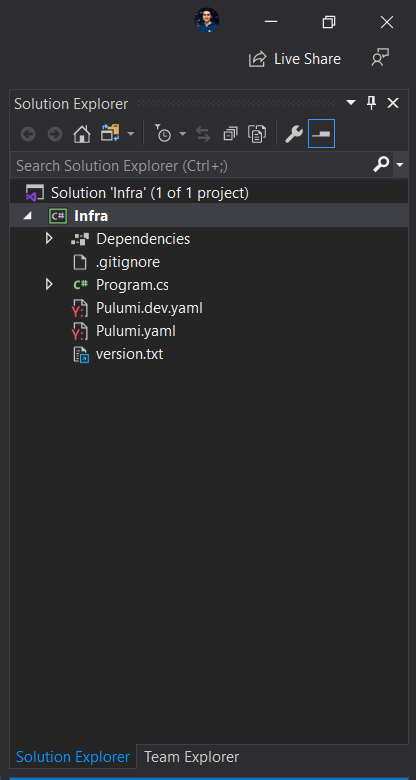
Open newly created Pulumi project in the Visual Studio
Once project is created we can open it with the Visual Studio. In the folder we should see project’s files:
Once project is opened in the Visal Studio we can review the files and modify them:
Let’s open “Program.cs” file:
class Program
{
    static Task<int> Main()
    {
        return Deployment.RunAsync(() => {

            // Create an Azure Resource Group
            var resourceGroup = new ResourceGroup("resourceGroup");

            // Create an Azure Storage Account
            var storageAccount = new Account("storage", new AccountArgs
            {
                ResourceGroupName = resourceGroup.Name,
                AccountReplicationType = "LRS",
                AccountTier = "Standard",
            });

            // Export the connection string for the storage account
            return new Dictionary<string, object>
            {
                { "connectionString", storageAccount.PrimaryConnectionString },
            };
        });
    }
}
As we can see the infrastructure code (in this case Azure Resource Group and Storage Account inside it) is all written in .NET C#. Each resource has its own C# class representation so we can easily navigate and check declaration. This is great because we do not have to play with JSON ARM templates. Of course, there are some more advantages:
-
We can automatically create, update, or delete cloud resources using Pulumi’s infrastructure as code engine, removing manual point-and-clicking in the Azure UI and ad-hoc scripts
-
We can use our favorite IDEs - in this case Visual Studio, taking advantage of features like auto-completion, refactoring, and interactive documentation
-
We can catch mistakes early on with standard compiler errors, Roslyn analyzers, and an infrastructure-specific policy engine for enforcing security, compliance, and best practices
-
We can reuse any existing NuGet library, or distribute our own to share some common infrastructure declaration
-
We can deploy continuously, predictably, and reliably using Azure DevOps Pipelines or GitHub Actions
-
We can build scalable cloud applications using classic infrastructure cloud-native technologies like Kubernetes, Docker containers, serverless functions, and highly scalable databases such as CosmosDB into our core development experience, bringing them closer to our application code
Modify default sample to deploy Azure App Service with SQL Database and Application Insights
We can modify the initial sample and use the code to provision Azure SQL Database and Azure Application Insights to be used in combination with Azure App Service. Application files will be taken from the Azure Blob Storage:
class Program
{
    static Task<int> Main()
    {
        return Deployment.RunAsync(() => {
            var resourceGroup = new ResourceGroup("appservice-rg");

            var storageAccount = new Account("sa", new AccountArgs
            {
                ResourceGroupName = resourceGroup.Name,
                AccountReplicationType = "LRS",
                AccountTier = "Standard",
            });

            var appServicePlan = new Plan("asp", new PlanArgs
            {
                ResourceGroupName = resourceGroup.Name,
                Kind = "App",
                Sku = new PlanSkuArgs
                {
                    Tier = "Basic",
                    Size = "B1",
                },
            });

            var container = new Container("zips", new ContainerArgs
            {
                StorageAccountName = storageAccount.Name,
                ContainerAccessType = "private",
            });

            var blob = new ZipBlob("zip", new ZipBlobArgs
            {
                StorageAccountName = storageAccount.Name,
                StorageContainerName = container.Name,
                Type = "block",
                Content = new FileArchive("wwwroot"),
            });

            var codeBlobUrl = SharedAccessSignature.SignedBlobReadUrl(blob, storageAccount);

            var config = new Config();
            var username = config.Get("sqlAdmin") ?? "pulumi";
            var password = config.RequireSecret("sqlPassword");
            var sqlServer = new SqlServer("sql", new SqlServerArgs
            {
                ResourceGroupName = resourceGroup.Name,
                AdministratorLogin = username,
                AdministratorLoginPassword = password,
                Version = "12.0",
            });

            var database = new Database("db", new DatabaseArgs
            {
                ResourceGroupName = resourceGroup.Name,
                ServerName = sqlServer.Name,
                RequestedServiceObjectiveName = "S0",
            });

            var app = new AppService("app", new AppServiceArgs
            {
                ResourceGroupName = resourceGroup.Name,
                AppServicePlanId = appServicePlan.Id,
                AppSettings =
                {
                    { "WEBSITE_RUN_FROM_PACKAGE", codeBlobUrl },
                },
                ConnectionStrings =
                {
                    new AppServiceConnectionStringsArgs
                    {
                        Name = "db",
                        Type = "SQLAzure",
                        Value = Output.Tuple<string, string, string>(sqlServer.Name, database.Name, password).Apply(t =>
                        {
                            (string server, string database, string pwd) = t;
                            return $"Server= tcp:{server}.database.windows.net;initial catalog={database};userID={username};password={pwd};Min Pool Size=0;Max Pool Size=30;Persist Security Info=true;";
                        }),
                    },
                },
            });

            return new Dictionary<string, object?>
            {
                { "endpoint", app.DefaultSiteHostname },
            };

        });
    }
}
In the project, we have to also create “wwwroot” folder and inside it we have to add simple HTML file called “index.html” with below content:
<!DOCTYPE html>

<html>
<body>
    <h1>Greetings from Azure App Service!</h1>
</body>
</html>
Deploy resources to Azure cloud
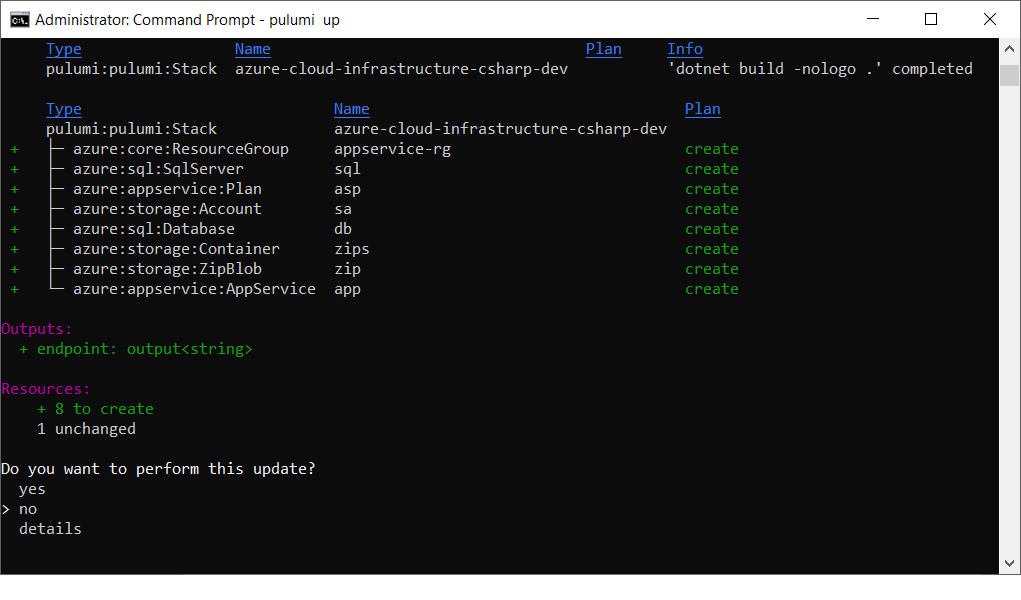
To deploy resources to Azure we have to use “pulumi up” command. It is great because Pulumi will first preview the current stack and ask if we want to apply changes. Before that we will be asked for providing the password for the Azure SQL database:
pulumi config set azure-cloud-infrastructure-csharp:sqlPassword <value>
Then we can click enter. Pulumi will ask us if we would like to apply changes:
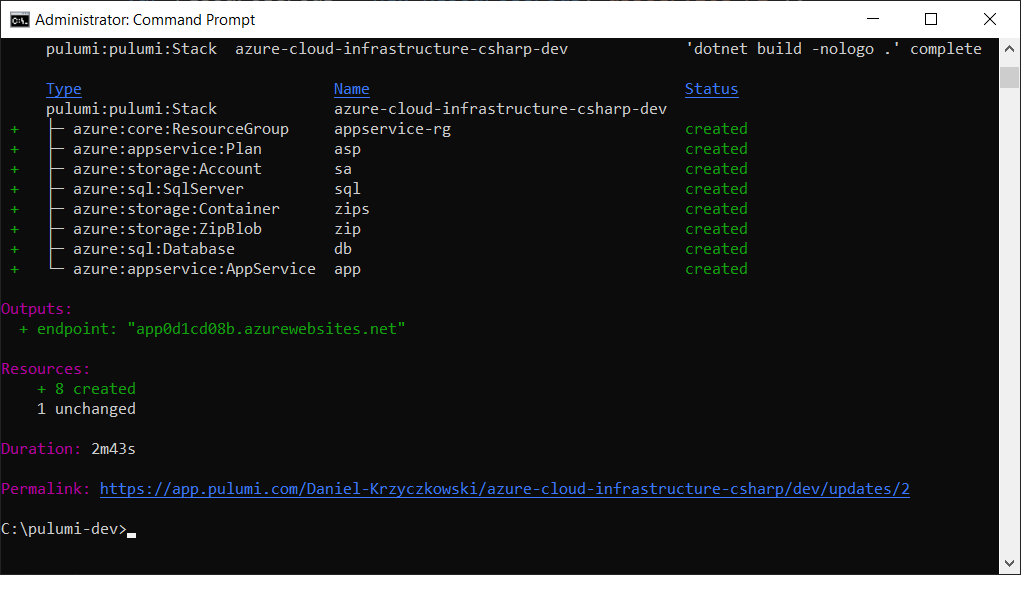
Once we select “yes”, Pulumi starts creating resources in the Azure cloud. Once resources are created Pulumi will display status in the console:
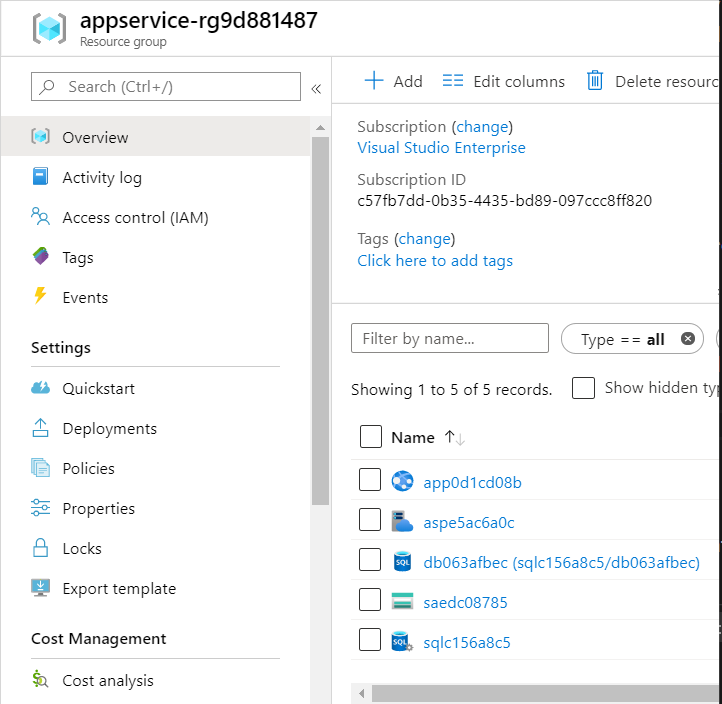
We can sign in to the Azure portal and verify if resource group with resources is created:
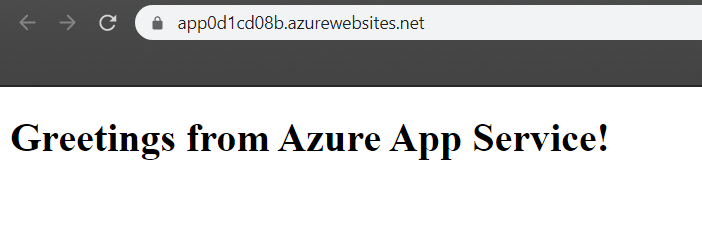
We can open Web App URL and check the result:
Summary
In this article I presented how to use Pulumi to create Azure cloud resources with .NET C# in the Visual Studio. For me personally this is great because I can use my current knowledge about C# (I am a software developer) and manage the infrastructure from the code using Visual Studio.
Below I provided some important links related to the Pulumi like code samples or comparison to the Terraform.