Lost in Azure cloud identity - part 5

Introduction
I have decided to create series related to identity and access management using Azure cloud services. Important note first - I will focus more on the development side and integration aspects. This series is focused on developers who would like to understand different concepts and mechanisms around identity using Azure cloud services like Azure Active Directory and Azure Active Directory B2C. It does not mean that if you are an architect or administrator, you will not find anything interesting. I think that this series can be helpful for everyone who wants to learn more about identity services in the Microsoft Azure cloud.
This is the fifth article from the series. In this article, we will discover how to send customized verification emails from the Azure Active Directory using the Twilio SendGrid service.
Important
This series assumes that you already have some basic knowledge around identity concepts, application implementation, and Azure cloud services - at least Azure Active Directory.
Source code
Source code of all applications and AD B2C custom policies are available on my GitHub
Links to additional helpful resources
In this specific article, I will focus on custom policies. There is really good documentation I recommend you to check:
Custom email verification with SendGrid
Tutorial: Create user flows in Azure Active Directory B2C using custom policies
Azure AD B2C custom policy overview
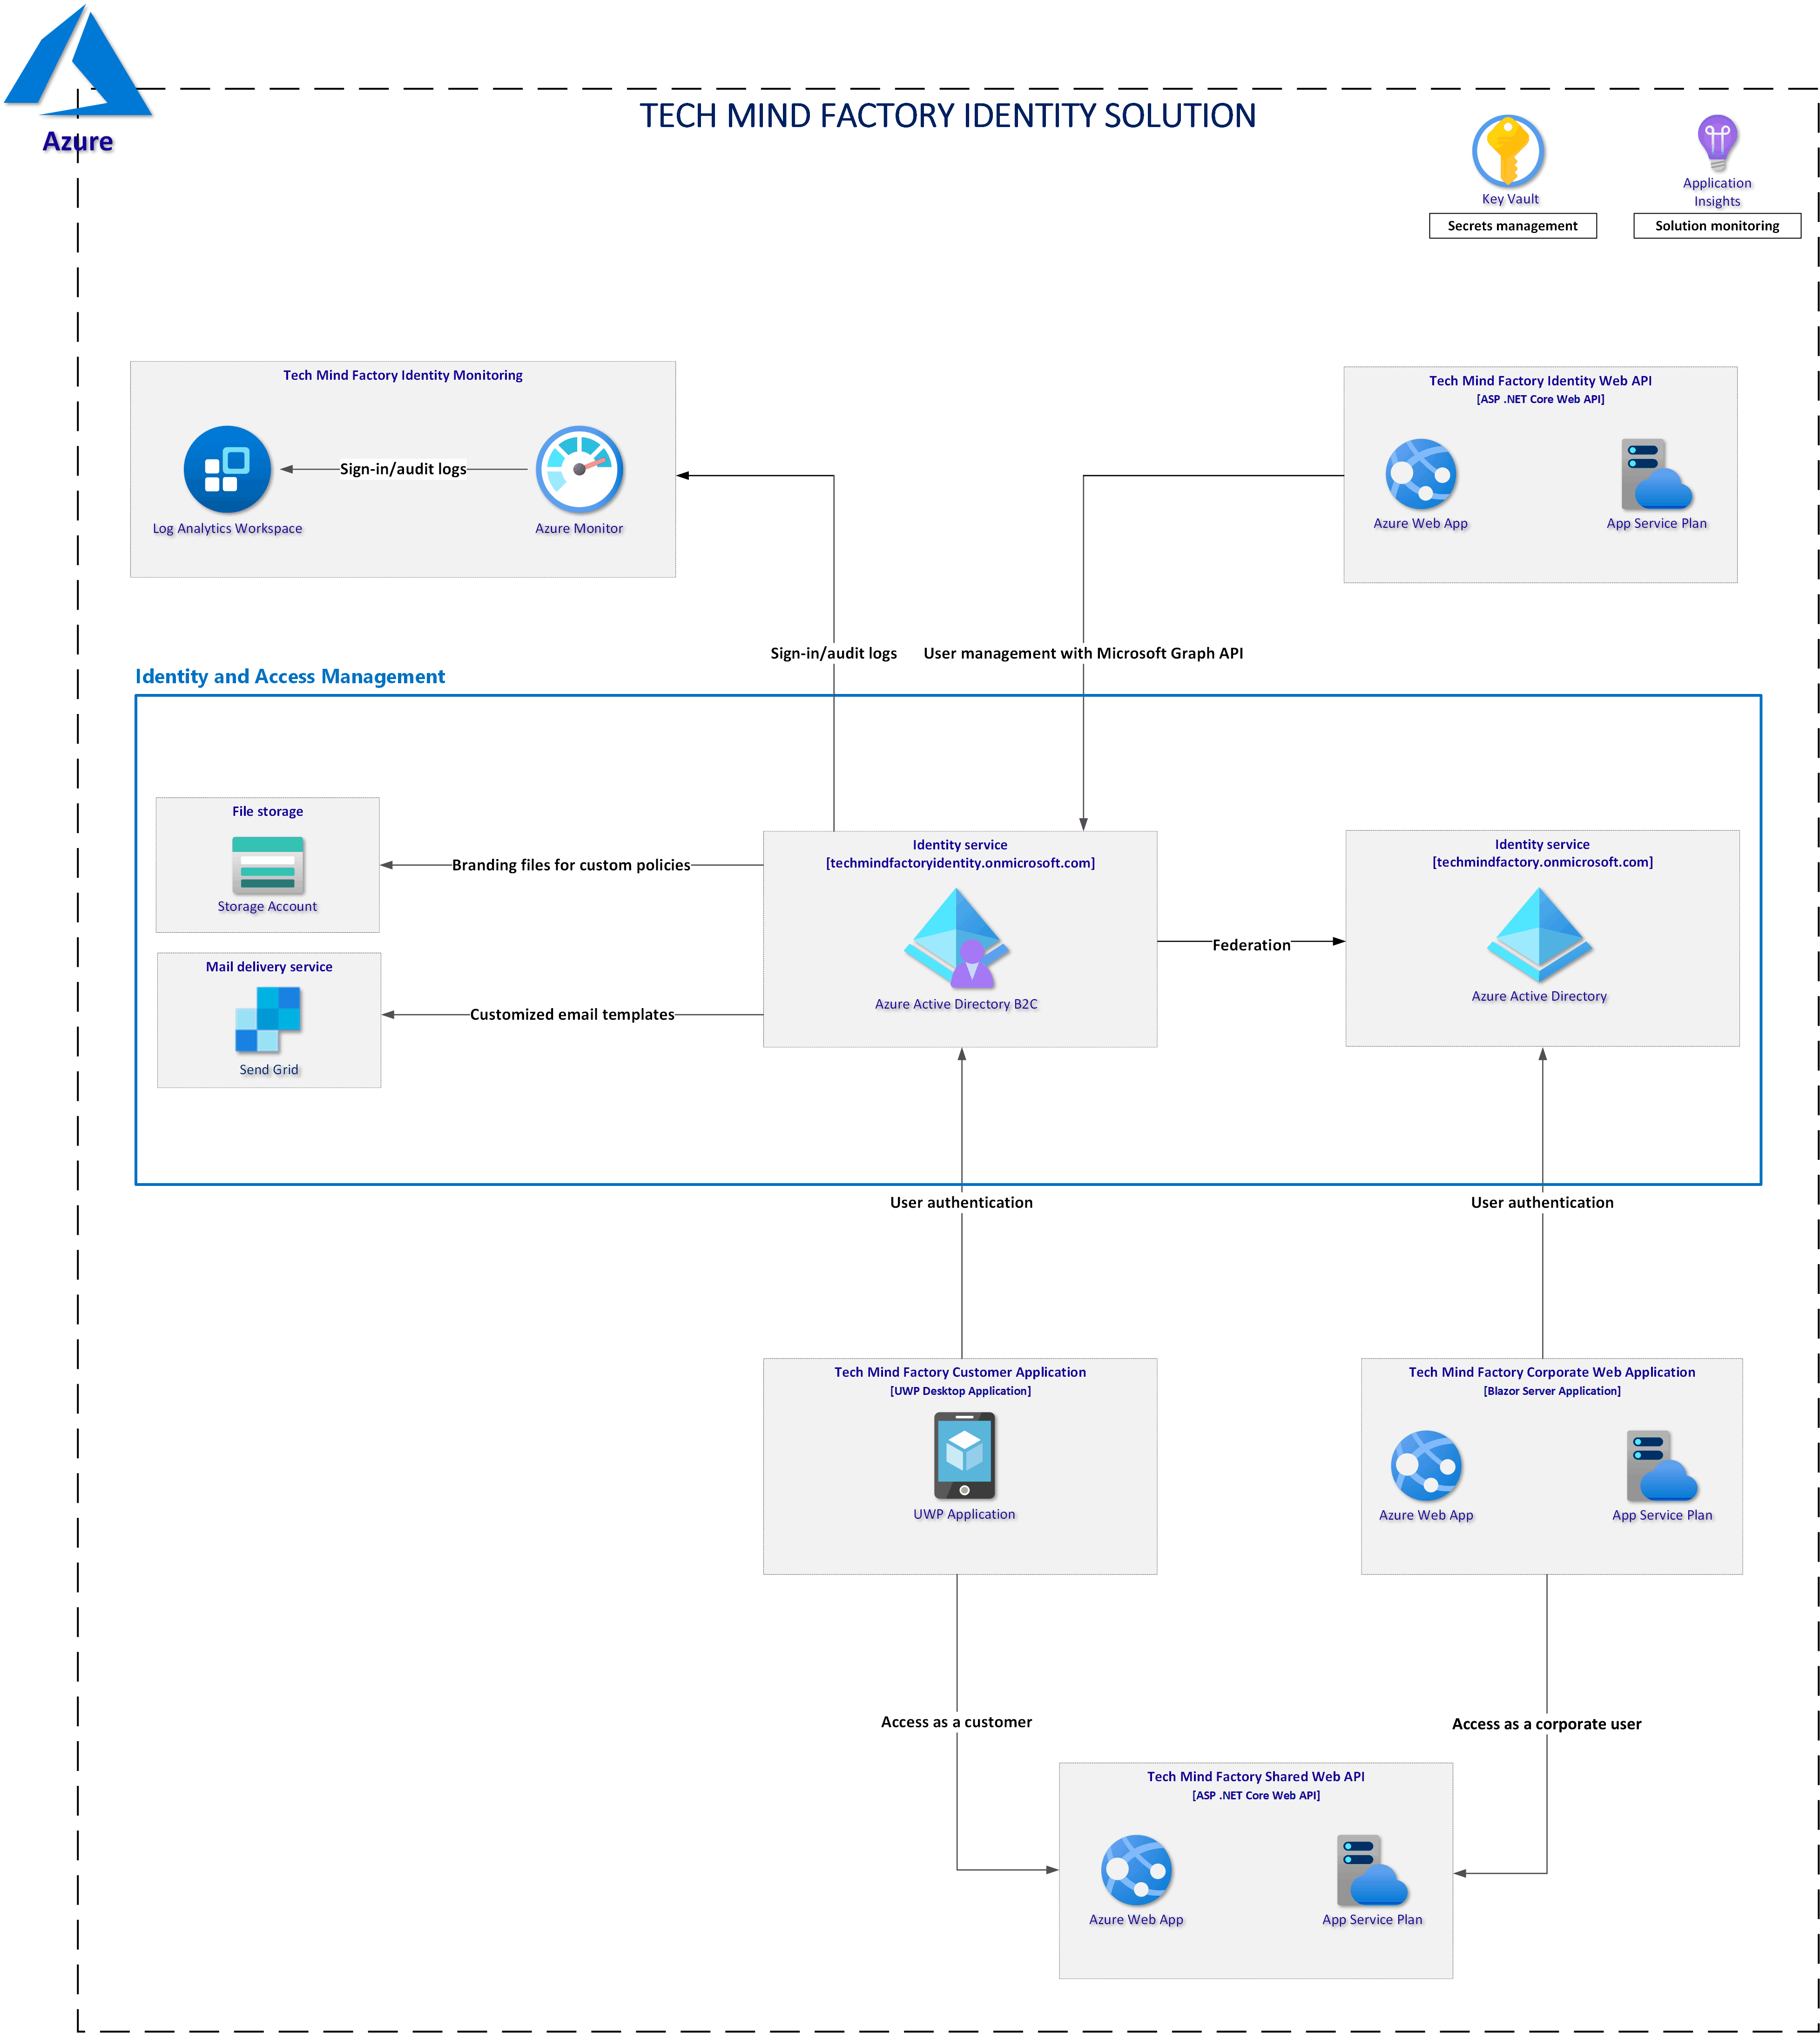
Solution architecture discussed in this series
Twilio SendGrid setup in the Azure portal
To send customized emails, first we have to create Twilio SendGrid service instance in the Azure portal. In the marketplace we have to find Twilio SendGrid:
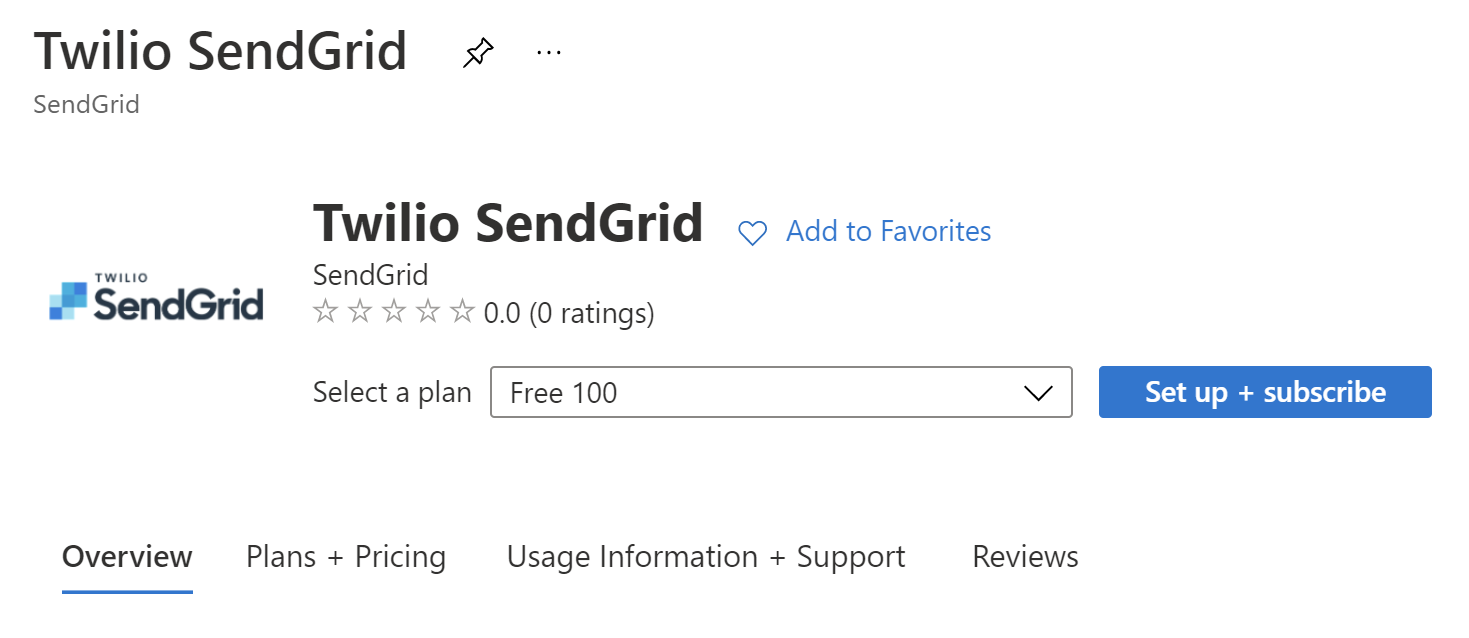
To start we can select free plan so we can send 100 emails per day for free.
Once the subscription is ready, we can setup a sender identity. This article is not about Twilio SendGrid itself but I want you to know that to send emails from SendGrid you have to setup a sender identity.
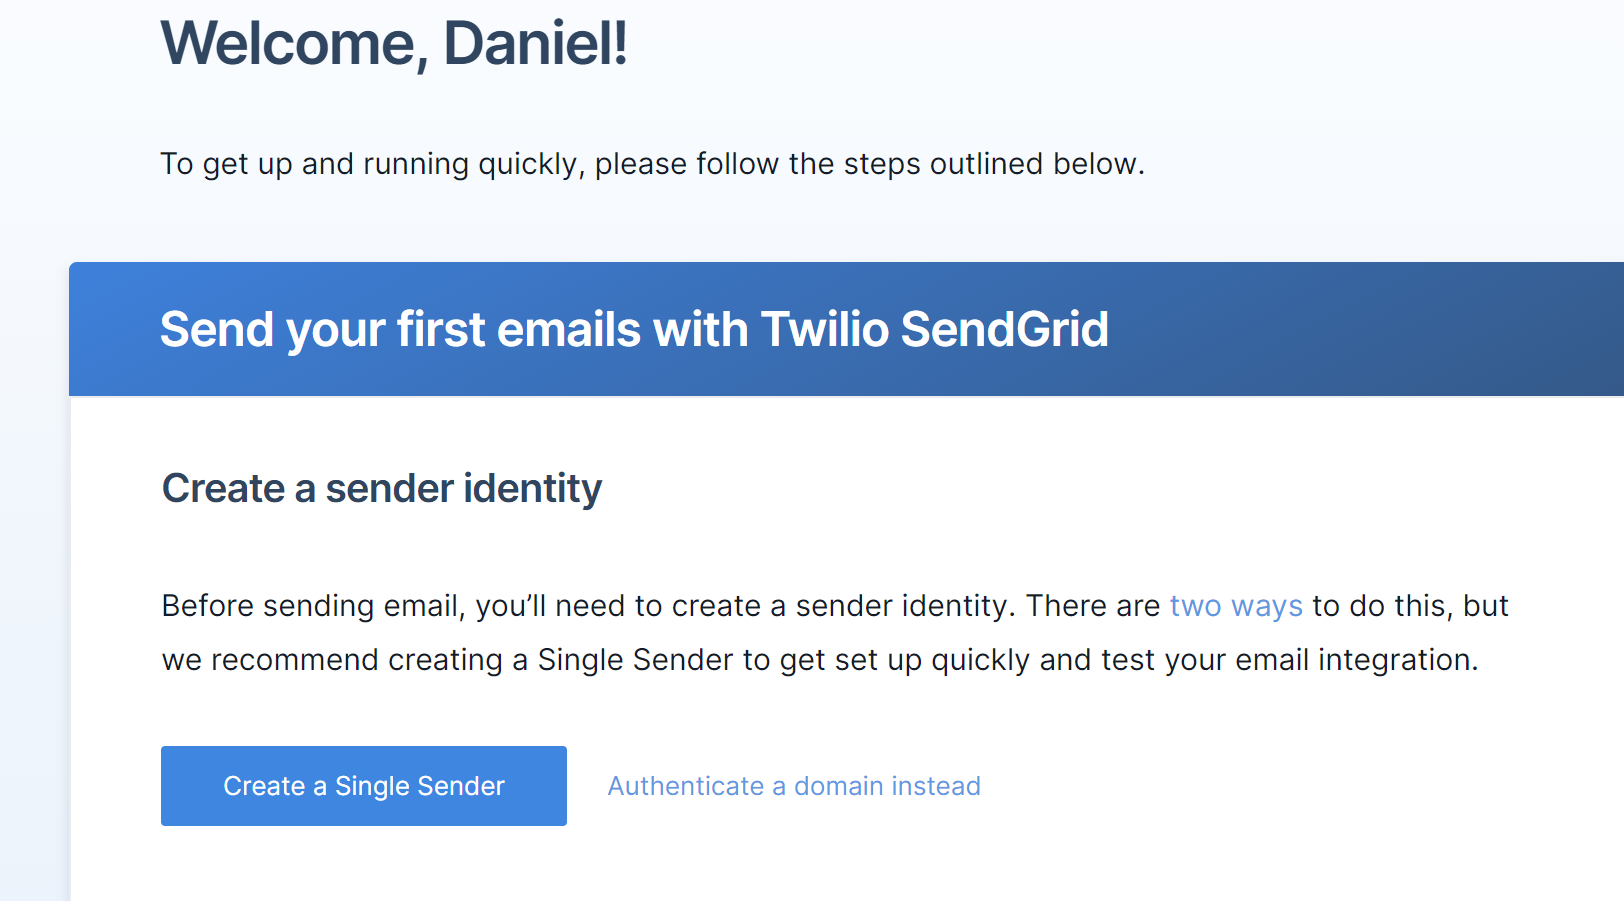
There are two ways of doing it:
- Create a single sender - with this option we can quickly setup sender identity using our existing email. This option is good for testing and development
- Authenticate a domain instead - this is recommended way for the production solutions. With it, you can setup domain authentication and send emails using an address like: no-reply@techmindfactory.com
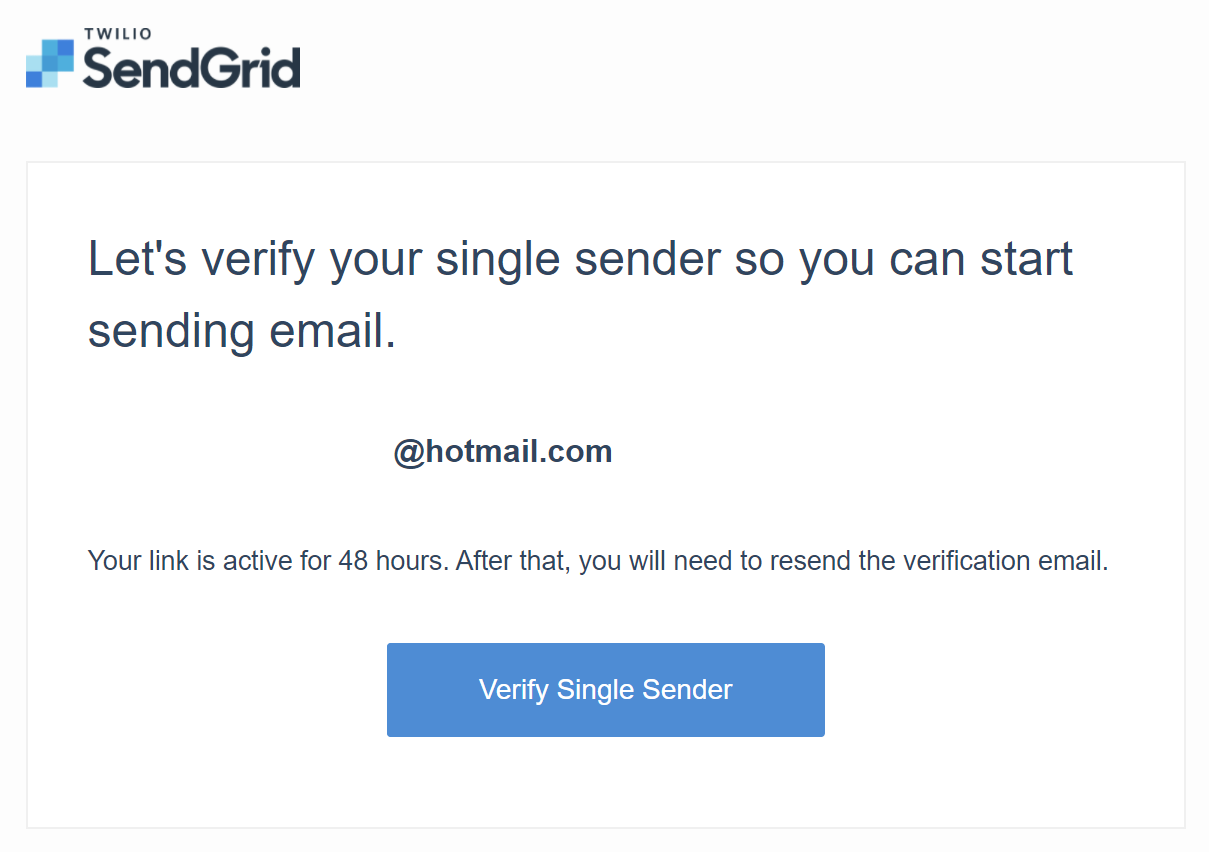
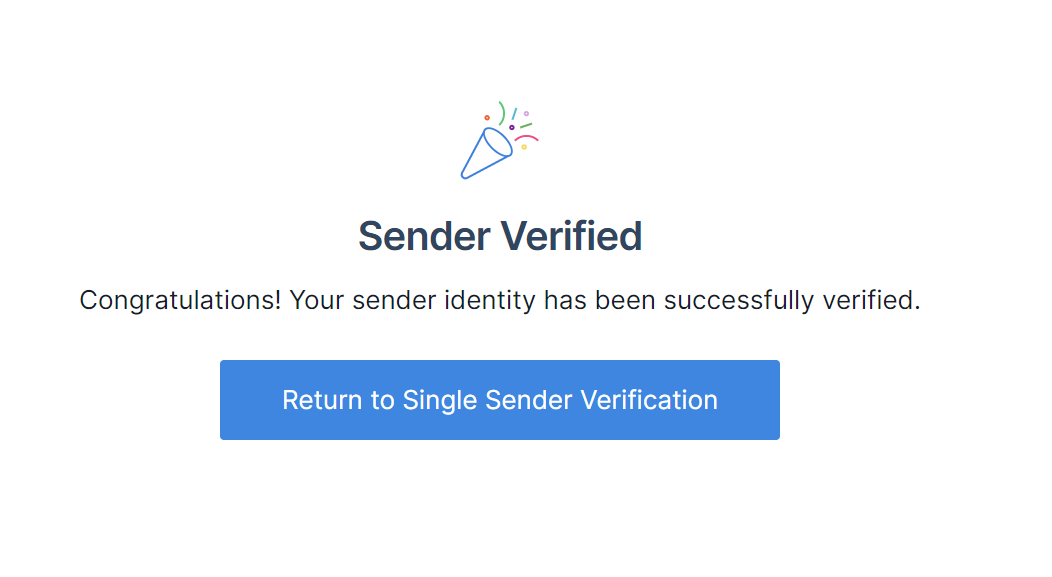
In this case I used a single sender identity. With this option you have to provide existing email address and confirm message sent to it from the SendGrid:
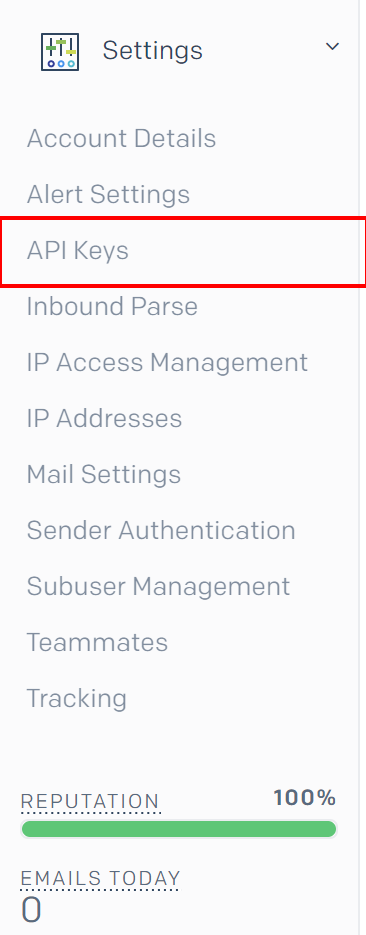
Generate API Key with permission to send emails using REST API
Next step is to get API Key so we can send emails using Twilio SendGrid REST API. Select Settings and then API Keys:
Then click Create API Key button, select Restricted Access, and below enable Send Mail, then click Create & View button at the bottom of the page:
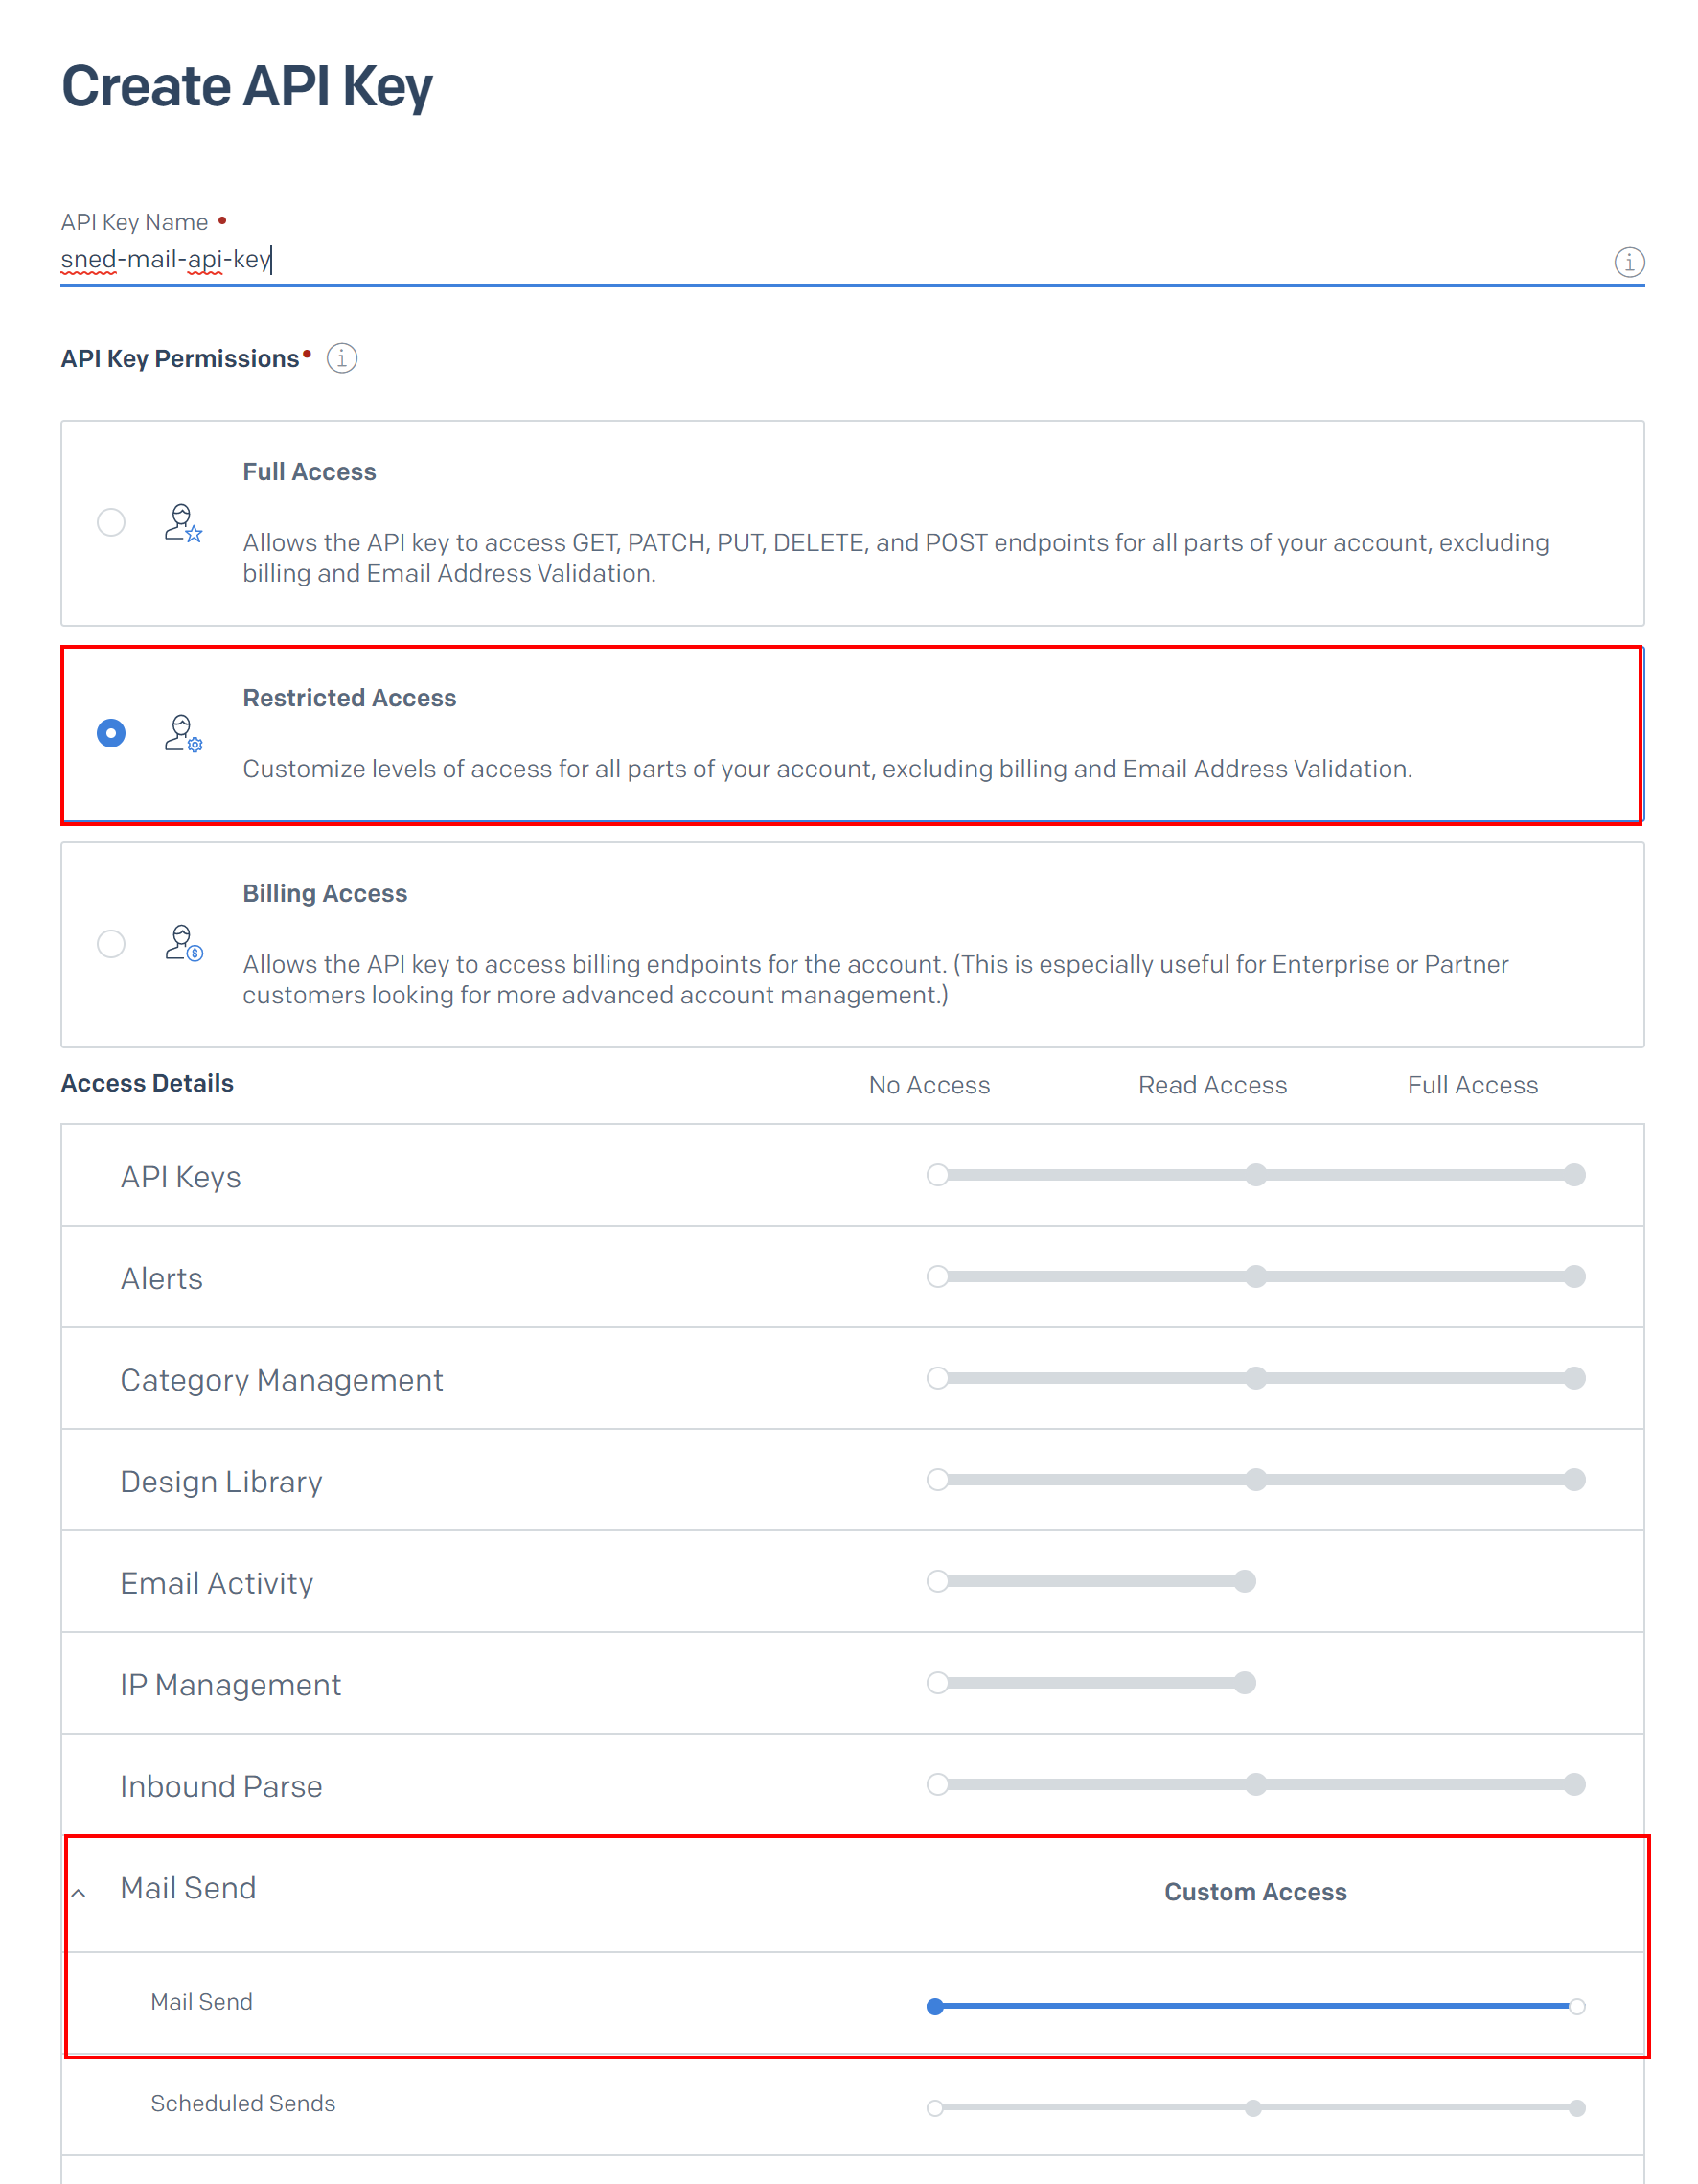
Copy generated key - we will need it soon.
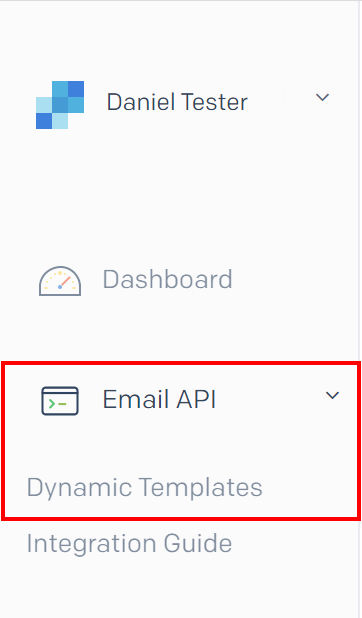
Add HTML email template
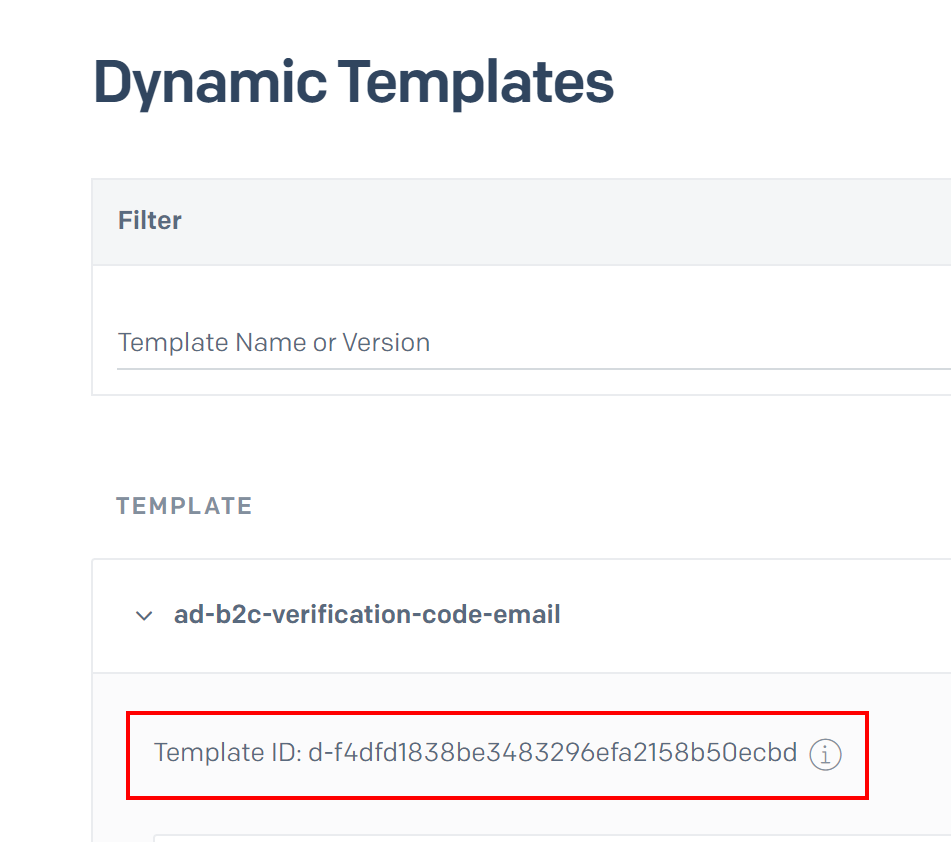
The last step is to add HTML email template that will be used to send customized emails from the Azure AD B2C. Under Email API, select Dynamic Templates:
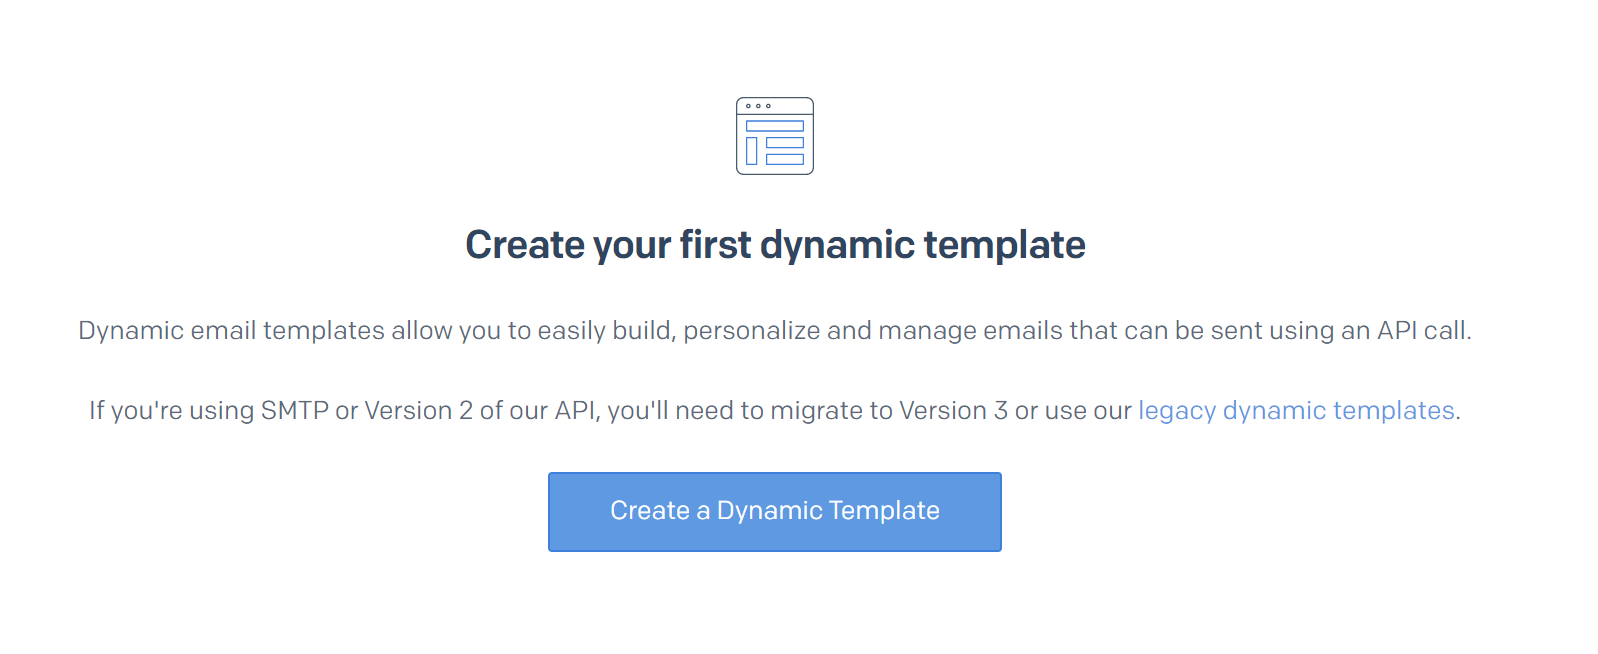
Then select Create a Dynamic Template button:
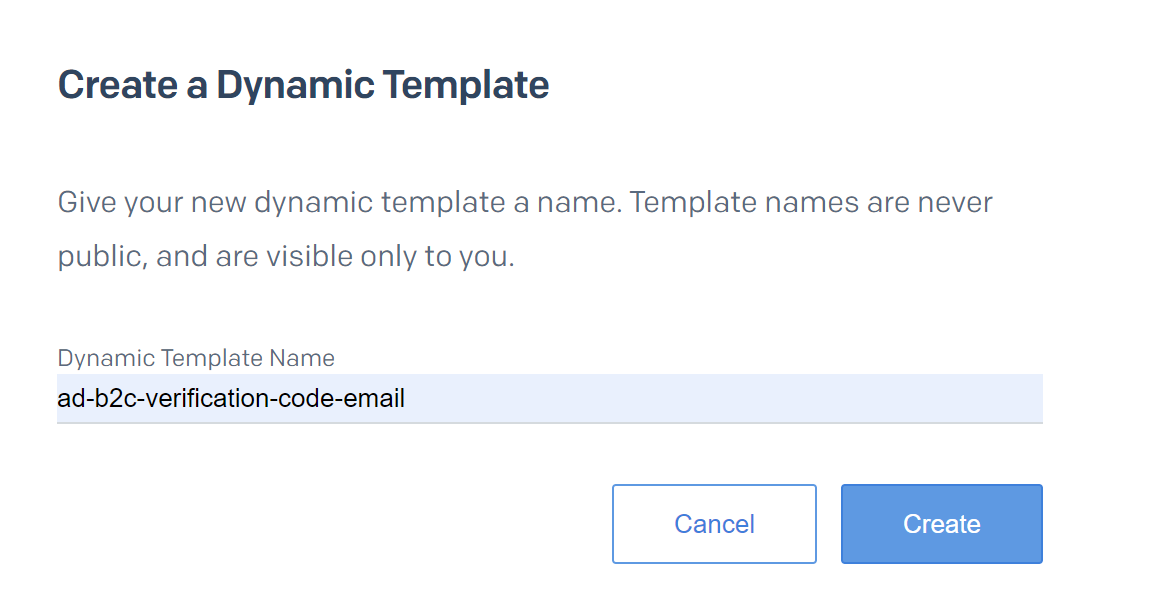
Type the name of the template and click Create button:
Newly created template will have an ID assigned. Copy it because we will need it later in the AD B2C custom policies code:
Click Add version button, then select Blank template, then select Code editor. After few seconds, there should be HTML editor displayed:
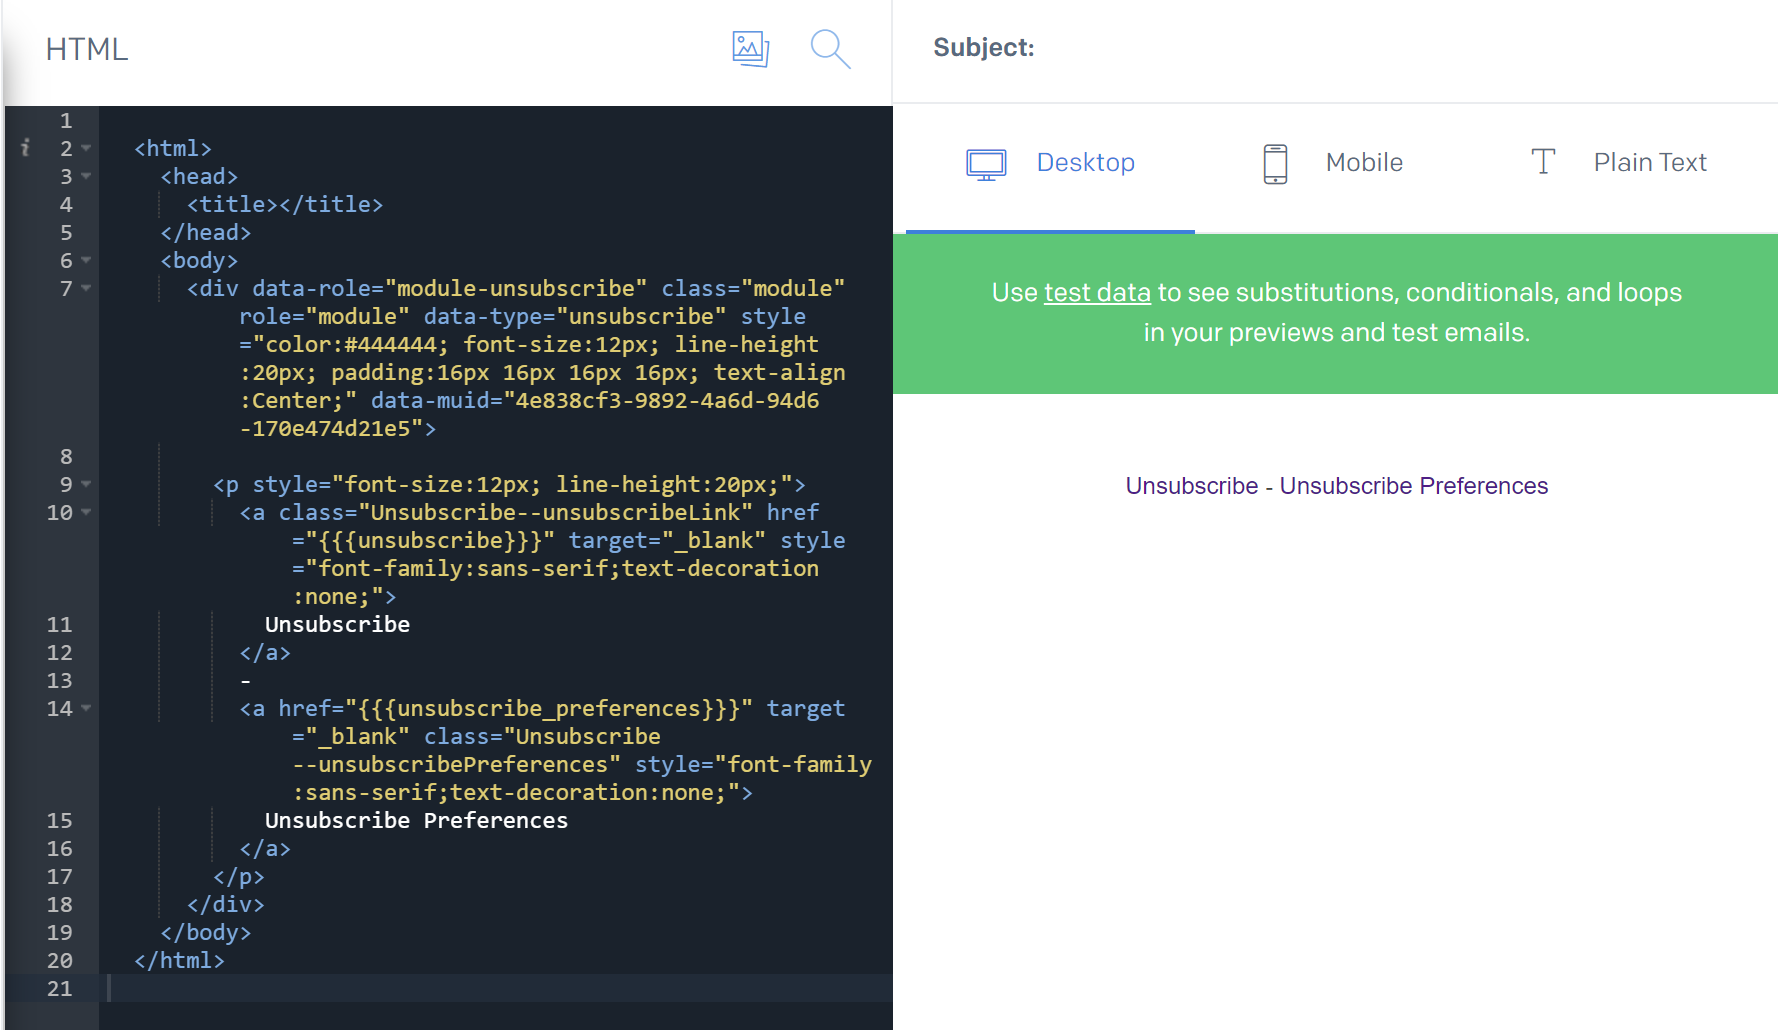
You can replace the existing code with the one I published on my GitHub:
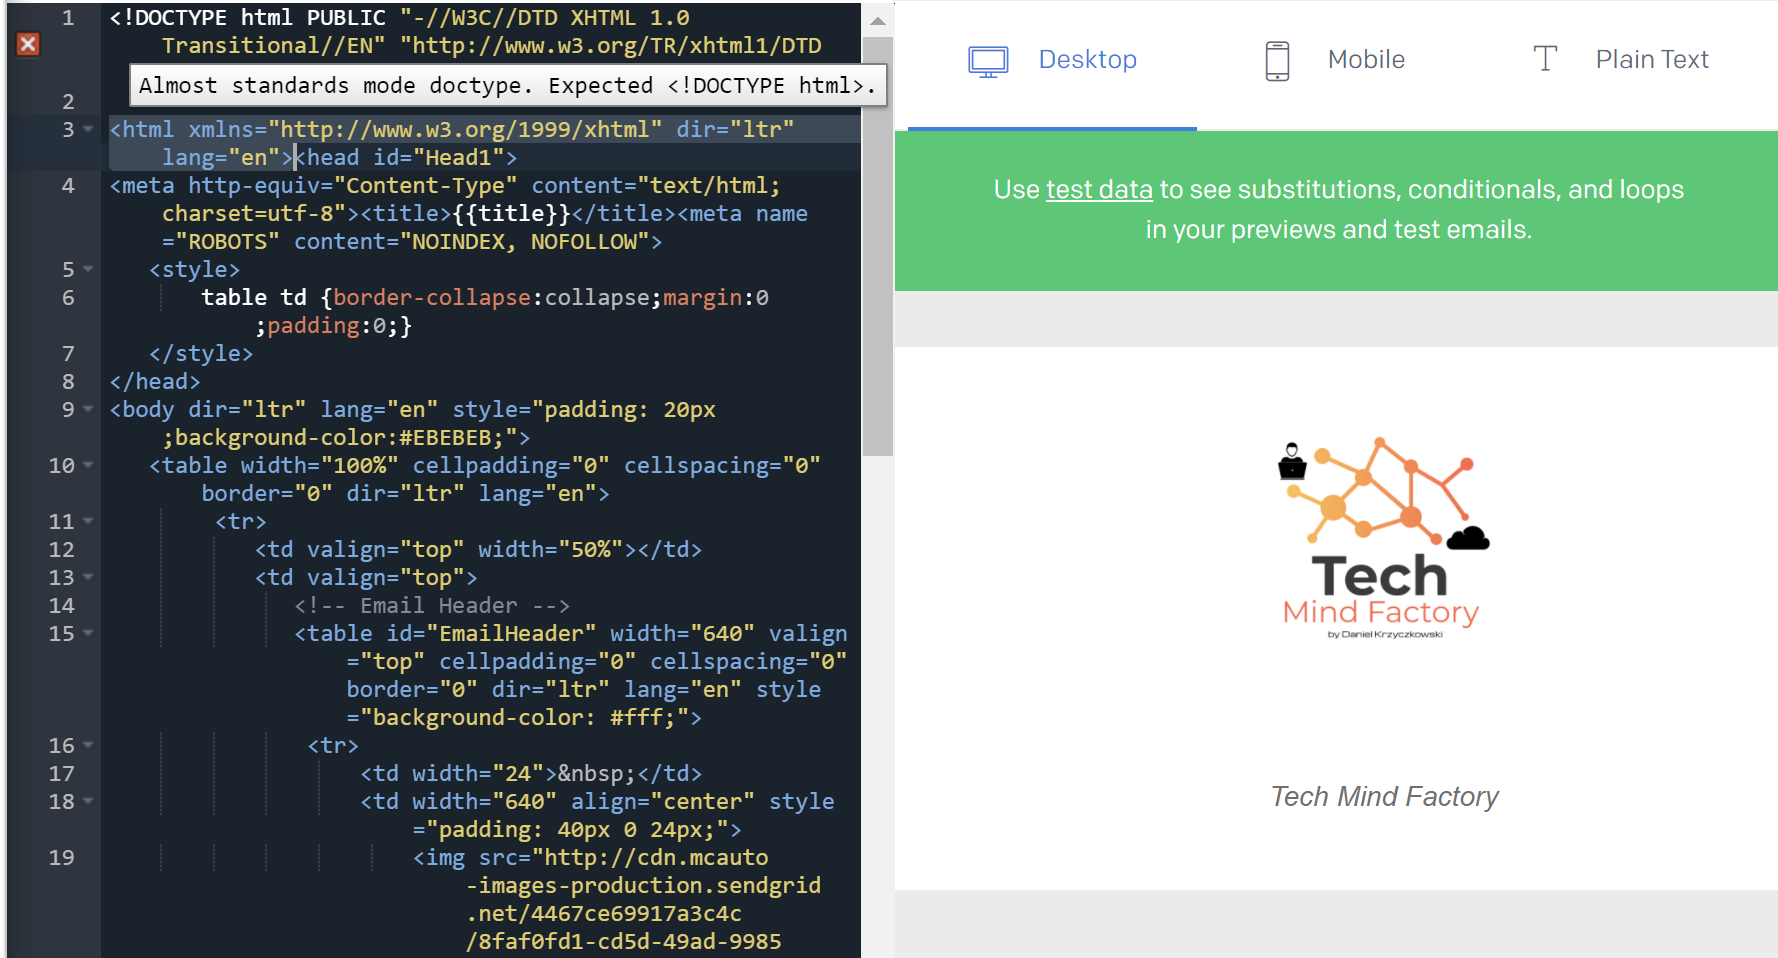
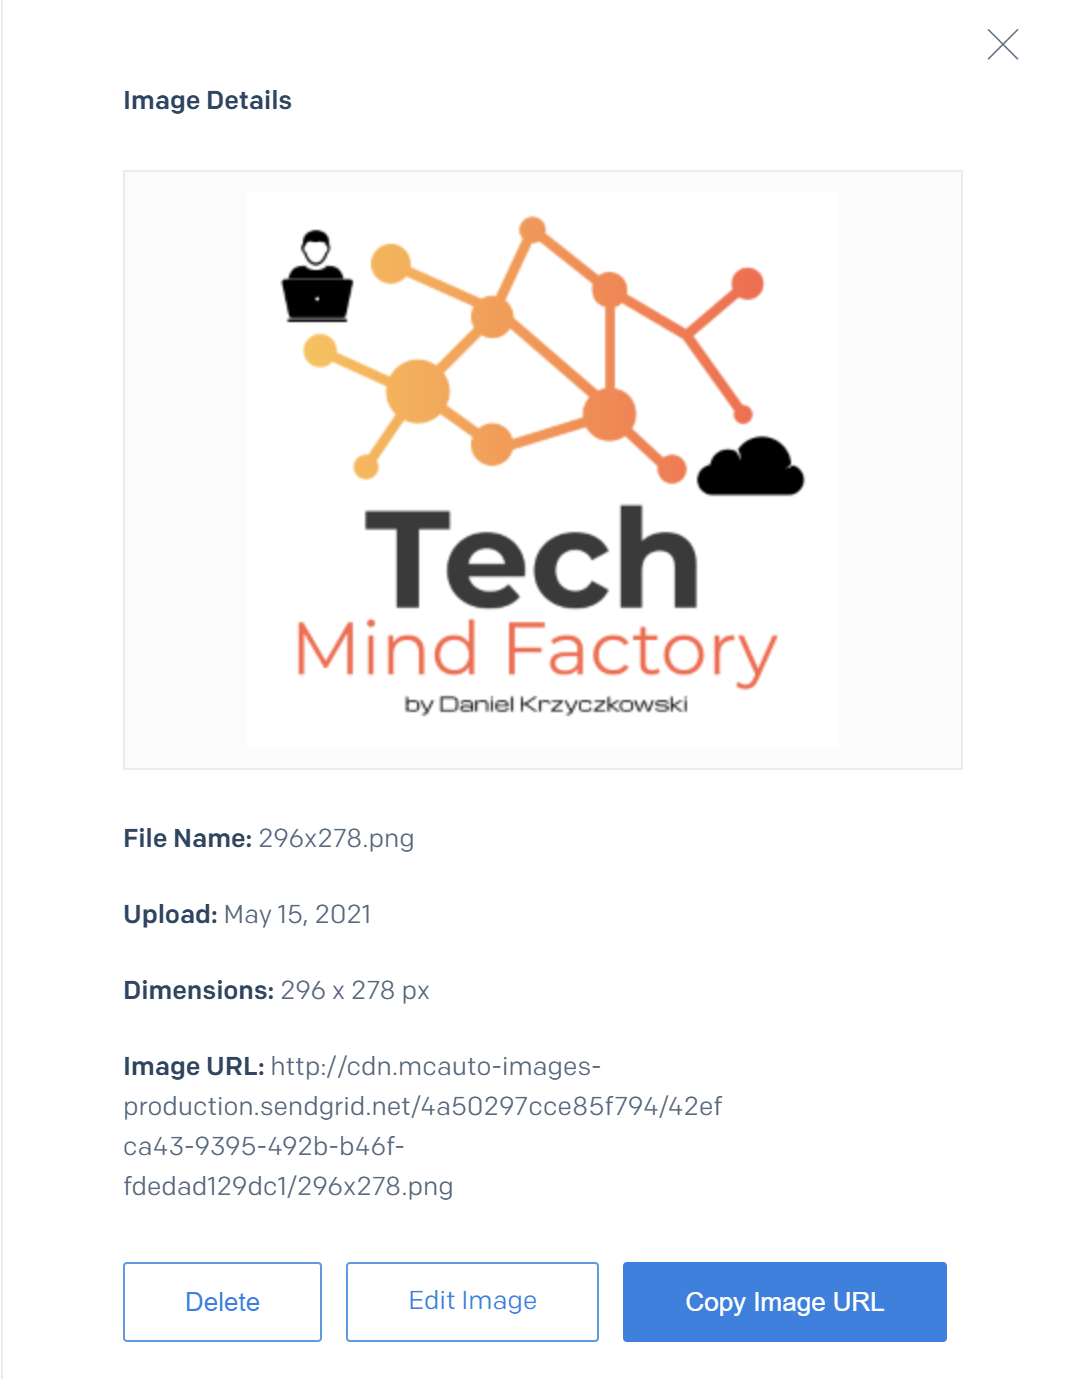
You can also upload your own images using image icon above the HTML editor. Once you upload the image it will have own URL assigned:
Please note that in the template code we use parameters. Parameters are injected once we send HTTP request to SendGrid API from the Azure AD B2C using * convention:

The same applied to subject value:
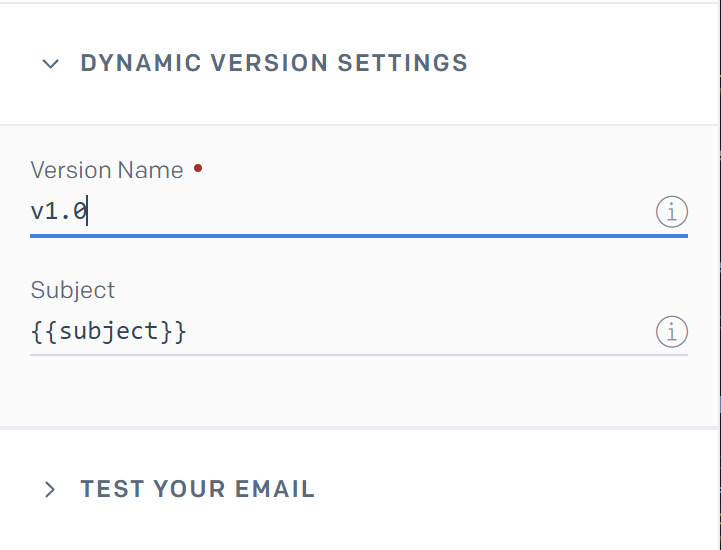
Once all changes are applied, we can click Save button at the top of the editor page.
Azure AD B2C custom policies setup
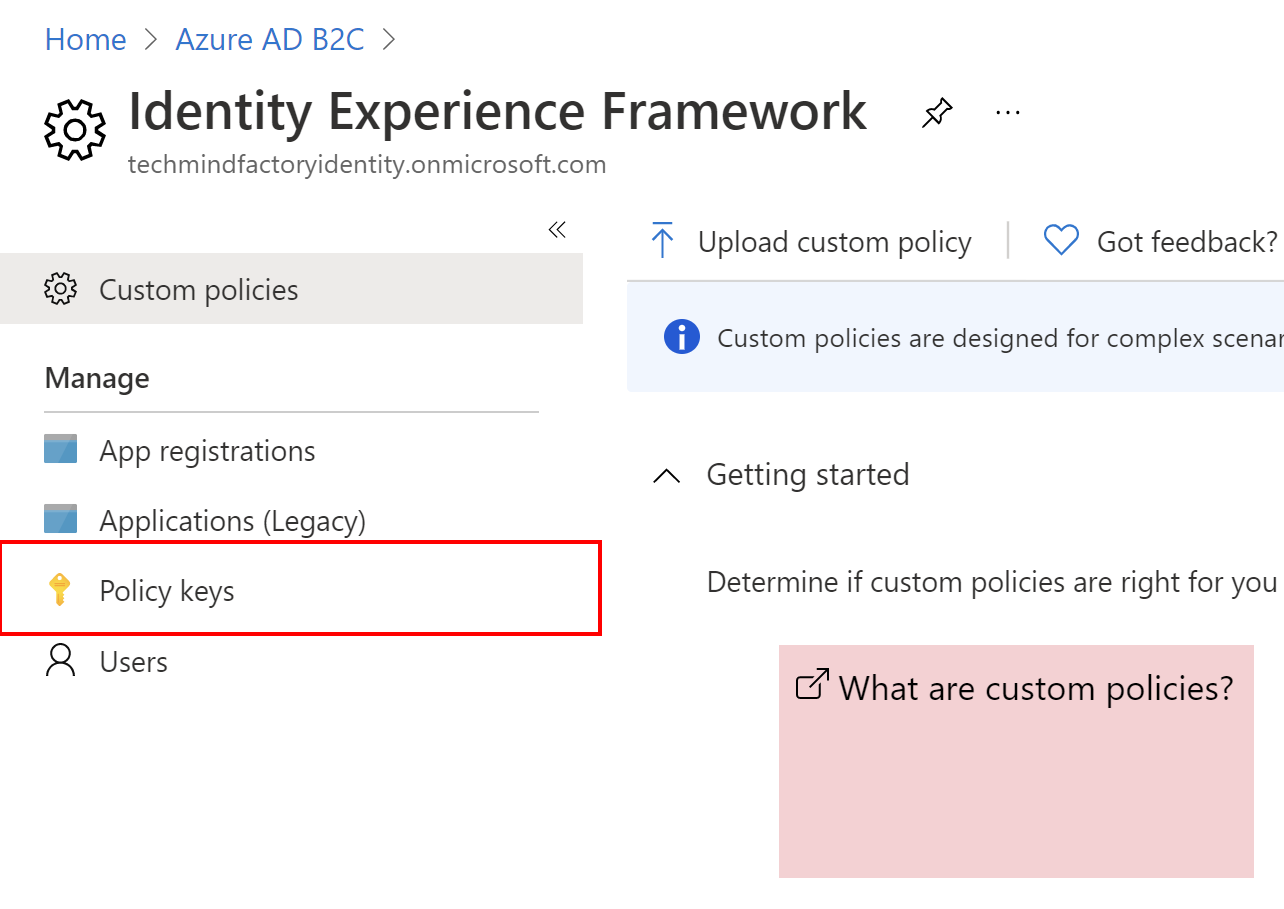
Now we can focus on the Azure AD B2C integration part. First, we have to save the key generated above as Policy key in the Azure AD B2C Identity Experience Framework management blade.
Save SendGrid key in the Azure AD B2C
From the left bar select Policy keys, then click + Add button. Then type SendGridSecret as a name and from the Options select Manual. Paste key value from SendGrid in the Secret field:
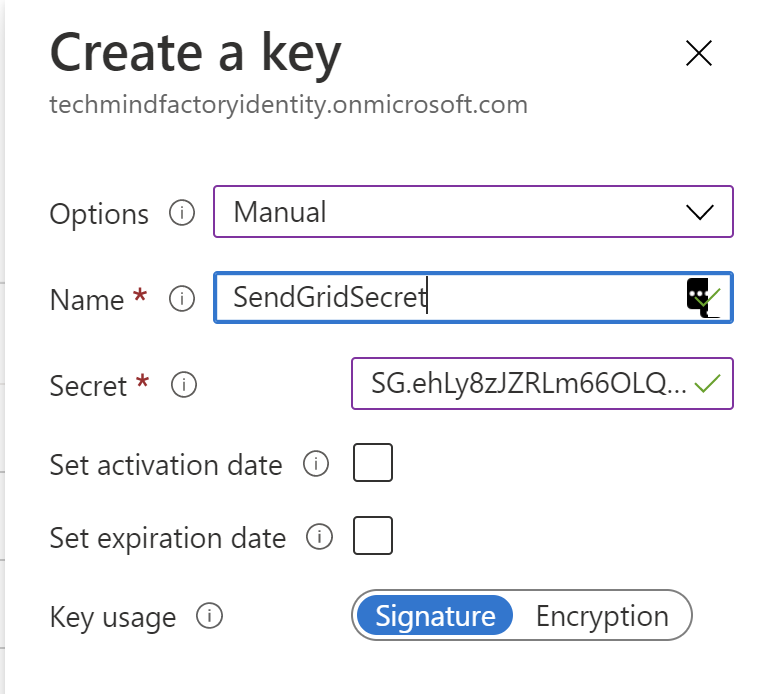
Once you click Create button, the secret should be saved and displayed on the list.
Custom policies configuration
Once we have the SendGrid key added as a key in the Azure AD B2C, we can modify the custom policy code to use SendGrid when sending verification email with code from the Azure AD B2C.
Below I will explain the code of the TrustFrameworkBase policy. You can check the details on my GitHub where I published all custom policies used in this project.
Setup claims
We need below claims to be added to the polocy code to generate and verify the email address using a one-time password (OTP) code:
      <ClaimType Id="Otp">
        <DisplayName>One-time password</DisplayName>
        <DataType>string</DataType>
      </ClaimType>
      <ClaimType Id="emailRequestBody">
        <DisplayName>SendGrid request body</DisplayName>
        <DataType>string</DataType>
      </ClaimType>
      <ClaimType Id="VerificationCode">
        <DisplayName>Verification Code</DisplayName>
        <DataType>string</DataType>
        <UserHelpText>Enter your email verification code</UserHelpText>
        <UserInputType>TextBox</UserInputType>
      </ClaimType>
      <ClaimType Id="subject">
        <DisplayName>Email subject</DisplayName>
        <DataType>string</DataType>
      </ClaimType>
      <ClaimType Id="message">
        <DisplayName>Email message</DisplayName>
        <DataType>string</DataType>
      </ClaimType>
      <ClaimType Id="codeIntro">
        <DisplayName>Email code introduction</DisplayName>
        <DataType>string</DataType>
      </ClaimType>
      <ClaimType Id="signature">
        <DisplayName>Email signature</DisplayName>
        <DataType>string</DataType>
      </ClaimType>
As you can see there is Otp claims (verification code that is sent), subject of the message, and message to add a customized message. Please note that you can adjust these claims and change their names if needed.
Prepare claims transformation
We need a claims transformation to output a JSON string claim that will be the body of the request sent to SendGrid API:
      <ClaimsTransformation Id="GenerateEmailRequestBody" TransformationMethod="GenerateJson">
        <InputClaims>
          <InputClaim ClaimTypeReferenceId="email" TransformationClaimType="personalizations.0.to.0.email" />
          <InputClaim ClaimTypeReferenceId="message" TransformationClaimType="personalizations.0.dynamic_template_data.message" />
          <InputClaim ClaimTypeReferenceId="subject" TransformationClaimType="personalizations.0.dynamic_template_data.subject" />
          <InputClaim ClaimTypeReferenceId="otp" TransformationClaimType="personalizations.0.dynamic_template_data.otp" />
        </InputClaims>
        <InputParameters>
          <InputParameter Id="template_id" DataType="string" Value="##sendgrid-email-template-id##" />
          <InputParameter Id="from.email" DataType="string" Value="##sendgrid-from-email##" />
        </InputParameters>
        <OutputClaims>
          <OutputClaim ClaimTypeReferenceId="emailRequestBody" TransformationClaimType="outputClaim" />
        </OutputClaims>
      </ClaimsTransformation>
As you can see, we provide otp code (personalizations.0.dynamic_template_data.otp), target email (personalizations.0.to.0.email), subject of the message (personalizations.0.dynamic_template_data.subject), and message (personalizations.0.dynamic_template_data.message”).
There are also two important input parameters:
- template_id - this is the ID of the email template we created in the SendGrid
- from.email - this is the sender email we configured above in the article (sender identity)
Replace the values in the above code.
Add localized resources
To send verification emails in different languages, we have to add LocalizedResourcesReferences section to api.localaccountsignup, and api.localaccountpasswordreset content definitions:
      <ContentDefinition Id="api.localaccountsignup">
        <LoadUri>##StorageAccountPath##/template/selfAsserted.html</LoadUri>
        <RecoveryUri>##StorageAccountPath##/template/exception.html</RecoveryUri>
        <DataUri>urn:com:microsoft:aad:b2c:elements:contract:selfasserted:2.1.2</DataUri>
        <Metadata>
          <Item Key="DisplayName">Local account sign up page</Item>
        </Metadata>
        <LocalizedResourcesReferences MergeBehavior="Prepend">
        <LocalizedResourcesReference Language="en" LocalizedResourcesReferenceId="api.custom-email.en" />
        <LocalizedResourcesReference Language="es" LocalizedResourcesReferenceId="api.custom-email.es" />
    </LocalizedResourcesReferences>
      </ContentDefinition>
      <ContentDefinition Id="api.localaccountpasswordreset">
        <LoadUri>##StorageAccountPath##/template/selfAsserted.html</LoadUri>
        <RecoveryUri>##StorageAccountPath##/template/exception.html</RecoveryUri>
        <DataUri>urn:com:microsoft:aad:b2c:elements:contract:selfasserted:2.1.2</DataUri>
        <Metadata>
          <Item Key="DisplayName">Local account change password page</Item>
        </Metadata>
      <LocalizedResourcesReferences MergeBehavior="Prepend">
        <LocalizedResourcesReference Language="en" LocalizedResourcesReferenceId="api.custom-email.en" />
        <LocalizedResourcesReference Language="es" LocalizedResourcesReferenceId="api.custom-email.es" />
      </LocalizedResourcesReferences>
      </ContentDefinition>
You have to also enable localization:
    <Localization Enabled="true">
      <SupportedLanguages DefaultLanguage="en" MergeBehavior="Append">
        <SupportedLanguage>en</SupportedLanguage>
        <SupportedLanguage>es</SupportedLanguage>
      </SupportedLanguages>
      <LocalizedResources Id="api.custom-email.en">
        <LocalizedStrings>
          <!--Email template parameters-->
          <LocalizedString ElementType="GetLocalizedStringsTransformationClaimType" StringId="email_subject">Tech Mind Factory - please verify your account</LocalizedString>
          <LocalizedString ElementType="GetLocalizedStringsTransformationClaimType" StringId="email_message">Verification is required to register your account, here is your code:</LocalizedString>
        </LocalizedStrings>
      </LocalizedResources>
      <LocalizedResources Id="api.custom-email.es">
        <LocalizedStrings>
          <!--Email template parameters-->
          <LocalizedString ElementType="GetLocalizedStringsTransformationClaimType" StringId="email_subject">Tech Mind Factory - por favor, verifique su cuenta</LocalizedString>
          <LocalizedString ElementType="GetLocalizedStringsTransformationClaimType" StringId="email_message">Se requiere verificación para registrar su cuenta, aquí está su código: </LocalizedString>
        </LocalizedStrings>
      </LocalizedResources>
    </Localization>
As you can see I provided translations for the email subject and message.
Add display control for the OTP
A verification display control is used to verify the email address with a verification code that’s sent to the user:
    <DisplayControls>
      <!-- Sign Up email verification -->
      <DisplayControl Id="signUpEmailVerification" UserInterfaceControlType="VerificationControl">
        <DisplayClaims>
          <DisplayClaim ClaimTypeReferenceId="email" Required="true" />
          <DisplayClaim ClaimTypeReferenceId="verificationCode" ControlClaimType="VerificationCode" Required="true" />
        </DisplayClaims>
        <OutputClaims>
          <OutputClaim ClaimTypeReferenceId="email" />
        </OutputClaims>
        <Actions>
          <Action Id="SendCode">
            <ValidationClaimsExchange>
              <ValidationClaimsExchangeTechnicalProfile TechnicalProfileReferenceId="GenerateOtp" />
              <ValidationClaimsExchangeTechnicalProfile TechnicalProfileReferenceId="SendOtp" />
            </ValidationClaimsExchange>
          </Action>
          <Action Id="VerifyCode">
            <ValidationClaimsExchange>
              <ValidationClaimsExchangeTechnicalProfile TechnicalProfileReferenceId="VerifyOtp" />
            </ValidationClaimsExchange>
          </Action>
        </Actions>
      </DisplayControl>
As you can see above, this control uses two ValidationClaimsExchangeTechnicalProfiles - first to generate OTP code and the second to send OTP code to the right person. You have to add reference to this control in the LocalAccountSignUpWithLogonEmail technical profile:
<DisplayClaims>
            <DisplayClaim DisplayControlReferenceId="signUpEmailVerification" />  <----------------------------------
            <DisplayClaim ClaimTypeReferenceId="displayName" Required="true" />
            <DisplayClaim ClaimTypeReferenceId="givenName" Required="true" />
            <DisplayClaim ClaimTypeReferenceId="surName" Required="true" />
            <DisplayClaim ClaimTypeReferenceId="newPassword" Required="true" />
            <DisplayClaim ClaimTypeReferenceId="reenterPassword" Required="true" />
          </DisplayClaims>
Add technical profiles to generate OTP and send it
We need technical profiles to generate OTP and call SendGrid API. Below you can see two technical profiles used by display control described above:
    <ClaimsProvider>
      <DisplayName>One time password technical profiles</DisplayName>
      <TechnicalProfiles>
        <TechnicalProfile Id="GenerateOtp">
          <DisplayName>Generate one time password</DisplayName>
          <Protocol Name="Proprietary" Handler="Web.TPEngine.Providers.OneTimePasswordProtocolProvider, Web.TPEngine, Version=1.0.0.0, Culture=neutral, PublicKeyToken=null" />
          <Metadata>
            <Item Key="Operation">GenerateCode</Item>
            <Item Key="CodeExpirationInSeconds">60</Item>
            <Item Key="CodeLength">6</Item>
            <Item Key="CharacterSet">0-9</Item>
            <Item Key="ReuseSameCode">true</Item>
            <Item Key="MaxNumAttempts">2</Item>
          </Metadata>
          <InputClaims>
            <InputClaim ClaimTypeReferenceId="email" PartnerClaimType="identifier" />
          </InputClaims>
          <OutputClaims>
            <OutputClaim ClaimTypeReferenceId="otp" PartnerClaimType="otpGenerated" />
          </OutputClaims>
        </TechnicalProfile>
        <TechnicalProfile Id="VerifyOtp">
          <DisplayName>Verify one time password</DisplayName>
          <Protocol Name="Proprietary" Handler="Web.TPEngine.Providers.OneTimePasswordProtocolProvider, Web.TPEngine, Version=1.0.0.0, Culture=neutral, PublicKeyToken=null" />
          <Metadata>
            <Item Key="Operation">VerifyCode</Item>
          </Metadata>
          <InputClaims>
            <InputClaim ClaimTypeReferenceId="email" PartnerClaimType="identifier" />
            <InputClaim ClaimTypeReferenceId="verificationCode" PartnerClaimType="otpToVerify" />
          </InputClaims>
        </TechnicalProfile>
      </TechnicalProfiles>
    </ClaimsProvider>
    <ClaimsProvider>
      <DisplayName>RestfulProvider</DisplayName>
      <TechnicalProfiles>
        <TechnicalProfile Id="SendOtp">
          <DisplayName>Use SendGrid's email API to send the code the the user</DisplayName>
          <Protocol Name="Proprietary" Handler="Web.TPEngine.Providers.RestfulProvider, Web.TPEngine, Version=1.0.0.0, Culture=neutral, PublicKeyToken=null" />
          <Metadata>
            <Item Key="ServiceUrl">https://api.sendgrid.com/v3/mail/send</Item>
            <Item Key="AuthenticationType">Bearer</Item>
            <Item Key="SendClaimsIn">Body</Item>
            <Item Key="ClaimUsedForRequestPayload">emailRequestBody</Item>
          </Metadata>
          <CryptographicKeys>
            <Key Id="BearerAuthenticationToken" StorageReferenceId="B2C_1A_SendGridSecret" />
          </CryptographicKeys>
          <InputClaimsTransformations>
            <InputClaimsTransformation ReferenceId="GenerateEmailRequestBody" />
          </InputClaimsTransformations>
          <InputClaims>
            <InputClaim ClaimTypeReferenceId="emailRequestBody" />
          </InputClaims>
        </TechnicalProfile>
      </TechnicalProfiles>
    </ClaimsProvider>
As you can see, the first technical profile is responsible for OTP generation. The second one is used to call SendGrid API to send a customized email with OTP.
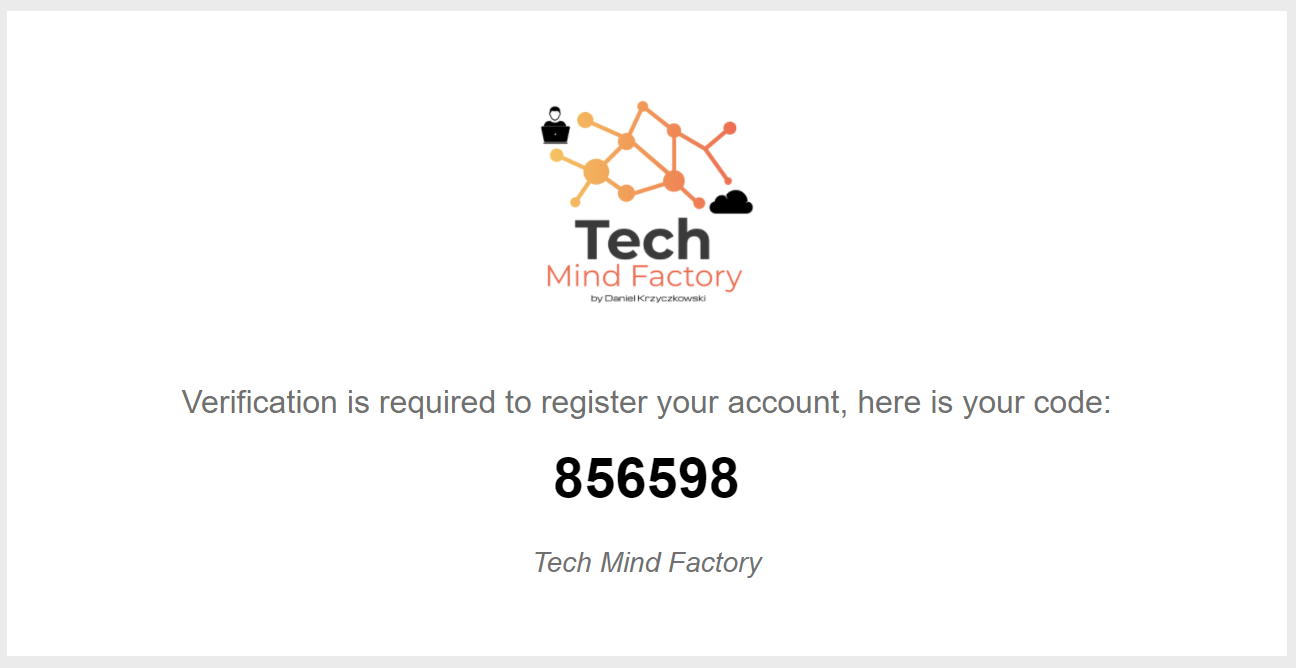
Test customized email
Once you upload custom policies files, try to register. Provide email and click verify button. You should receive customized verification email:
Summary
In this article, we discovered how to use Azure AD B2C together with the Twilio SendGrid service to send customized verification emails. Please note that you can integrate Azure AD B2C with any mailing service (like Salesforce Marketing Cloud) if one has REST API available.