Cars Island Azure Functions - integration with SendGrid - part 7

Introduction
In my first article, I introduced you to Cars Island car rental on the Azure cloud. I created this fake project to present how to use different Microsoft Azure cloud services and how to their SDKs. I also presented what will be covered in the next articles. Here is the next article from the series where I would like to discuss how to integrate with Azure Twilio SendGrid service in the Azure Function App project.
In the Cars Island solution, Azure Twilio SendGrid service is used to send car reservation confirmation emails to customers. Below I present solution architecture:
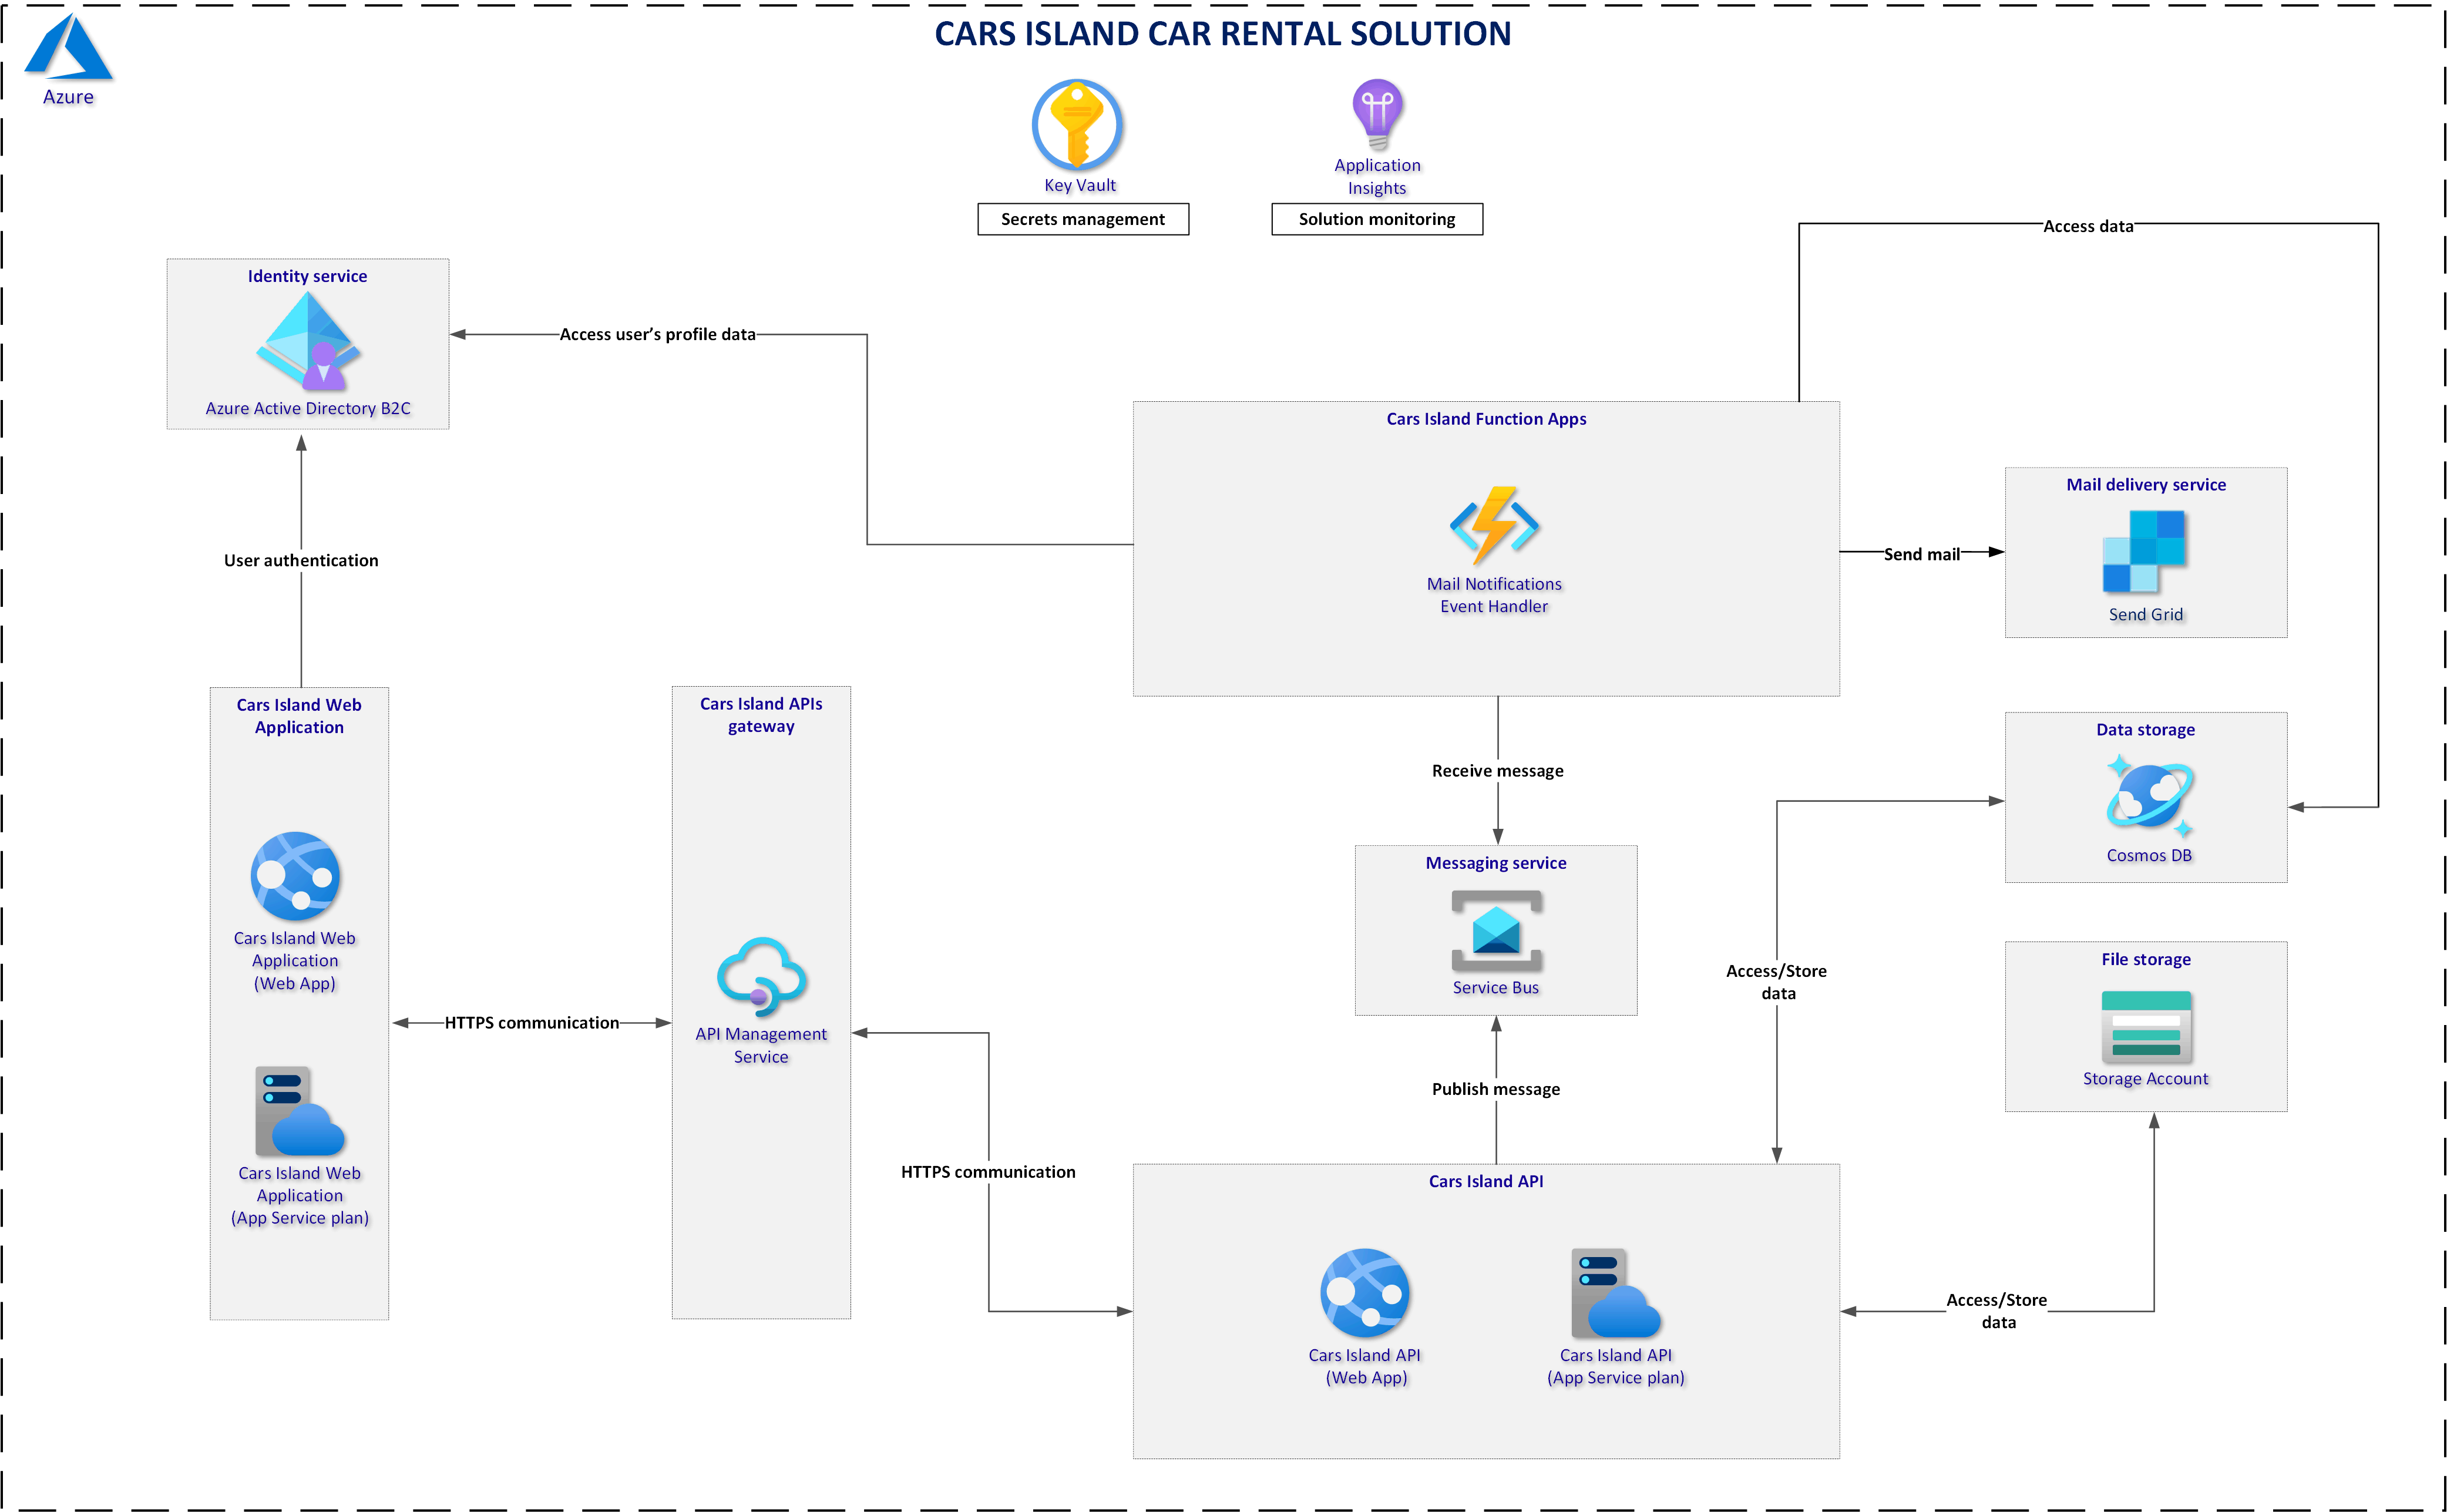
Once the new reservation is created, a new message is added to the Azure Service Bus Queue. Then, Mail Notifications Event Handler Function App is triggered and a new confirmation email is sent using SendGrid.
Cars Island project is available on my GitHub
Azure Twilio SendGrid setup
Azure Twilio SendGrid service enables sending emails with customized templates (using HTML and CSS). First of all, service has to be created from the Azure Marketplace. Here is the step-by-step guide on how to create SendGrid.
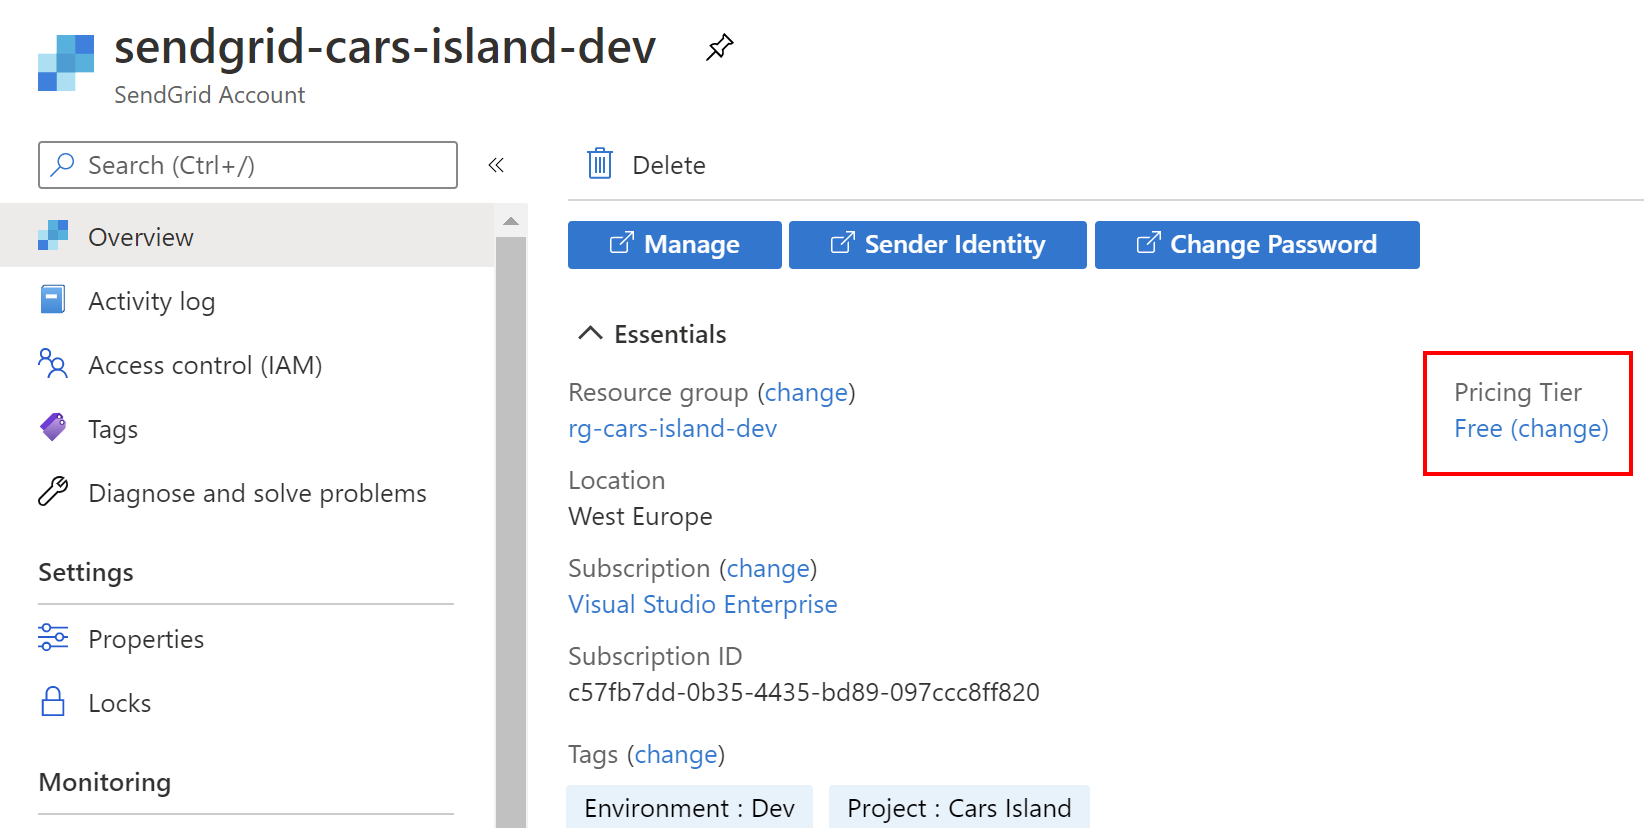
Some time ago I have noticed that Free pricing tier is not available anymore to be selected in the Azure portal. I made small research and I was able to create SendGrid with Free tier using ARM templates. Here is the line in the ARM template responsible for creating SendGrid with Free plan.
Important
Once you run the ARM template I mentioned above there will be an error returned related to terms and conditions acceptance for Azure subscription where you want to provision Azure Twilo SendGrid service. To accept terms and conditions and enable Free tier, use below Azure CLI script, once you sign in to your Azure account:
az account set --subscription <<subscription ID>>

az vm image accept-terms --publisher sendgrid --offer sendgrid_azure --plan free
After executing the script, there will be below information displayed. It is important to check if new command is available:
This command has been deprecated and will be removed in version ‘3.0.0’. Use ‘az vm image terms accept’ instead.
Once service is created, you can see that Free tier is applied in the Azure portal:
Azure Twilio SendGrid Management Portal
Once SendGrid is created, we can access its dashboard directly from the Azure portal using Manage button from the Overview tab.
Create sender identity
First of all, we have to setup Sender identity. SendGrid offers two approaches: Domain Authentication and Single Sender Verification:
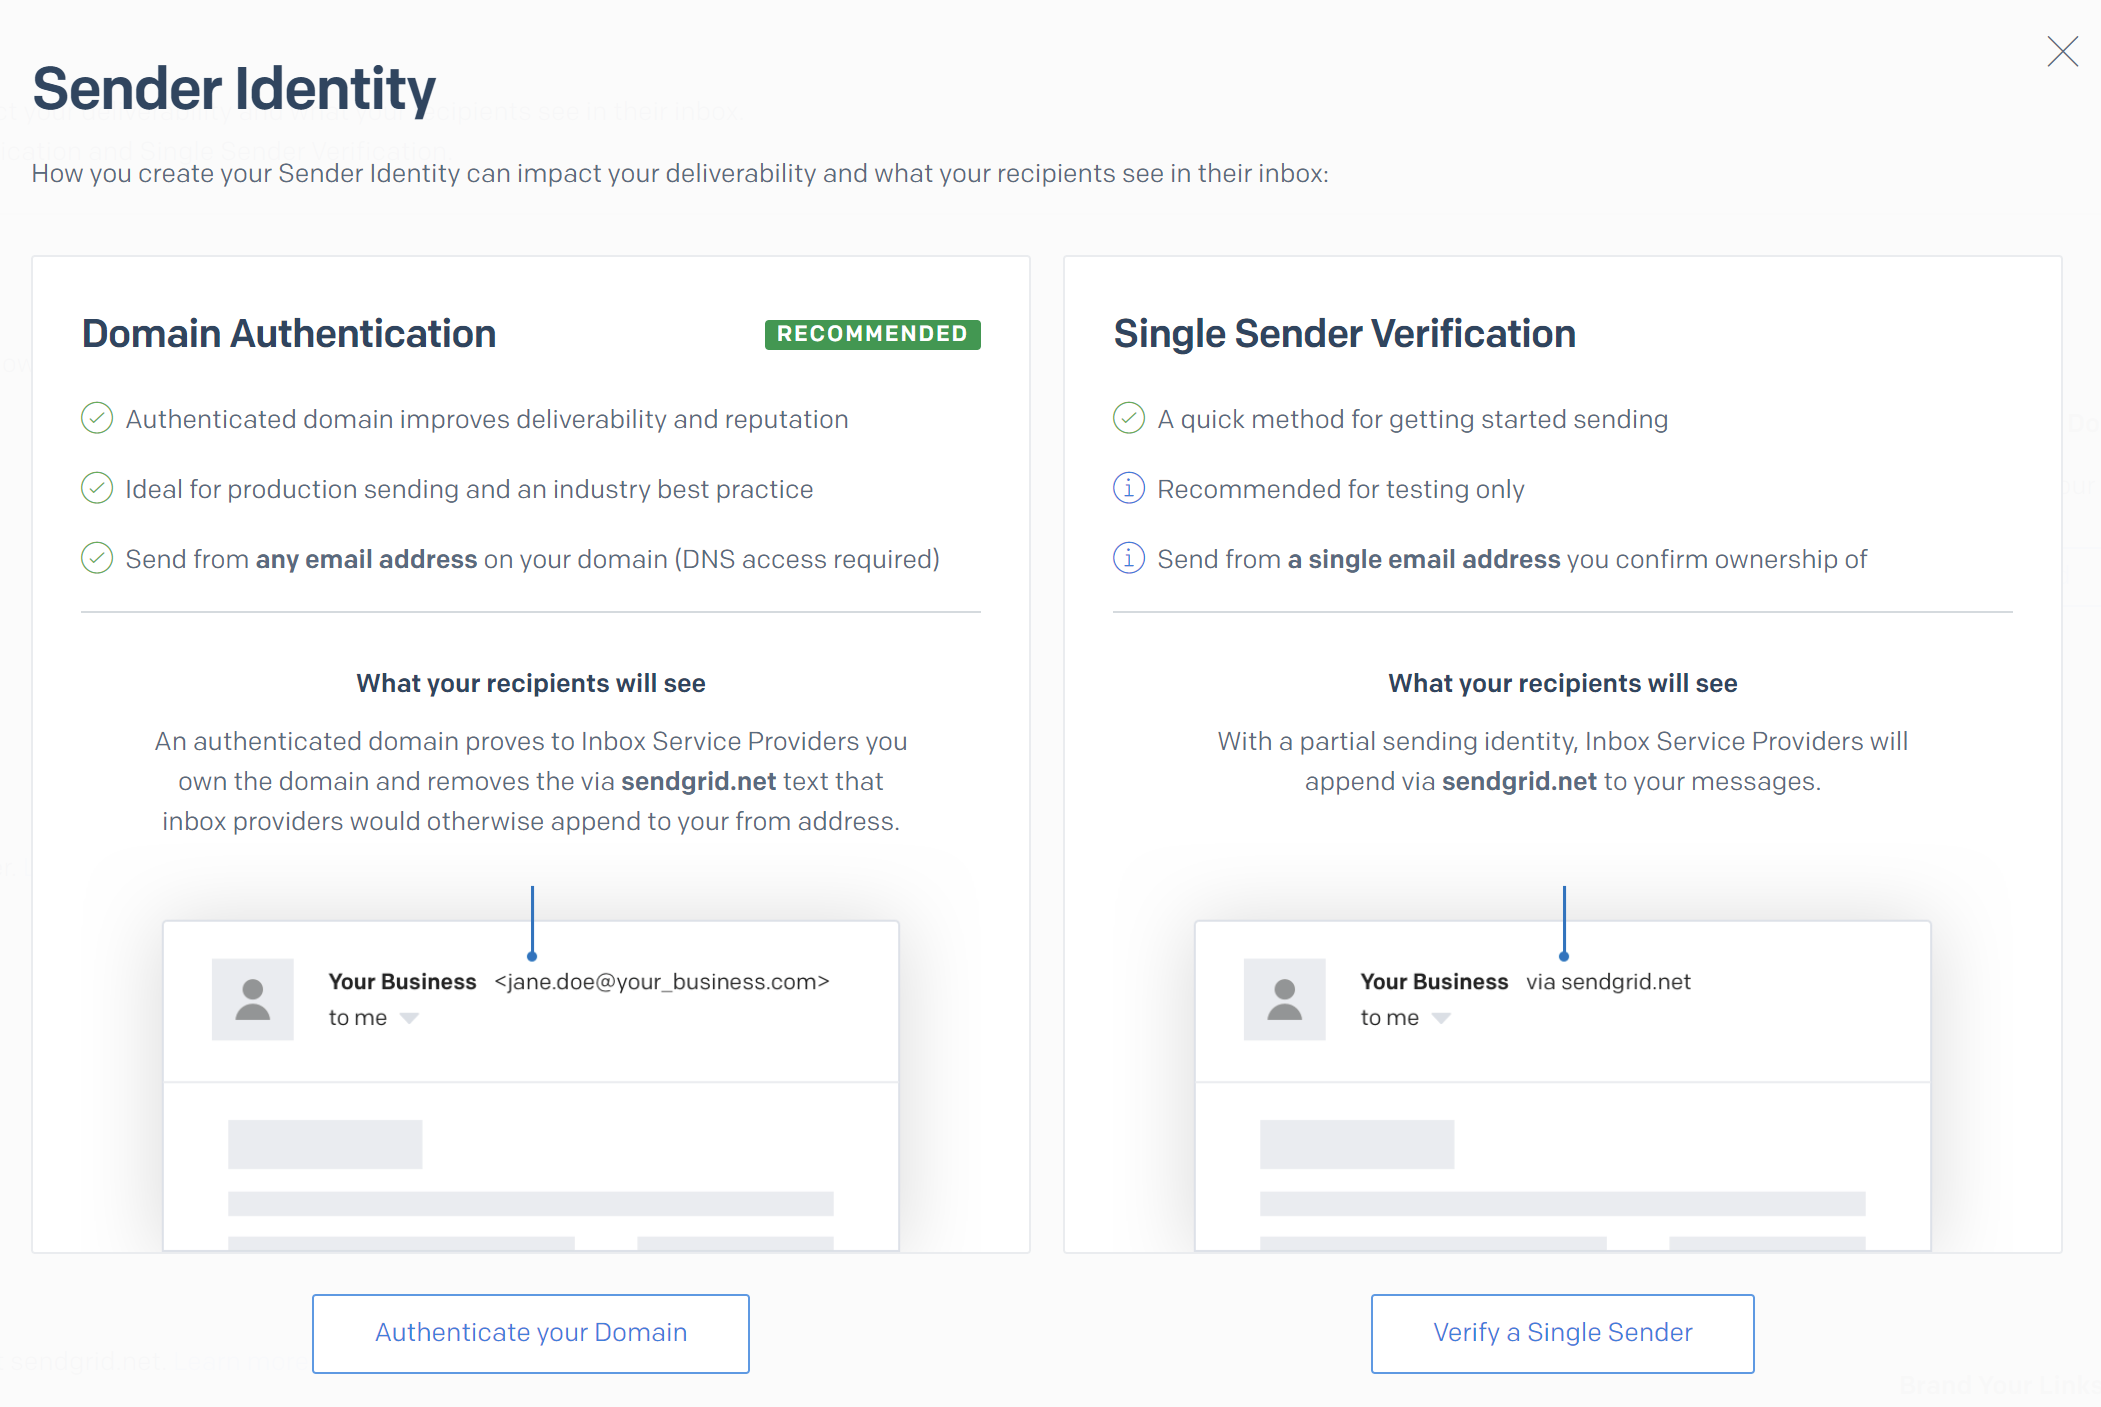
In the Cars Island project, I used Single Sender Verification approach because it was simple and fast for development. For the production solutions you should use Domain Authentication. If you want to learn more about Domain Authentication, please check this official documentation.
Generate API key with permission for sending emails
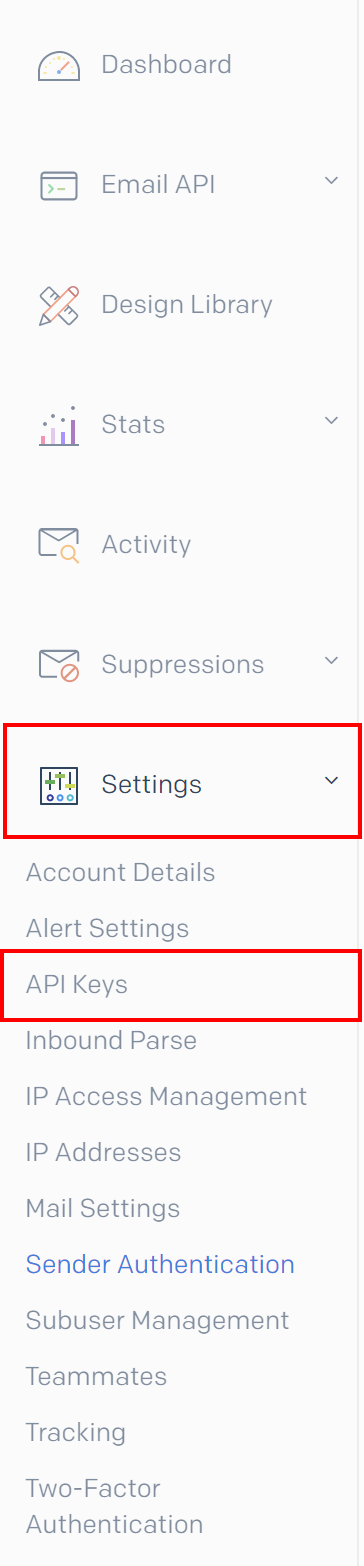
Next step is to generate key with the right permission. To be more specific, we need send email permission. In the SendGrid dasboard, uder Settings section, we have to select API Keys:
Then click “Create API Key* button, then select Restricted Access and enable Mail Send permission:
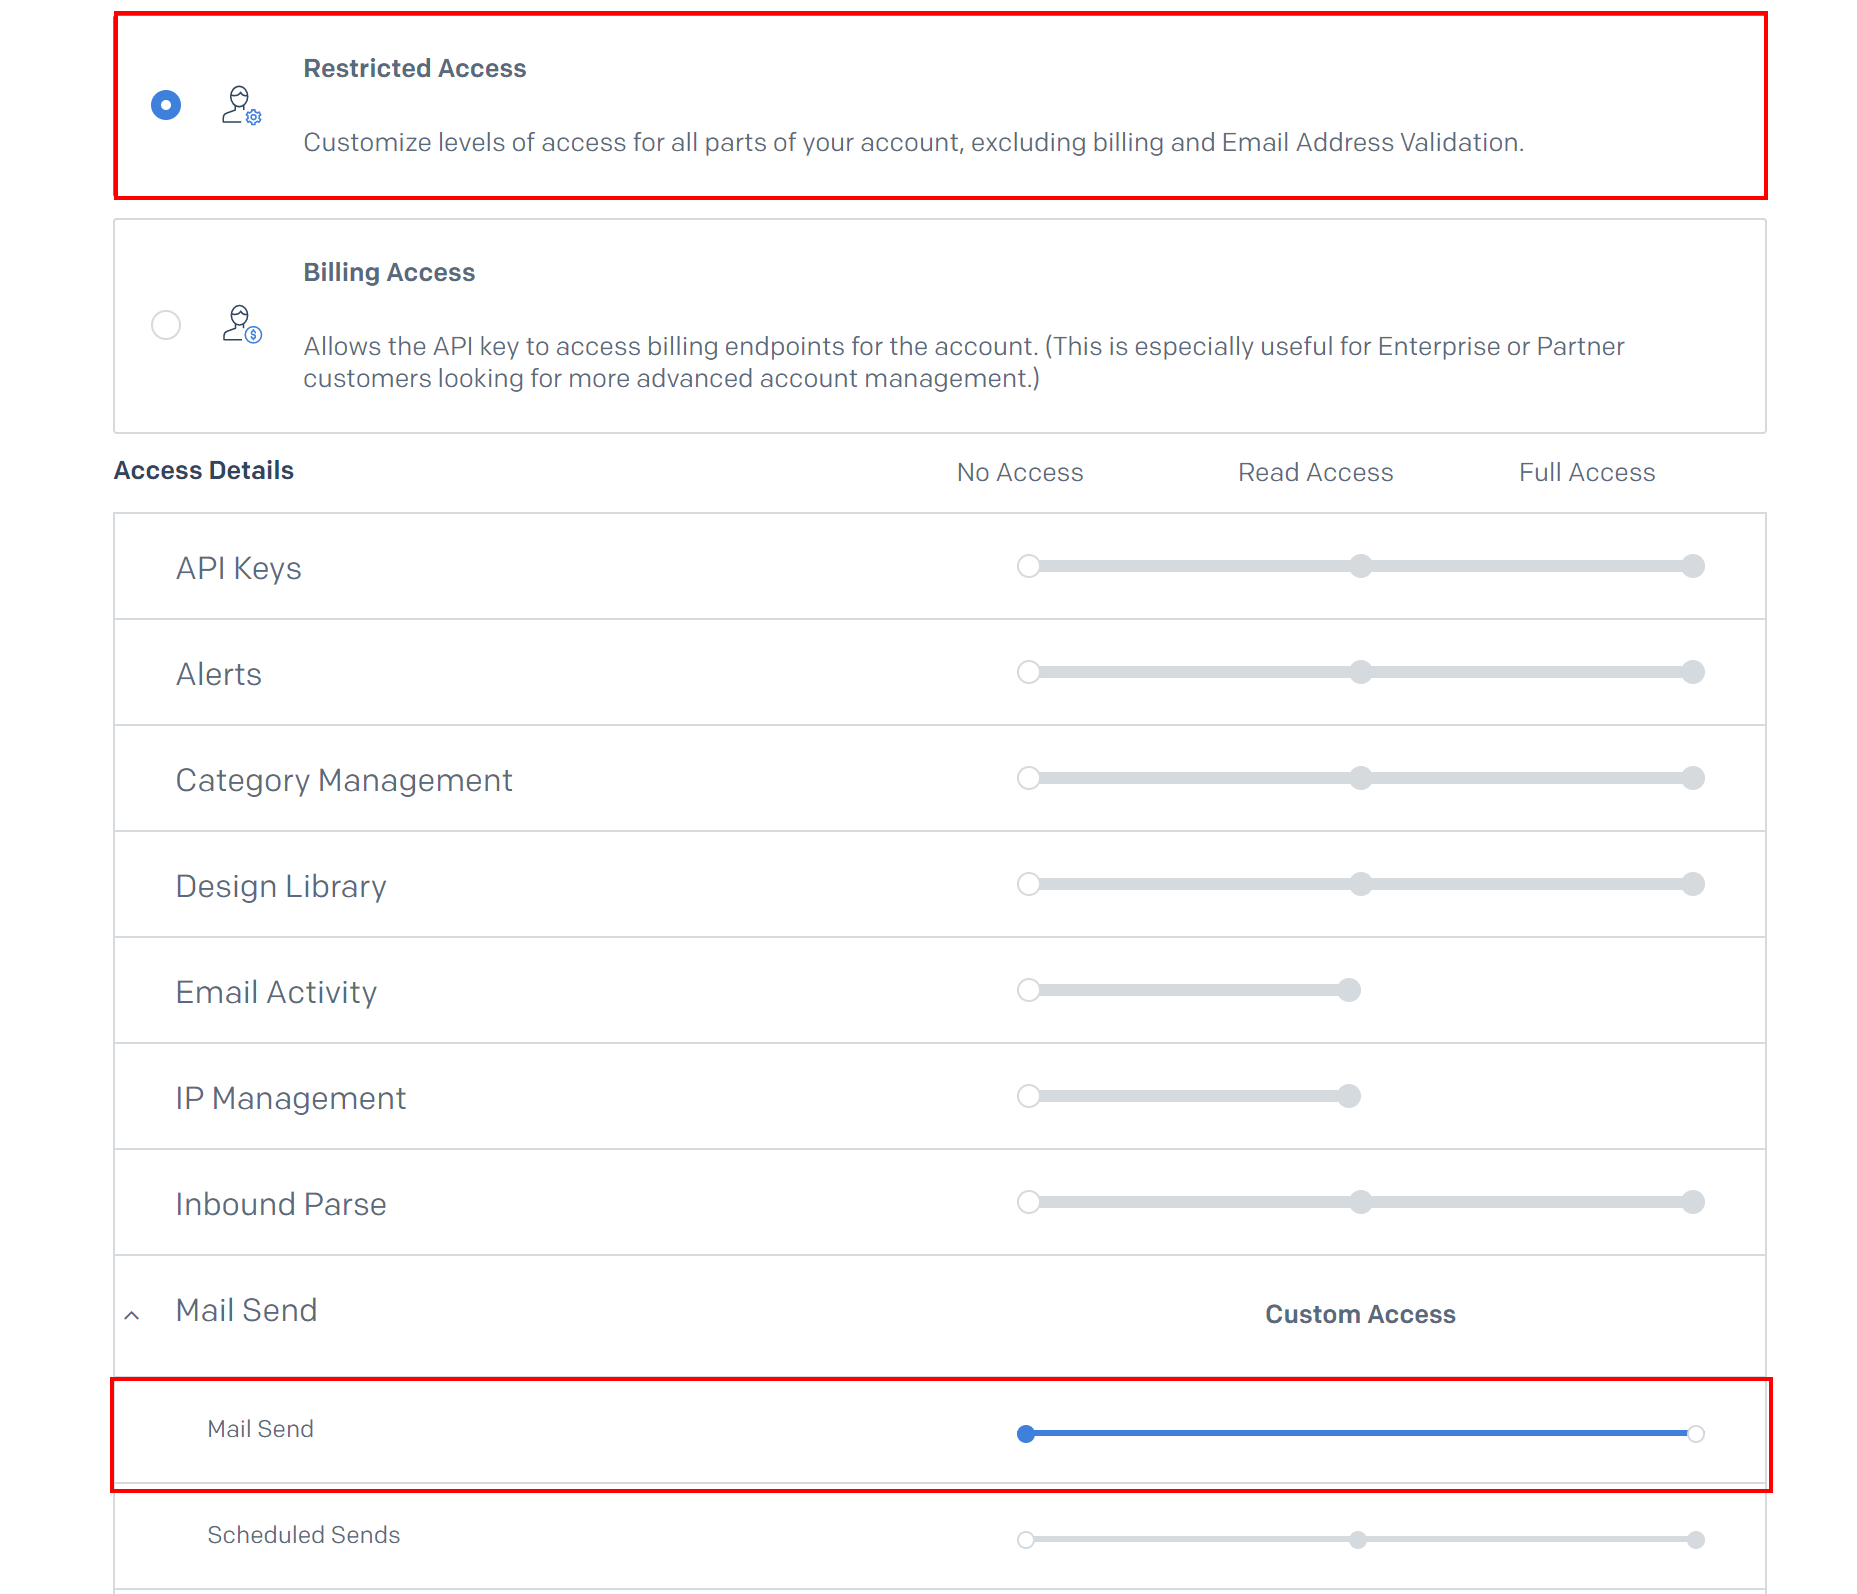
Once permissions are set, click Create & View button to display the key. Save it, because it will not be visible anymore. We need this key to be used in the Azure Function with SendGrid SDK.
Setup email template
Last step is to setup email HTML template. From the SendGrid dashboard, select Email API from the left and then Dynamic Templates. Click Create a Dynamic Template. Next, type the name of the template and click Create button. Once template is created, click Add Version, and select Blank template. Then use Code Editor. Then you can edit HTML template. I added Cars Island template to my GitHub repository:
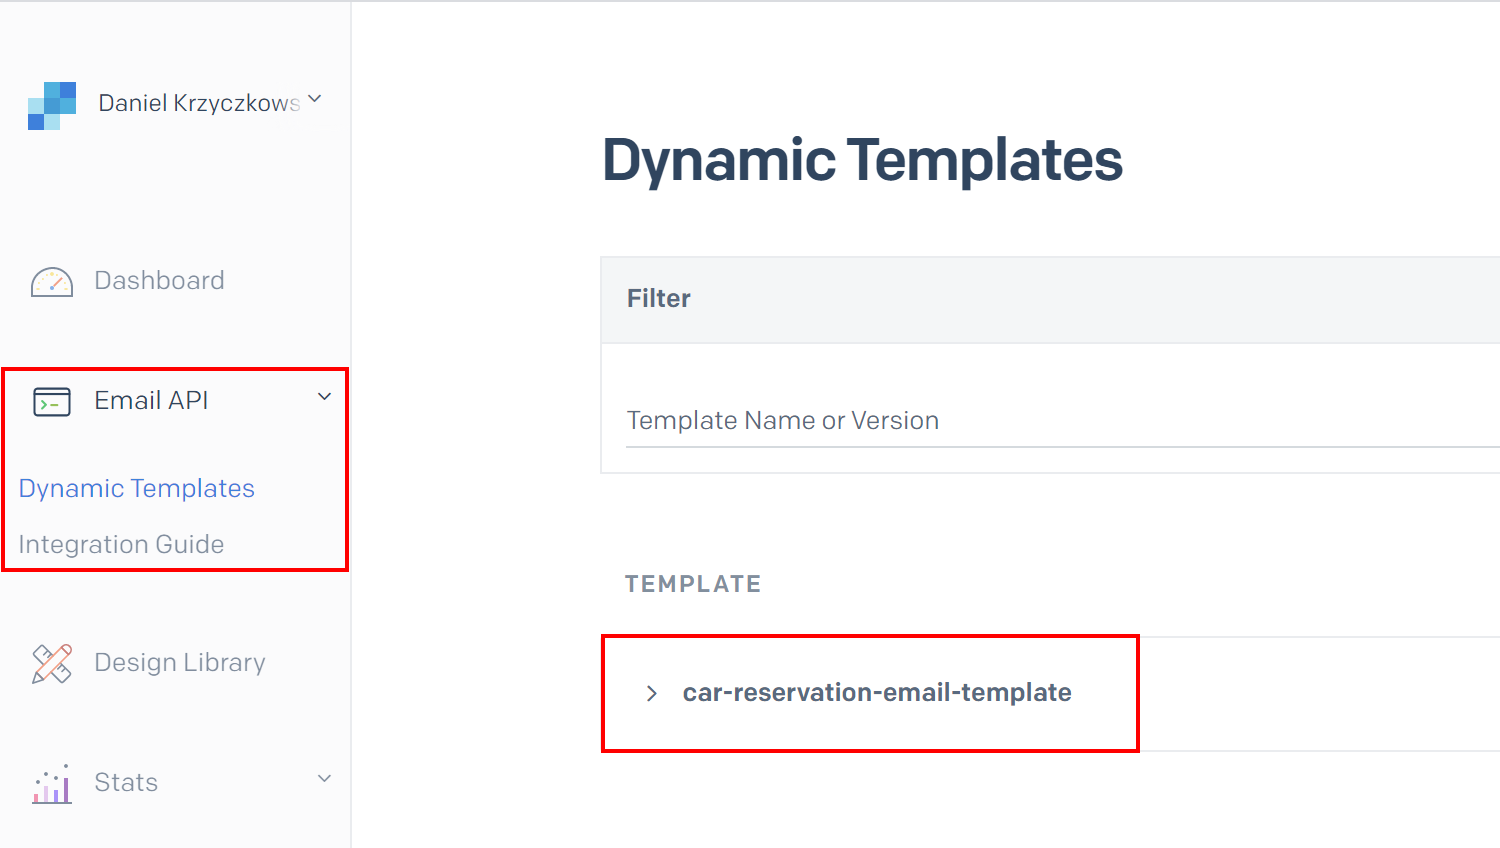
Please note that each template has unique ID. Copy it because it is required in the Azure Function setup where SendGrid SDK is used. Here is the email that is sent to customers when new car reservation is confirmed:

Azure Twilio SendGrid .NET SDK integration
Twilio provides great C# SDK that can be used in many different kind of projects like API or Azure Functions. In the Cars Island project, I integrated SendGrid SDK with Azure Function App. Once there is new message sent to the Service Bus Queue, Azure Function App is triggered (I am using Service Bus Queue trigger) and new car reservation confirmation email is sent using SendGrid.
Azure Function App integrated with Azure Application Insights
Mail Notifications Event Handler Function App is integrated with Azure Twilio SendGrid. In this case, I used Sendgrid library.
Let’s start with the initial setup. In the Startup.cs file you can see that there is below line:
builder.Services.AddMailDeliveryServices();
This is the extensiom method that is implemented in the MailDeliveryServiceCollectionExtensions class:
    internal static class MailDeliveryServiceCollectionExtensions
    {
        public static IServiceCollection AddMailDeliveryServices(this IServiceCollection services)
        {
            services.AddSendGrid((sp, options) =>
            {
                var mailDeliveryServiceConfiguration = sp.GetRequiredService<IMailDeliveryServiceConfiguration>();
                options.ApiKey = mailDeliveryServiceConfiguration.ApiKey;
            });

            services.AddScoped<IMailDeliveryService, MailDeliveryService>();
            return services;
        }
    }
As you can see above, ISendGridClient instance is injected using AddSendGrid method provided by the SDK. API key is injected from the settings. Then there is a MailDeliveryService class instance registered. It uses ISendGridClient to send emails:
    public class MailDeliveryService : IMailDeliveryService
    {
        private readonly ISendGridClient _sendGridClient;
        private readonly IMailDeliveryServiceConfiguration _mailDeliveryServiceConfiguration;
        private readonly ILogger<MailDeliveryService> _logger;

        public MailDeliveryService(ISendGridClient sendGridClient,
                                   IMailDeliveryServiceConfiguration mailDeliveryServiceConfiguration,
                                    ILogger<MailDeliveryService> logger)
        {
            _sendGridClient = sendGridClient
                 ?? throw new ArgumentNullException(nameof(sendGridClient));

            _mailDeliveryServiceConfiguration = mailDeliveryServiceConfiguration
                 ?? throw new ArgumentNullException(nameof(mailDeliveryServiceConfiguration));

            _logger = logger
                 ?? throw new ArgumentNullException(nameof(logger));
        }

        public async Task SendInvitationMessageAsync(CarReservationConfirmationMailTemplate carReservationConfirmationMailTemplate)
        {
            var emailMessage = MailHelper.CreateSingleTemplateEmail(
                 new EmailAddress(_mailDeliveryServiceConfiguration.FromEmail),
                 new EmailAddress(carReservationConfirmationMailTemplate.CustomerEmail),
                 _mailDeliveryServiceConfiguration.CarReservationConfirmationTemplateId,
                 new
                 {
                     customerName = carReservationConfirmationMailTemplate.CustomerName,
                     carBrand = carReservationConfirmationMailTemplate.CarBrand,
                     carModel = carReservationConfirmationMailTemplate.CarModel,
                     carImageUrl = carReservationConfirmationMailTemplate.CarImageUrl,
                     fromDate = carReservationConfirmationMailTemplate.FromDate,
                     toDate = carReservationConfirmationMailTemplate.ToDate
                 });

            var response = await _sendGridClient.SendEmailAsync(emailMessage);
            if (response.StatusCode != HttpStatusCode.Accepted)
            {
                var responseContent = await response.Body.ReadAsStringAsync();
                _logger.LogError($"SendGrid service returned status code {response.StatusCode} with response: {responseContent}");
            }
        }
    }
Please note that in the SendInvitationMessageAsync method we have to provide below parameters:
- FromEmail - sender email that will be displayed in the received mail message
- CustomerEmail - email of the customer
- CarReservationConfirmationTemplateId - ID of the template that we created in the SendGrid dashboard in the Azure portal
You can also ask how parameters like FromDate or ToDate are injected so they are displayed in the mail message. As you can see above there is CreateSingleTemplateEmail method where we can pass the parameters. Then in the HTML template we have to use special tags to indicate where these parameters should be injected:
<span id="BodyPlaceholder_UserVerificationEmailBodySentence3">Hi , your car was successfully reserved.<br>Car details: <br>From: <br>To: <br><br>
Summary
In this article, I described how to set up an Azure Twilio SendGrid service and how to integrate it into the Azure Function App. Source code of the Cars Island solution is available on my GitHub so you can see all implementation details.
If you want to learn more about the Azure Twilio SendGrid, you can also check this official documentation.